
You know the feeling: forty saved photos of snowy mantels and glowing little villages, and then you stand in your living room wondering where any of it actually goes. Faux snow is the one holiday material that can look magical or look like a spilled craft project — and the difference is almost always placement, not price.
We spent serious time browsing Target, Walmart, Etsy, Pottery Barn, and Amazon to bring you only what’s worth your attention this year, and we narrowed hundreds of flocked trees, bottle brush forests, and light-up villages down to 31 ideas that actually deliver — from $8 ornaments to a $340 statement tree. This post contains affiliate links, so we may earn a small commission if you buy through them.
Inside you’ll find traditional red-and-gold flocking, elegant cream-paneled rooms, rustic loft setups, modern minimalist trees, and enough miniature ceramic villages to fill a bookshelf. Budget and luxury versions sit side by side, so you can see exactly what the extra money buys.
In 2026, faux snow pushed past tree flocking into tablescapes, garlands, and window displays — the “quiet winter” look Pinterest can’t stop saving. And stay until the end — we break down the most common mistakes that can ruin these looks. 📌 Save this to Pinterest for later — you’ll want to revisit these ideas.
1. A Flocked Tree in a Woven Basket by the Fireplace
The basket is doing more work than it gets credit for. Choose one about two inches wider than your tree’s pole collar, drop a folded bath towel in the bottom to take up height, then set the stand inside and pack faux snow around the rim. You get a soft, textured base without a red skirt in sight — and the towel keeps the whole thing from wobbling on hardwood when the tree shifts. Anything past a 14-inch basket starts reading as a laundry hamper, so measure before you fall in love.

Flocking sheds hardest in its first ten days, so lay a cheap white flat sheet underneath before you decorate and shake the branches outside first. After that, vacuum weekly with a brush attachment on low — a robot vacuum will eat the loose snow and jam. Store it in a breathable cotton bag, never a vacuum-sealed one; compressed flocking clumps and never fluffs back out.
2. Three Illuminated Flocked Trees on Herringbone Floors
It’s the trio. One flocked tree is a tree; three of them at staggered heights read as a small snow-covered forest, and that’s what makes this room feel like a scene rather than a display. Group them at 5, 6, and 7 feet with the tallest at the back so the warm string lights layer instead of clumping. Take the middle one away and the whole arrangement collapses into ordinary holiday decorating. Massing beats buying more ornaments, every single time.
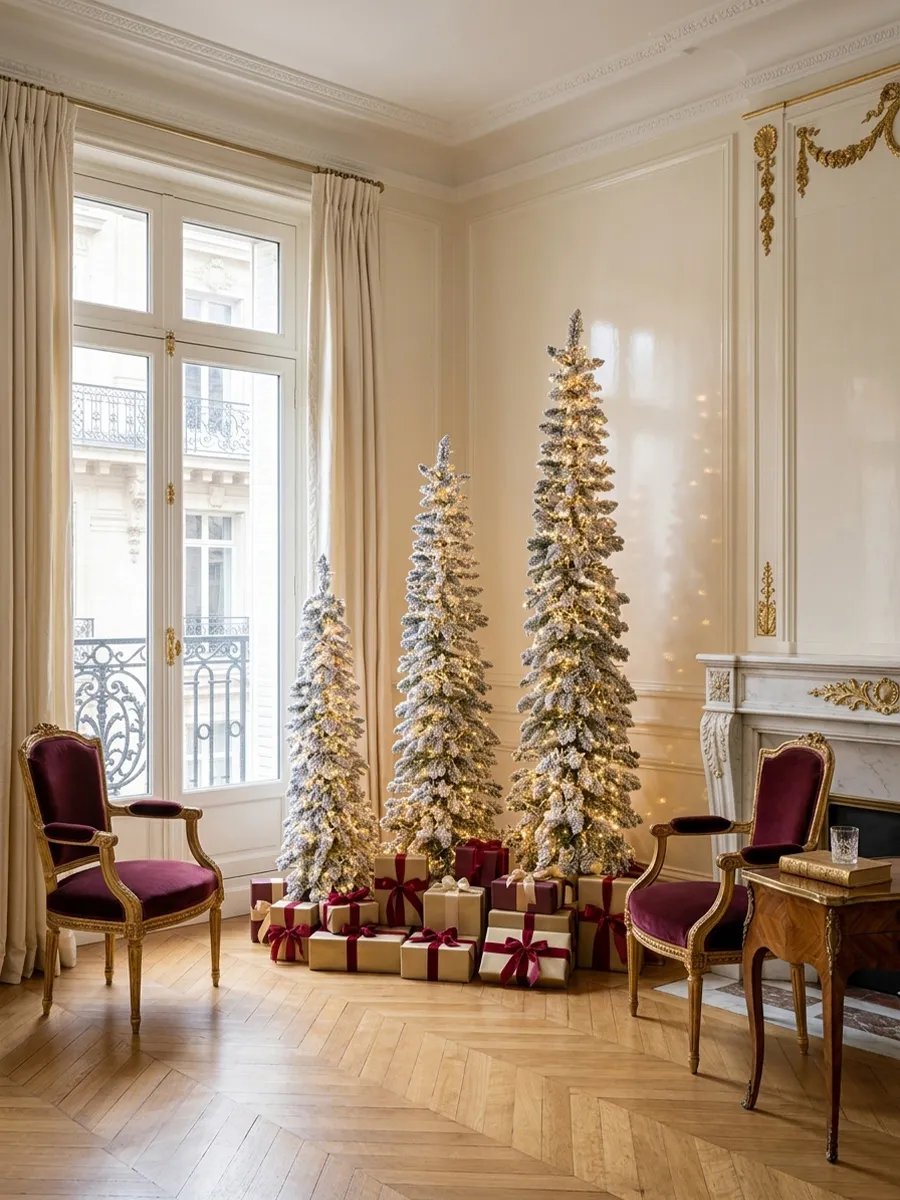
The formula here is roughly 70% cream and white, 20% deep red, 10% gold — and the discipline is that nothing else gets in. Swap the burgundy velvet chairs for camel leather and it still works; swap the deep red presents for forest green and you get a quieter, more masculine version. What breaks it is adding a fourth color. To change the mood without touching the palette, change the metallic finish instead.
3. A Single Lit Manor House on a Bed of Faux Snow
$60 at a garden center buys the same effect as a $300 boutique vignette. Pick up one ceramic or resin house with cut-out windows at a thrift store ($6–$12), a bag of buffalo-style faux snow ($10), and a pack of bottle brush trees in three heights ($12 at Target). Tuck a strand of battery micro lights behind the house so the windows glow, then add a few red berries clipped off a cheap garland. It’s the light behind the windows that sells it, nothing else.
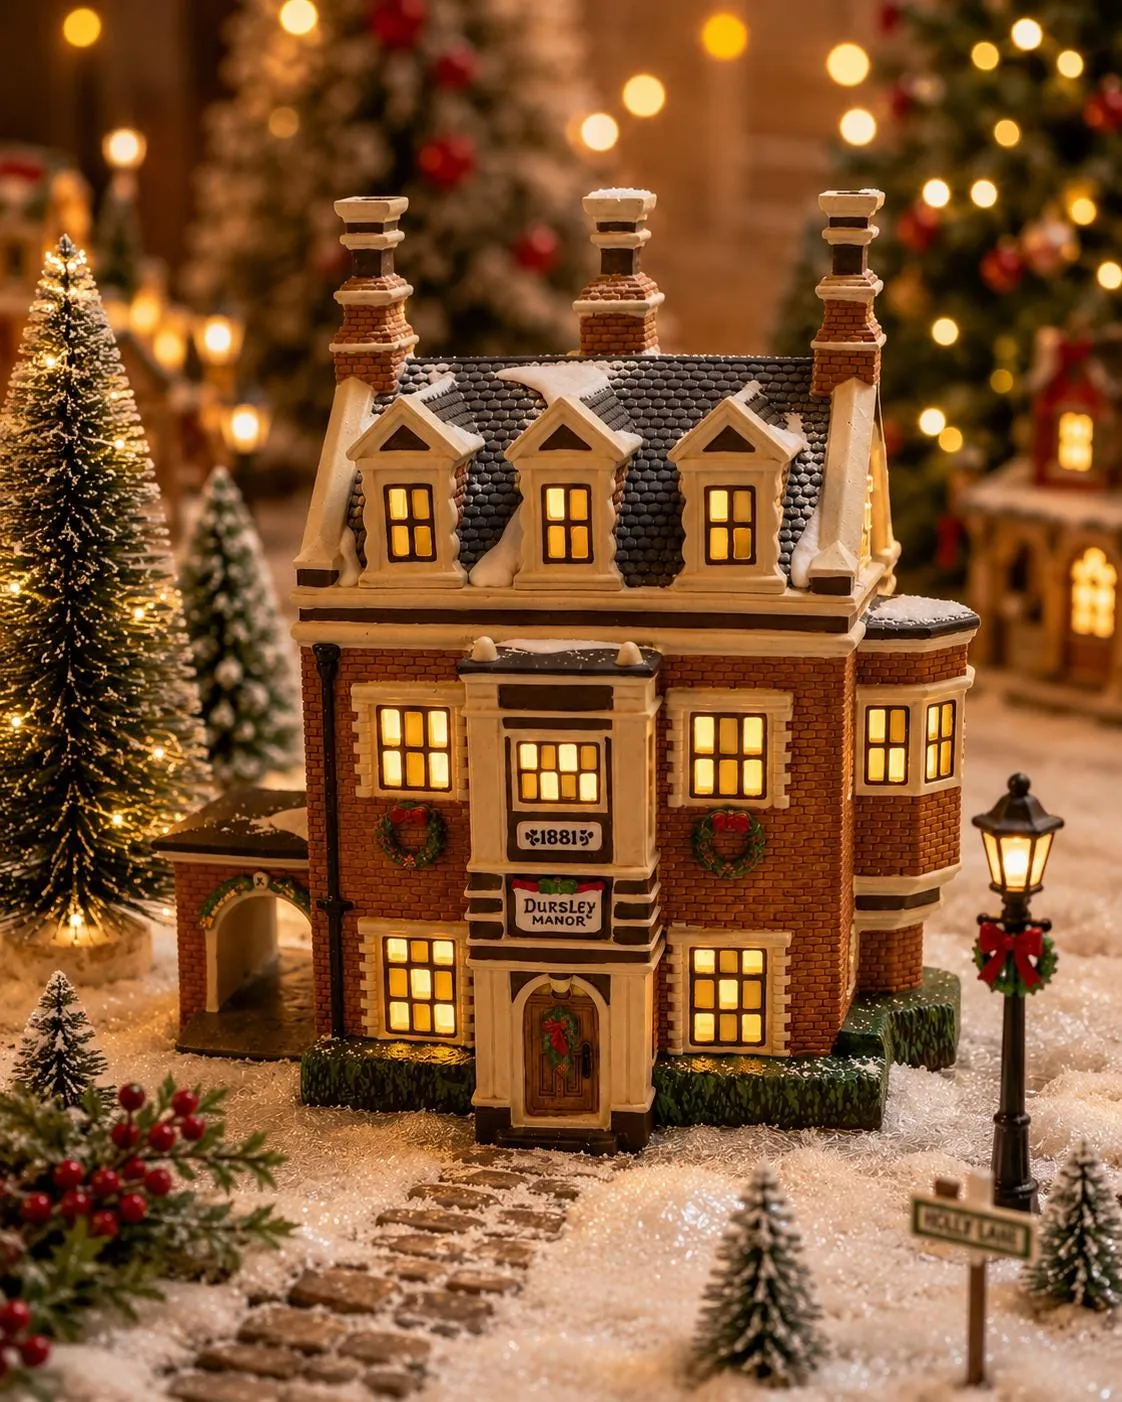
Two principles carry this little scene. First, scale contrast: the manor is big relative to its trees and tiny relative to the room, which is exactly why it reads as a miniature world instead of a decoration. Second, one light source — the glow comes from inside the house, not a spotlight above, and that single-point lighting is what makes the snow look like real snow at dusk. Everything else can be imperfect as long as the light stays inside those windows.
4. Pinecones, Red Gifts, and Candy Canes in Fake Snow
This is the cheapest look in the whole article, and it’s the one guests always pick up.

- Faux snow, 20 oz bag: $8–$14
- Two large natural pinecones: $4–$10 (or free from a walk)
- Red foil gift boxes with gold ribbon, set of 6: $10–$18
- Glittered candy cane ornaments, set of 12: $9–$16
- One small red spherical ornament: $2–$5
Total: $33–$63 for a full tray or shelf vignette. Skip the ornaments, keep the pinecones and boxes, and you’re at $15.
This arrangement lives on a surface, not in a room, so measure the surface first. A tray or shelf 14–18 inches wide holds two pinecones, three gift boxes, and two candy canes without crowding — anything narrower and you get a pile instead of a composition. It works on console tables, open shelving, and windowsills. On a bigger surface, don’t scale up the objects; repeat the grouping twice, which is what Idea #13 does with cake stands and cloches.
5. Tiered White Village with Bottle Brush Trees
Building a tiered village is mostly about hiding the risers.
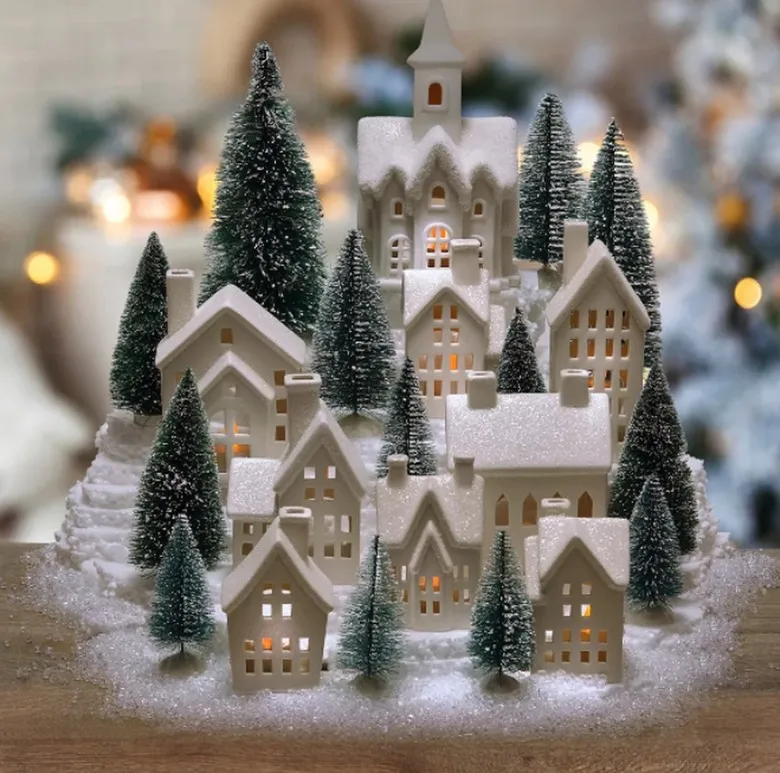
- Set two cake stands or inverted bowls at staggered heights.
- Drape a white cloth over each so no riser shows.
- Anchor faux snow in a thick band along the front edge.
- Place the largest house at the back, smallest at the front.
- Tuck bottle brush trees between houses to fill gaps.
- Run battery lights behind the houses, never in front.
Time: about 45 minutes. Materials: $25–$45 if you already own the stands.
Tabletop villages stopped being a grandma thing a few years ago and never went back. What changed is the finish — white ceramic and matte glaze instead of painted resin, so they sit next to modern furniture without looking like a department store display. The 2026 version skews quieter: fewer pieces, more snow, warm bulbs instead of cool white. It has staying power because it’s collectible without being expensive.
6. Close-Up of Snow on Red and Gold Branches
Flock your own branches instead of buying pre-flocked and you control where the snow actually lands. Spray adhesive in short bursts from about 10 inches away, then sift artificial snow through a fine strainer from above. Snow should sit on the top and outer third of each branch tip — the interior stays green so the tree still reads as a tree. Over-flock and you get a white blob; under-flock and it looks dusty. One can of adhesive covers roughly four feet of garland.

Red and gold is the most forgiving pairing in holiday decor because the two do different jobs. Red carries the eye around the tree and gives it rhythm; gold bounces the warm string lights and makes flocked branches look lit from within. Together they keep a white tree from feeling cold. The trick is proportion — about two red ornaments for every gold one, with the gold pieces slightly larger and pushed deeper into the branches so they glow rather than shout.
7. Flocked Branches with Velvet, Santa, and Stars
Heavy flocking plus dark green branches is a dust magnet, and velvet ornaments are worse — they hold lint, pet hair, and whatever’s drifting around your living room. If you have a long-haired cat, skip the velvet balls on the lower third; that’s exactly where paws and vacuum brushes reach. Also worth knowing: this much white on dark green only works with warm white bulbs. Cool white against flocking goes grey and slightly blue, and the whole tree ends up looking like a doctor’s office waiting room.

The palette is 50% flocked white, 30% deep green, 15% red velvet, and 5% metallic — and the whimsy lives in that last five percent. The black-and-gold star sphere and the Santa figurine are what keep this from being a catalog tree; they’re the odd ones out, and odd ones out are what make a tree feel personal. Swap the 5% and you change the mood: a nutcracker instead of Santa, brass bugs instead of stars.
8. Flocked Garland Draped Around a Window Frame
It’s the gold beaded chains. The garland is lovely and the red baubles are classic, but the chains add vertical movement and a little shine right at eye level — exactly where a window needs it. Take them away and you have a nice garland. Add them and the whole frame reads as a Victorian shop window. String them in loose swags 6–8 inches deep rather than tight lines, and let the ornaments hang at slightly different heights so it looks hung, not installed.
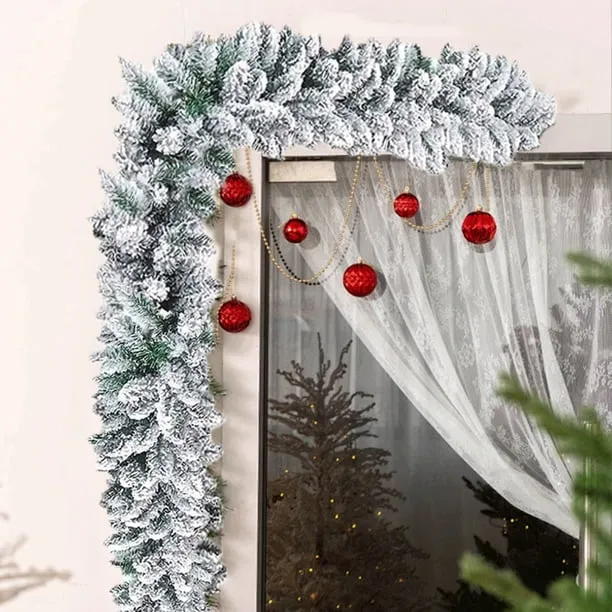
Windows and flocked garland are a complicated relationship. Sun through glass bleaches the snow to a yellow-tinged off-white after two or three seasons, and condensation from cold glass can make the flocking tacky. Keep the garland on the interior frame, never touching the pane, and take it down by mid-January. Vacuum it with a brush attachment before storage — dust settles into flocking and sets. If your window gets direct afternoon sun, plan on replacing it every three years.
9. Three Glowing Village Scenes on Rustic Wood
You don’t need three matching scenes from one collection — that’s a $250 commitment. Build them from singles: one house from a thrift store, one from Walmart’s holiday aisle, one splurge piece you actually love. Spray-paint the mismatched ones matte white ($7 a can) and suddenly they’re a set. Add a bag of faux snow ($10) and a handful of dollar-store bottle brush trees. Three coordinated scenes for under $70, and nobody will clock that they didn’t come in the same box.
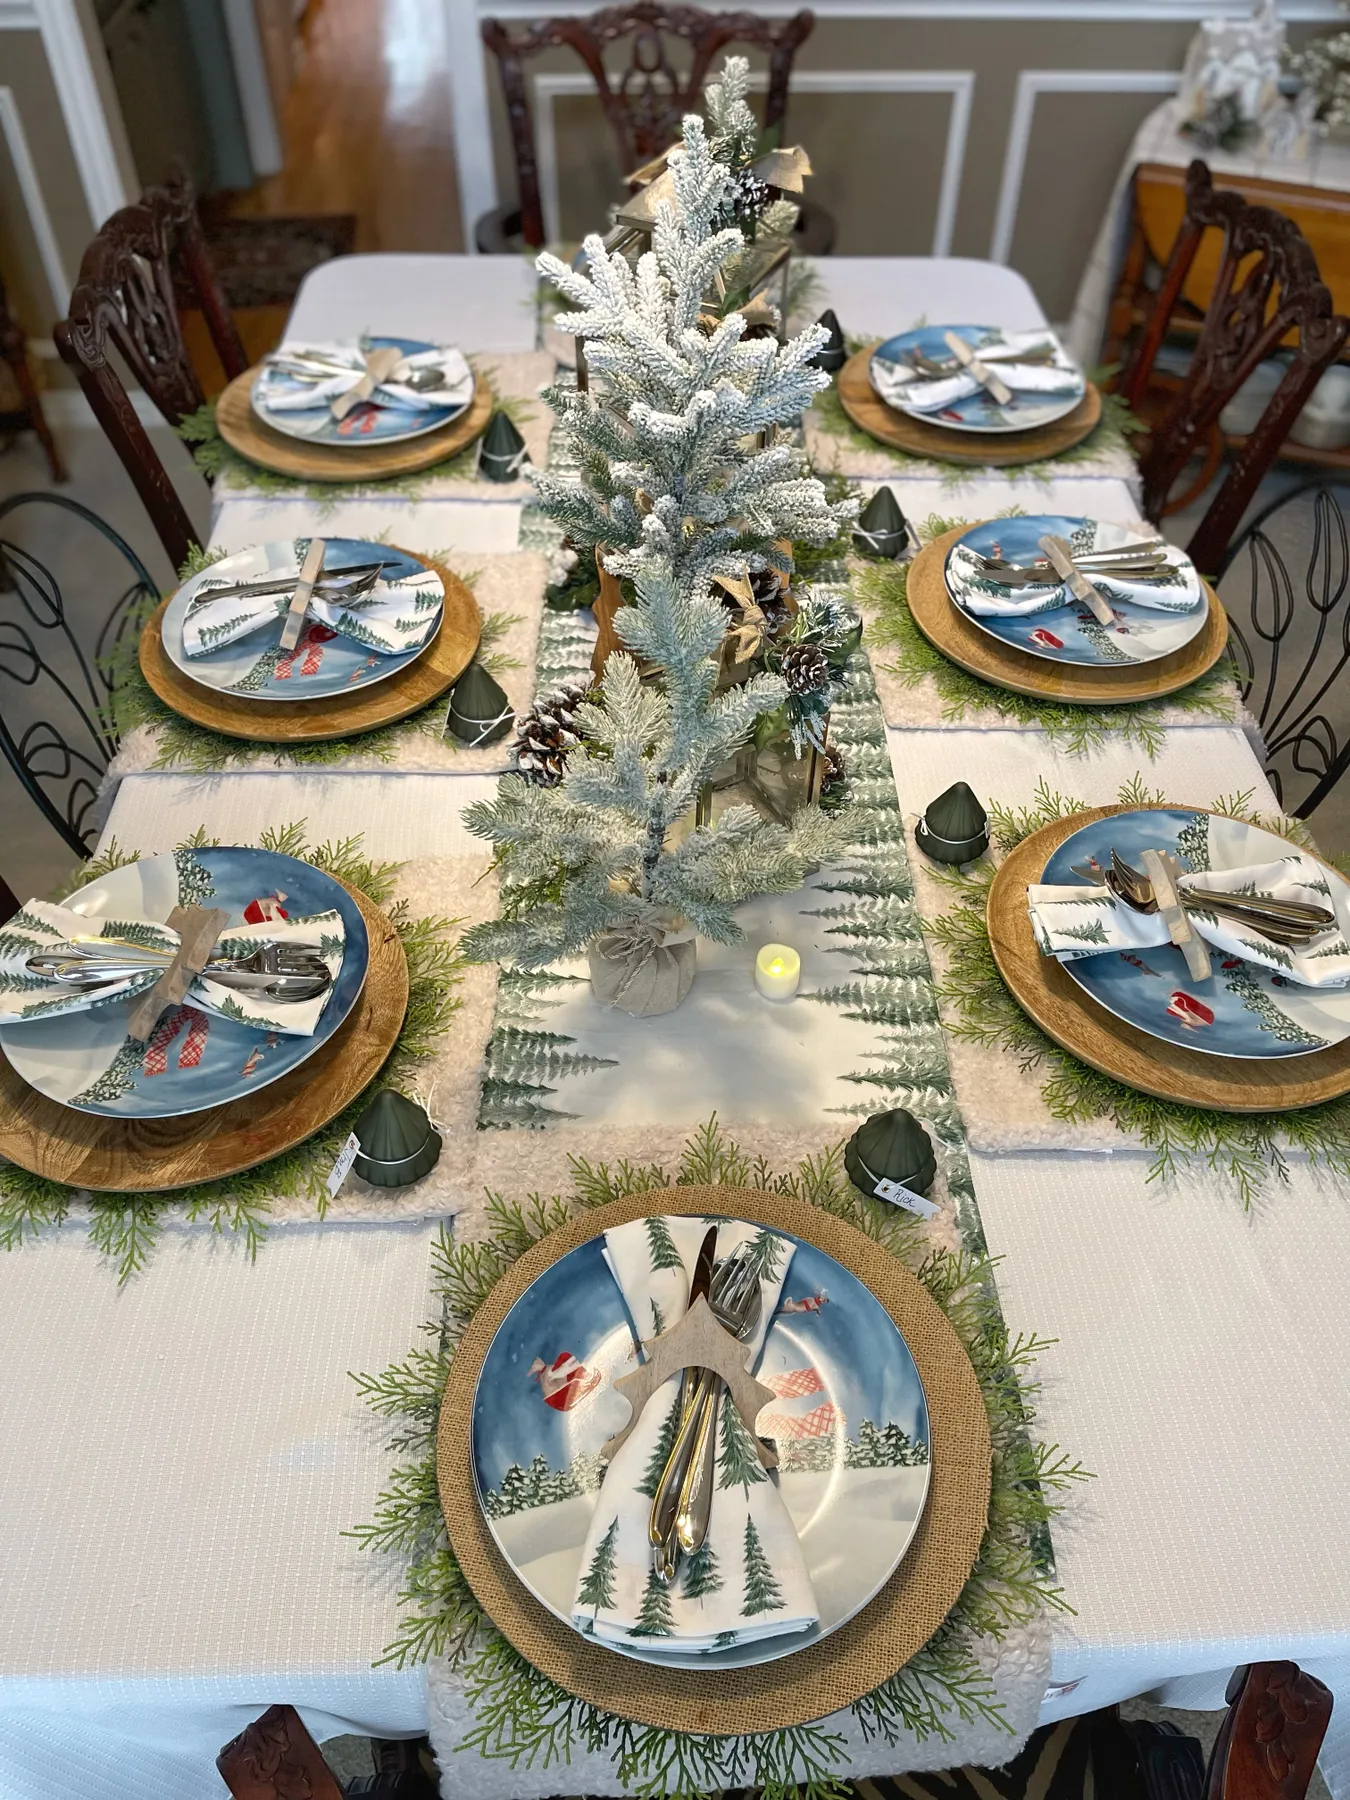
Three separate scenes need breathing room — plan 20–24 inches of surface per scene, plus a 6-inch gap so they don’t merge into one long blob. The rustic wooden base is doing the unifying work here; if your surface is glossy or dark, add a runner or a board so the snow has something soft to sit on. For a console under 48 inches, do one scene instead. Compare with Idea #17, which stacks a whole village onto a single dresser top.
10. A Snowy Dining Table with Winter Plates
The centerpiece is the only part that needs planning; the place settings follow.
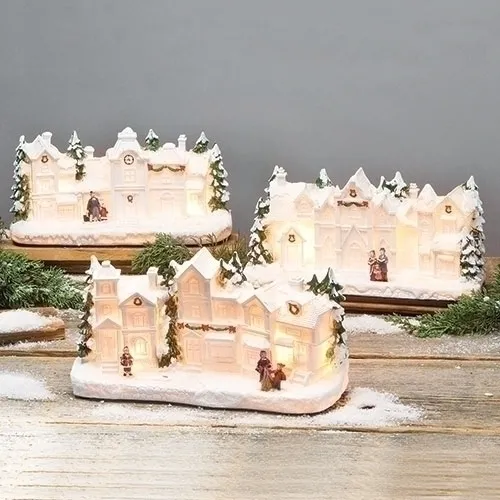
- Lay a white cloth, then a runner down the middle.
- Set three mini flocked trees at staggered heights.
- Add two lanterns with pinecones, one at each end.
- Layer a wood charger under each winter-scene plate.
- Tuck pine sprigs between charger and plate.
- Roll cutlery in a themed napkin and set it on top.
Time: 40 minutes for eight seats. Cost: $0 if the plates are yours, $60–$90 to buy the layers.
The dining table has become the place people actually decorate, mostly because it’s the one surface guests sit at for hours. Faux snow works here in a way it doesn’t on a tree — it’s contained, it’s under glass or on a runner, and it doesn’t shed across the floor. Illustrated winter plates are their own micro-trend, and they photograph far better than solid colors under warm candlelight.
11. Oversized Flocked Tree Against Dark Patterned Curtains
A flocked tree against dark curtains needs two things to avoid looking like a glowing hole in the wall: warm bulbs and a light anchor at the base. Use 2700K warm white lights only — 3000K and up reads blue against white flocking. Then put something pale on the floor beneath it, a cream skirt or a light rug, so the tree doesn’t float. If your curtains sit within 12 inches of the branches, pull the tree forward a few inches; flocking and fabric rubbing together creates static mess that’s genuinely hard to clean.

60% white and cream, 25% charcoal, 10% silver, 5% warm light. It’s a near-monochrome room with a snowy tree dropped into it, which is why it reads calm instead of cluttered. Swap charcoal for navy and the tree still holds; swap the cream sofa for warm taupe and the whole thing softens. The formula only breaks if red or green ornaments sneak in — this look needs the tree to be the only colorful thing in frame. See Idea #29 for the opposite approach.
12. Lighted Village on a Faux Snow Table Runner
A village runner down the middle of a dining table looks incredible and eats about a foot of usable surface. On a 36-inch-wide table that leaves roughly 12 inches per side for plates, which is fine — on a 30-inch table it isn’t, and your guests will be eating with their elbows in a church steeple. Measure before you commit. Also, battery-operated houses mean battery changes, so buy the kind with a built-in timer and set it for the same four hours nightly.
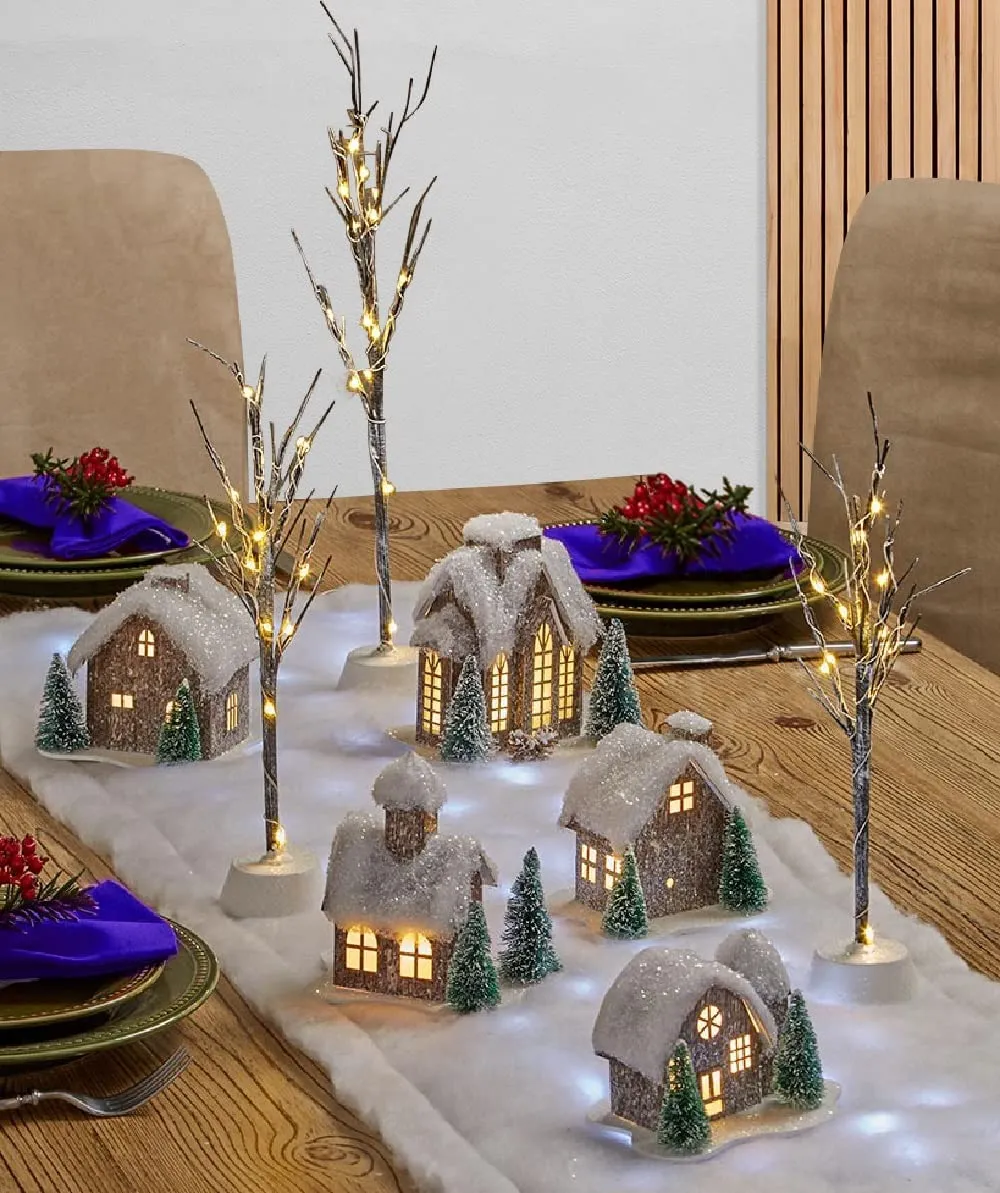
The purple napkins are the tell that someone with an eye put this together. Green plates and white snow are the obvious move; purple adds a cool note that makes the warm village lights look warmer by contrast — simultaneous contrast doing the work for you. The lighted bare-branch trees at either end are the second smart move: they frame the scene vertically and stop the eye from sliding off the edge of the table entirely.
13. Cake Stands, Cloches, and Tiny Illuminated Houses
The cloches. Glass over miniature houses does two things at once: it protects delicate pieces from dust and curious hands, and it makes them look like specimens in a cabinet of curiosities rather than toys on a table. That’s the difference between a display and a collection. Buy the plain glass domes from a craft store and skip the ones with chunky wooden bases — they’re too tall and eat the vertical space your houses need to breathe.
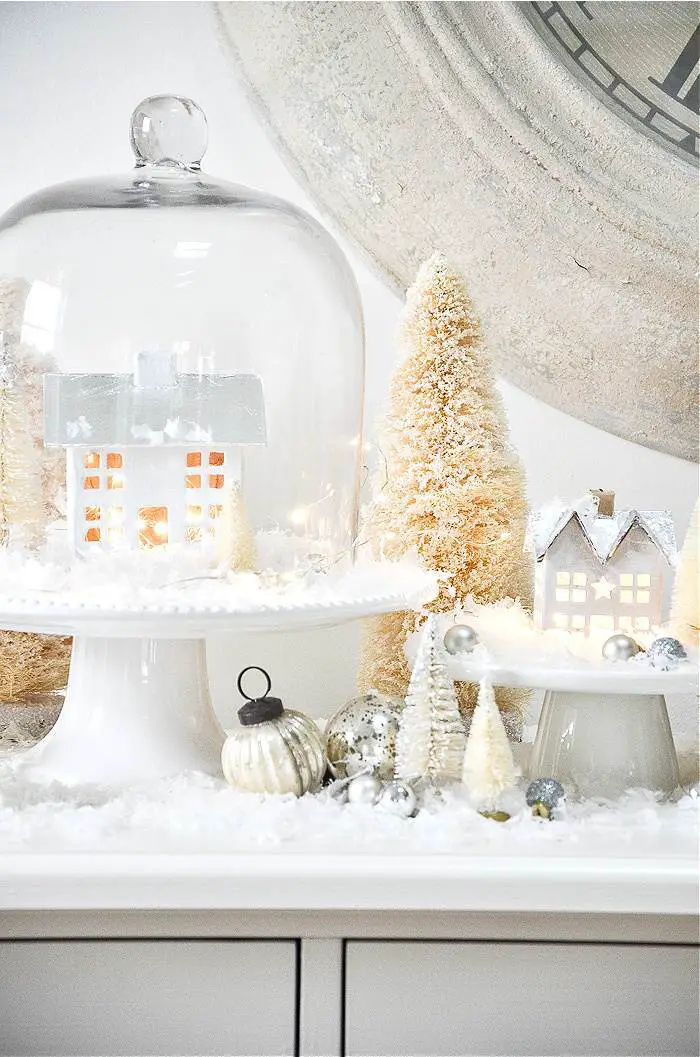
This is a small-surface look, best on a sideboard, buffet, or bookshelf top between 40 and 60 inches wide. You need at least 14 inches of depth for the cake stands to stagger without hanging off the edge, and the arrangement tops out around 20 inches tall — so it works under a window or beneath a mirror, but not under low shelving. Compare with Idea #9 if you have a wide, shallow console instead.
14. Candlelit Forest Table with Bottle Brush Trees
The candlelight is free; the rest is a short list.
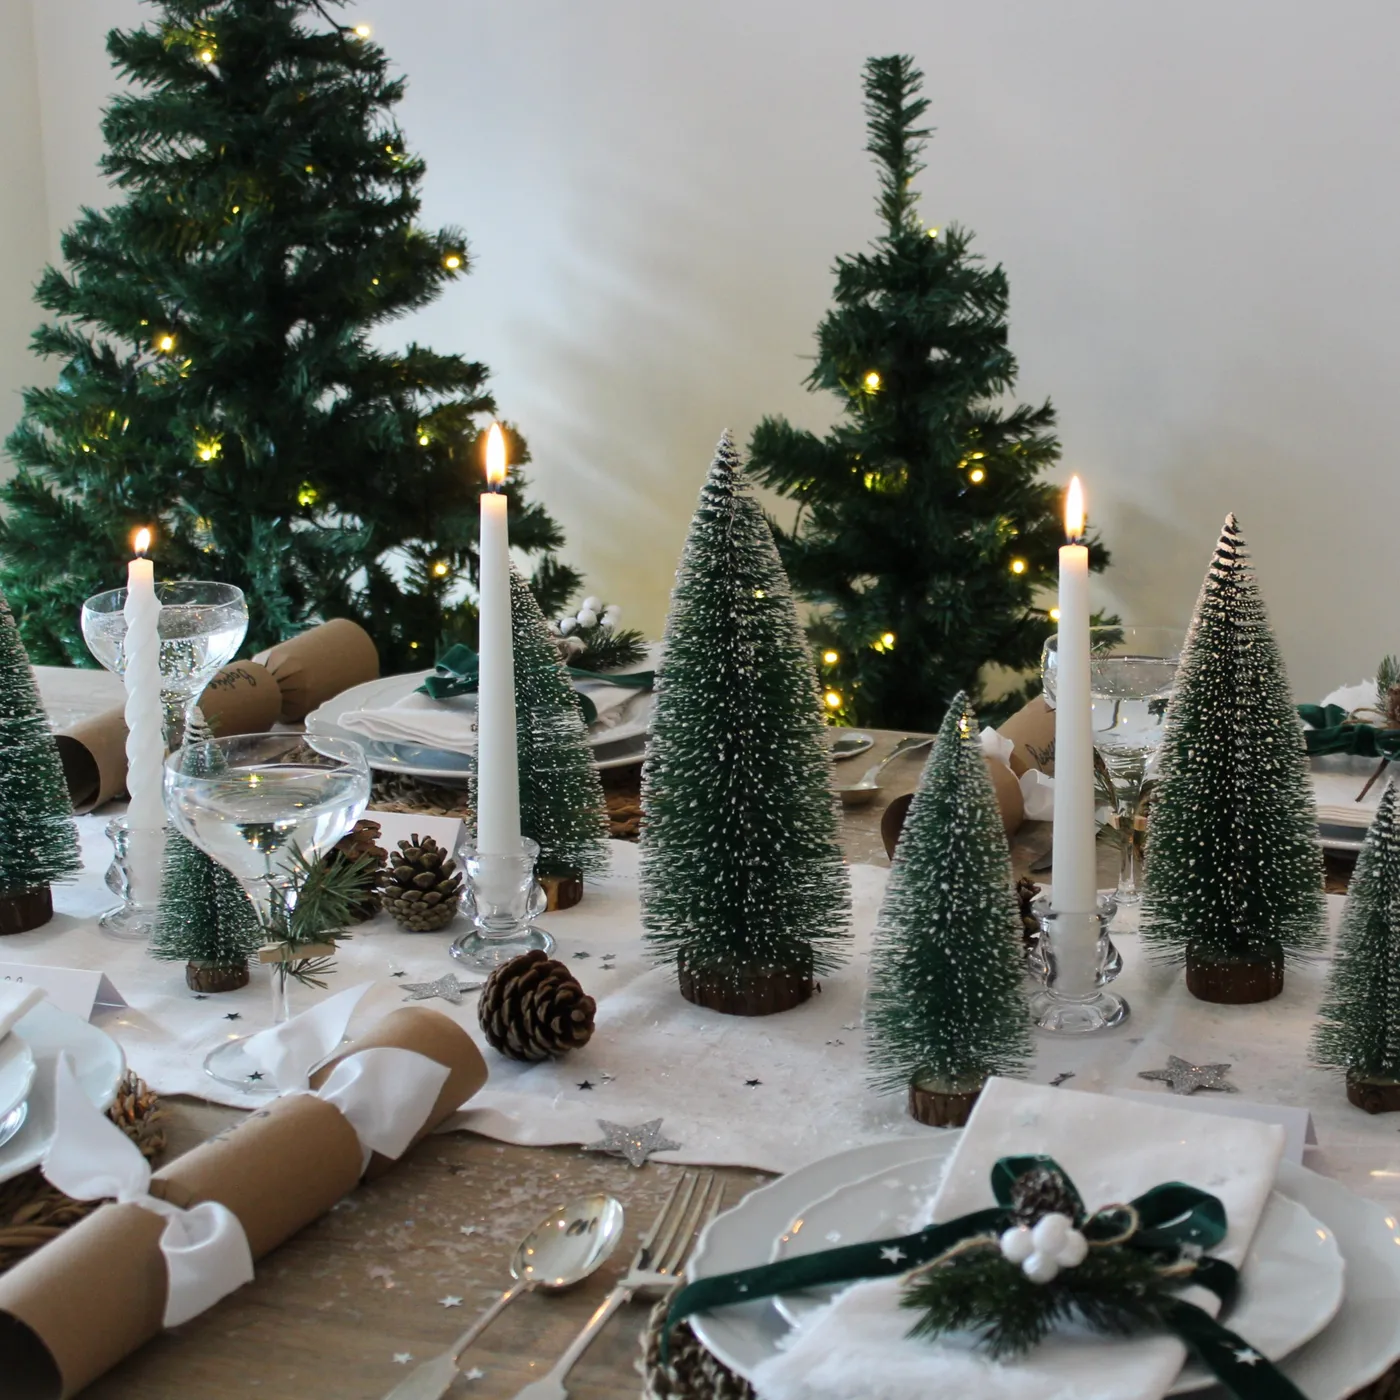
- Linen-look white table runner: $15–$30
- Bottle brush trees, set of 12 mixed sizes: $14–$25
- Taper candles, set of 6: $8–$14
- Clear glass candle holders: $6–$16
- Dark green velvet ribbon, 3 yards: $8–$14
- Kraft paper crackers, set of 6: $18–$30
- Loose silver stars and faux snow: $8–$12
Total: $77–$141 for a table for six. Skip the crackers and ribbon and you’re under $60.
80% white and green, 15% natural wood and kraft, 5% silver sparkle. The restraint is what makes it read elegant rather than craft-fair — no red, no gold, nothing shiny except the stars and the flames. Swap the green velvet ribbon for burgundy and it becomes a completely different table without buying a single new object. Keep the tapers white; colored candles against white snow look like a birthday party.
15. White House Lantern Glowing on Deep Faux Snow
A lantern is the fastest route to that warm-window glow without committing to a whole village.
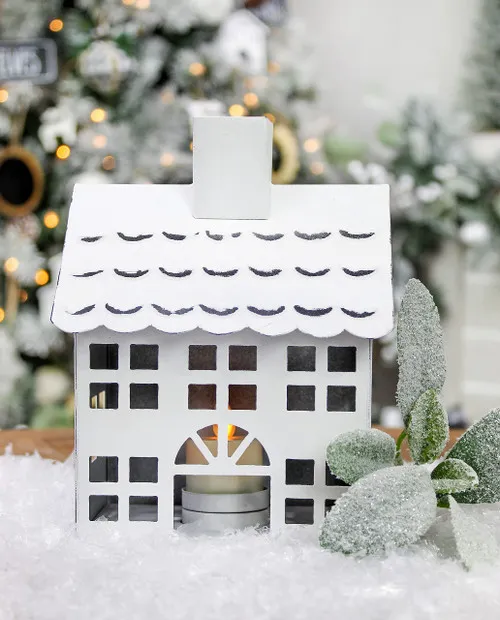
- Pile faux snow 2–3 inches deep on a tray or board.
- Set the lantern slightly off-center, never dead middle.
- Use a real tea light if it’s metal; LED if it’s paper or fabric.
- Nestle a glittered sprig against one side of the base.
- Scatter a little loose snow over the sprig and roof edge.
Time: 10 minutes. Cost: $12–$35 depending on the lantern — the snow and sprig are the cheap part.
Real candles inside a metal house lantern are lovely and also a small fire risk once flocking starts shedding near the flame. If you go real, keep the lantern on a non-flammable tray and never leave it lit unattended. LED tea lights with a flicker effect have gotten convincing enough that most people can’t tell from three feet, and they don’t need replacing every four hours. One more thing: glitter sprigs shed, so set them down last.
16. White Village Houses Against Sheet Music Windows
The sheet music behind those window panes is the most copied trick in this whole article, and it costs nothing. Print vintage sheet music at 60–70% opacity on cream paper, then tape it to the back of an old window frame or a picture frame with the glass removed. Backlight it with a warm LED puck light and from a distance it glows like a lit window. Choose hymns or carols rather than dense orchestral scores — the eye needs white space between the notes to read it as texture.
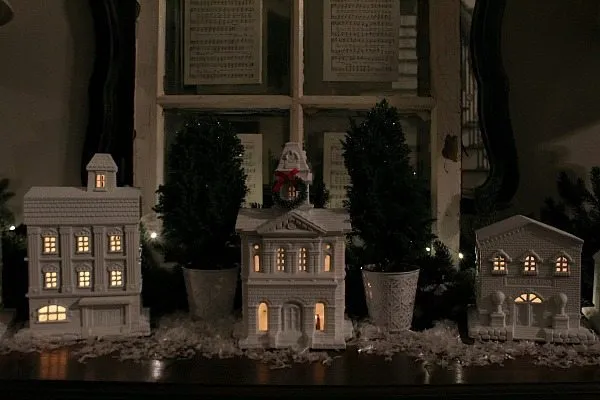
Vintage sheet music, old window frames, and white ceramic villages have merged into one aesthetic: nostalgia, but make it neutral. It’s a reaction against the color-saturated holiday decor of the last few years — the same impulse behind the quiet-luxury shift in interiors. Interest in antique and thrifted holiday pieces has been climbing since 2024, and 2026 is the year it went mainstream. Staying power: high. It photographs beautifully, it’s cheap to source, and it doesn’t date.
17. Ceramic Village on a Dark Wood Dresser
A polished dark wood surface plus white ceramic plus loose faux snow equals scratches if you’re careless. Snow is abrasive, and dragging a village across a lacquered dresser top leaves a haze you’ll be buffing out with a cloth and a lot of regret. Put down a runner, a felt pad, or parchment first. And dark wood shows every stray fleck of snow, so keep a soft brush nearby. If the dresser is a family piece, don’t put anything battery-operated on it — leaking batteries ruin finishes.
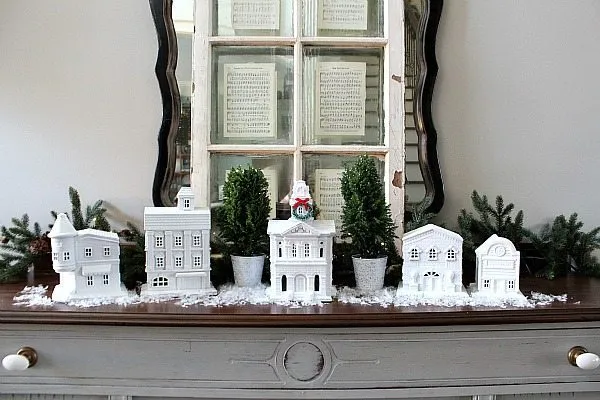
The distressed white window frame with sheet music in it is the whole trick. Without that backdrop, this is a nice village on a nice dresser. With it, you get depth — the village sits in front of something that reads as a real lit window, and the eye interprets the arrangement as a scene rather than objects. The wavy-edged mirror beside it quietly doubles the light. If you copy one thing from this photo, copy the backdrop.
18. Flocked Tree Over a Deep Red Velvet Skirt
A deep red velvet skirt runs $50–$90 at a home store, and velvet from a fabric shop is about $18 a yard. Three yards, a hem, and a quick gather around the trunk gets you the same drape for a third of the price — nobody is inspecting the hemline under a tree. Same logic for the gifts: kraft paper, gold ribbon, and greenery cuttings look expensive and cost about $12 total. The flocked tree is where your money should go; everything underneath it can be cheap.
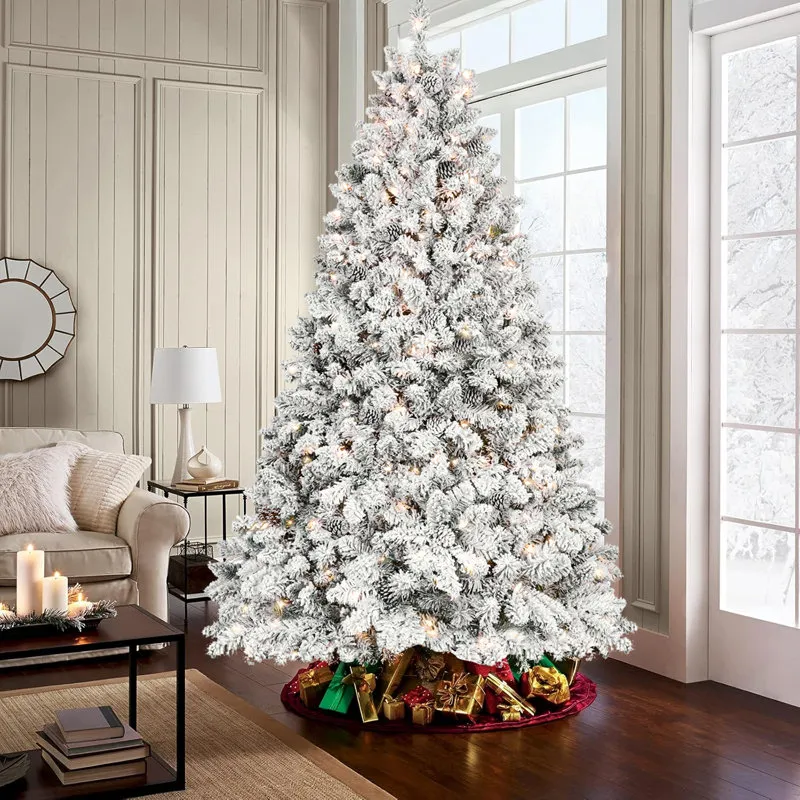
The red skirt is doing something specific: it grounds a white tree on a light floor. Flocked trees float visually when the floor is pale, and a saturated dark base stops that. The second principle is value contrast — white flocking, dark wood furniture, mid-tone beige walls — three distinct values that keep a room from going flat in photos. Third is repetition: red in the skirt, on the gifts, and in tiny ornaments, which is what makes it feel deliberate.
19. Glossy Ceramic Tree with Green Bulbs and Kraft Gifts
Vintage-style ceramic trees are back and they’re stupidly easy to style.
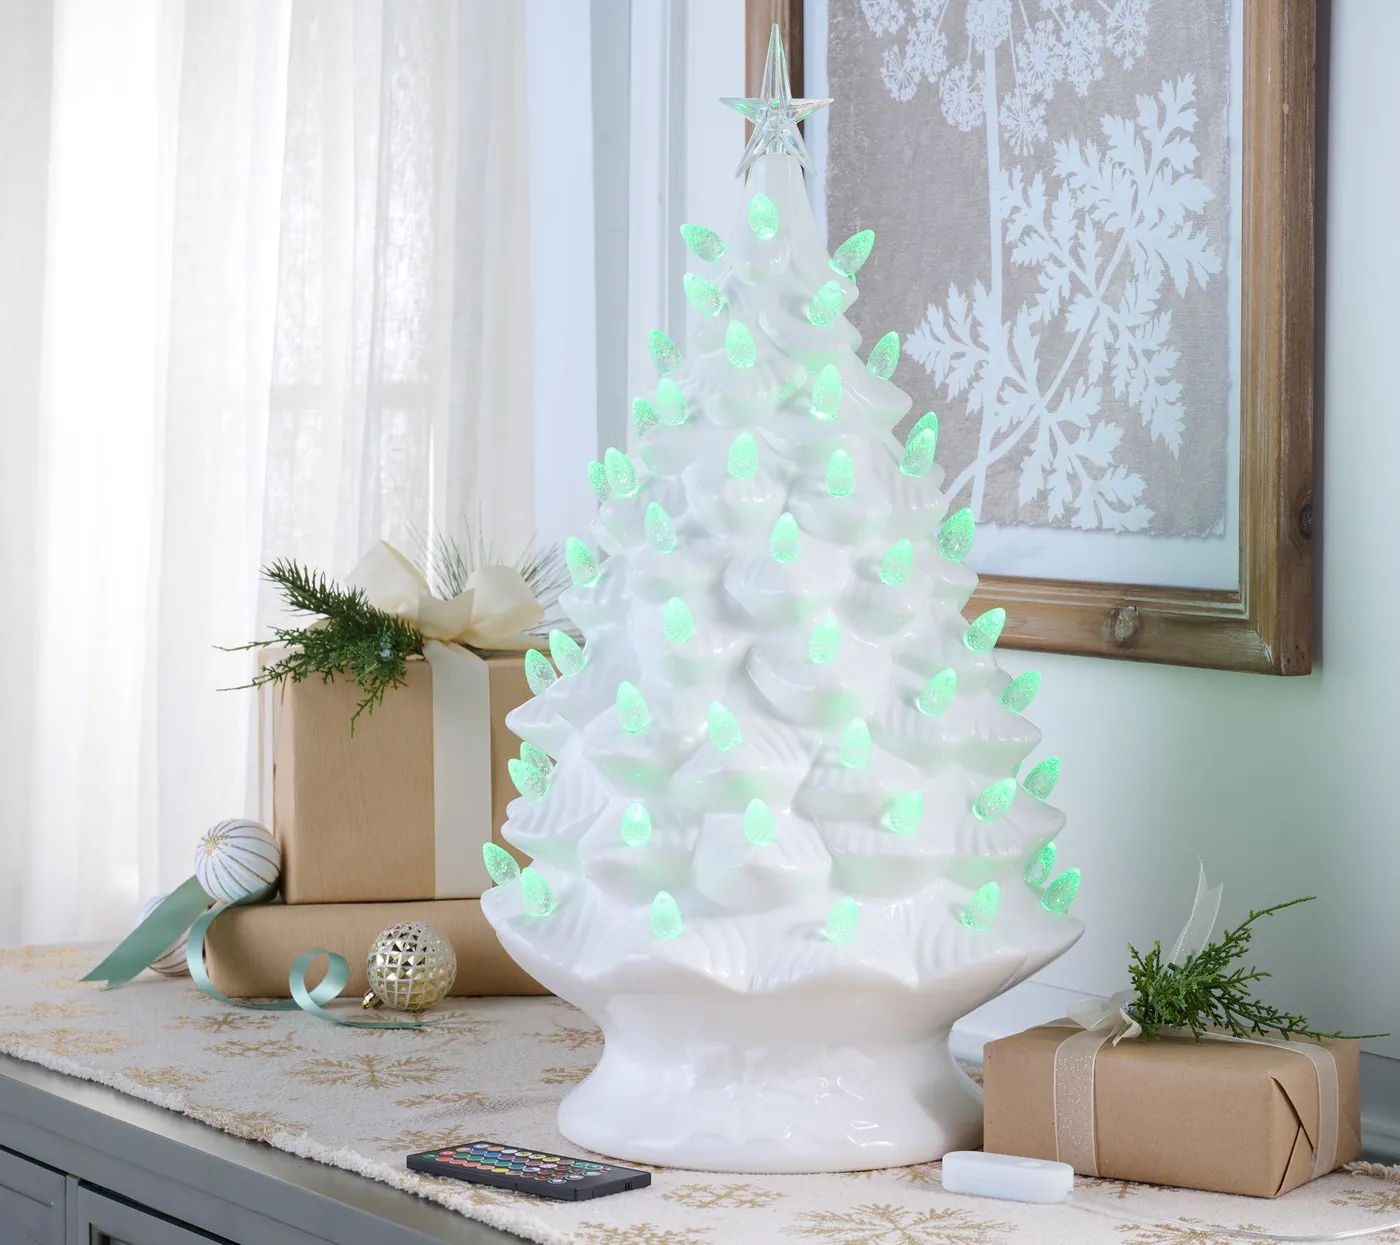
- Set it on a runner or low tray, never directly on wood.
- Give it 6 inches of clear space on all sides.
- Wrap gifts in kraft paper with cream ribbon for contrast.
- Add real greenery cuttings, not faux, beside the base.
- Face the tree toward the room’s main sightline, not the wall.
Time: 15 minutes. Cost: $35–$75 new; vintage ones run $20–$60 at estate sales.
Ceramic trees are small — most are 12 to 18 inches tall — which means they disappear on a big console and get swallowed on a dining table. This one works because it sits on a low cabinet with wall behind it and nothing competing for attention. Ideal surface: 30–40 inches wide with 20 inches of wall above. For larger surfaces, cluster three at different heights, or see Idea #24 for a village that can hold a wide space.
20. Giant Glitter Poinsettia in Striped Fabric
Oversized florals only work when they’re placed asymmetrically and at eye level. Put one 10-inch poinsettia about a third of the way up the tree and slightly off-center, then leave the space around it empty of other large ornaments. Two big flowers on the same tree need at least 18 inches between them or they fight each other. Clip them to a sturdy branch near the trunk, not a tip — a heavy fabric flower will drag a branch down and leave a permanent droop in the wire.

Fabric plus glitter is a maintenance combination. The glitter sheds for the first two seasons, which means it ends up on the floor, in the tree skirt, and on anything underneath. Give glittered ornaments a light coat of matte clear spray before they go on and they’ll shed far less. The white fuzzy trim picks up dust and dark lint from storage, so bag these individually rather than tossing them in a bin. Wipe with a lint roller, never water.
21. Snow Globe Snowman on a Bed of Faux Snow
Snow globes leak. Not all of them, not immediately, but the seal on a cheap globe gives out within a few years and you end up with a ring of cloudy water on your furniture. Set them on a coaster or a tray, never directly on unfinished wood. Keep them out of direct sun, too — the water goes yellow and there’s no fixing it. If you’re buying vintage, check the waterline before you pay; a globe that’s lost a quarter of its water has a bad seal and will only get worse.

This is a 70% white, 25% silver, 5% warm light composition. Silver and white together read cold and clean, which is why the warm bokeh in the background matters so much — it keeps the whole thing from feeling like an ice bucket. Swap silver for champagne gold and it warms up instantly. Swap the bright white snow for a pale grey and you get a more modern, almost Scandinavian version of the same vignette.
22. Red and White Village Centerpiece on Striped Runner
The red and white striped runner. The village and the berries are the content, but the stripes are what make the table feel like a storybook instead of a display. A stripe gives the eye a direction to travel and creates instant pattern without adding a single object. Take the runner away and you have a nice centerpiece on a plain cloth; put it back and the whole table snaps into focus. If stripes feel like too much, try buffalo check or a narrow band of red ticking.
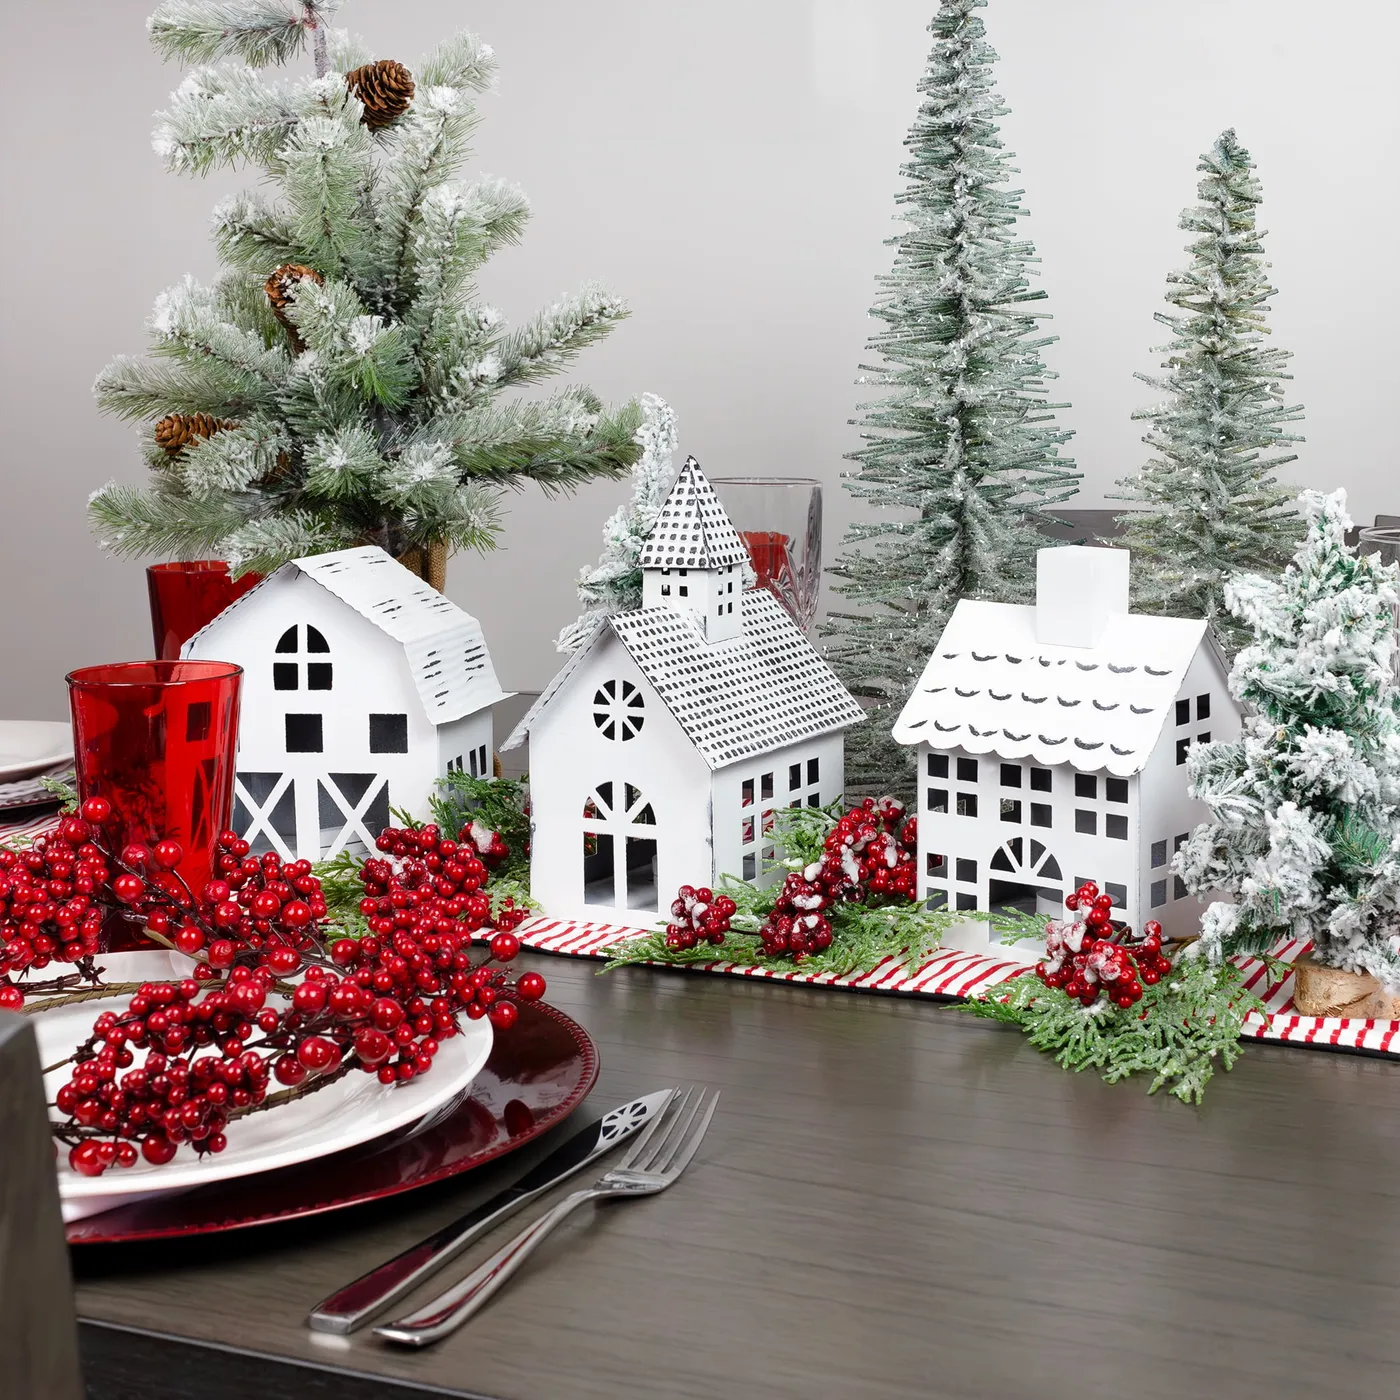
Repetition is doing the heavy lifting: red berries in the garland, red chargers at each seat, red tumblers, red stripes on the runner. Four separate red moments tie the table together without needing matching objects. The white metal houses sit quietly in the middle because they’re the only thing that isn’t red or green, which makes them the visual resting point. Dominant, secondary, neutral — three notes, and that’s why it photographs so well.
23. The Snowman-Shaped Lighted Tree by the Fireplace
Novelty trees are where holiday pricing gets silly — the same snowman silhouette runs $80 at a boutique and $35 at a big-box store, and the difference is usually the light count. Check the bulb count before you buy: 150 lights minimum for a 5-foot silhouette, or it looks sparse in daylight. If you already own a white tree, a black top hat, a plaid scarf, and two black felt circles turn it into this exact look for about $20. Store-bought shape, handmade personality.
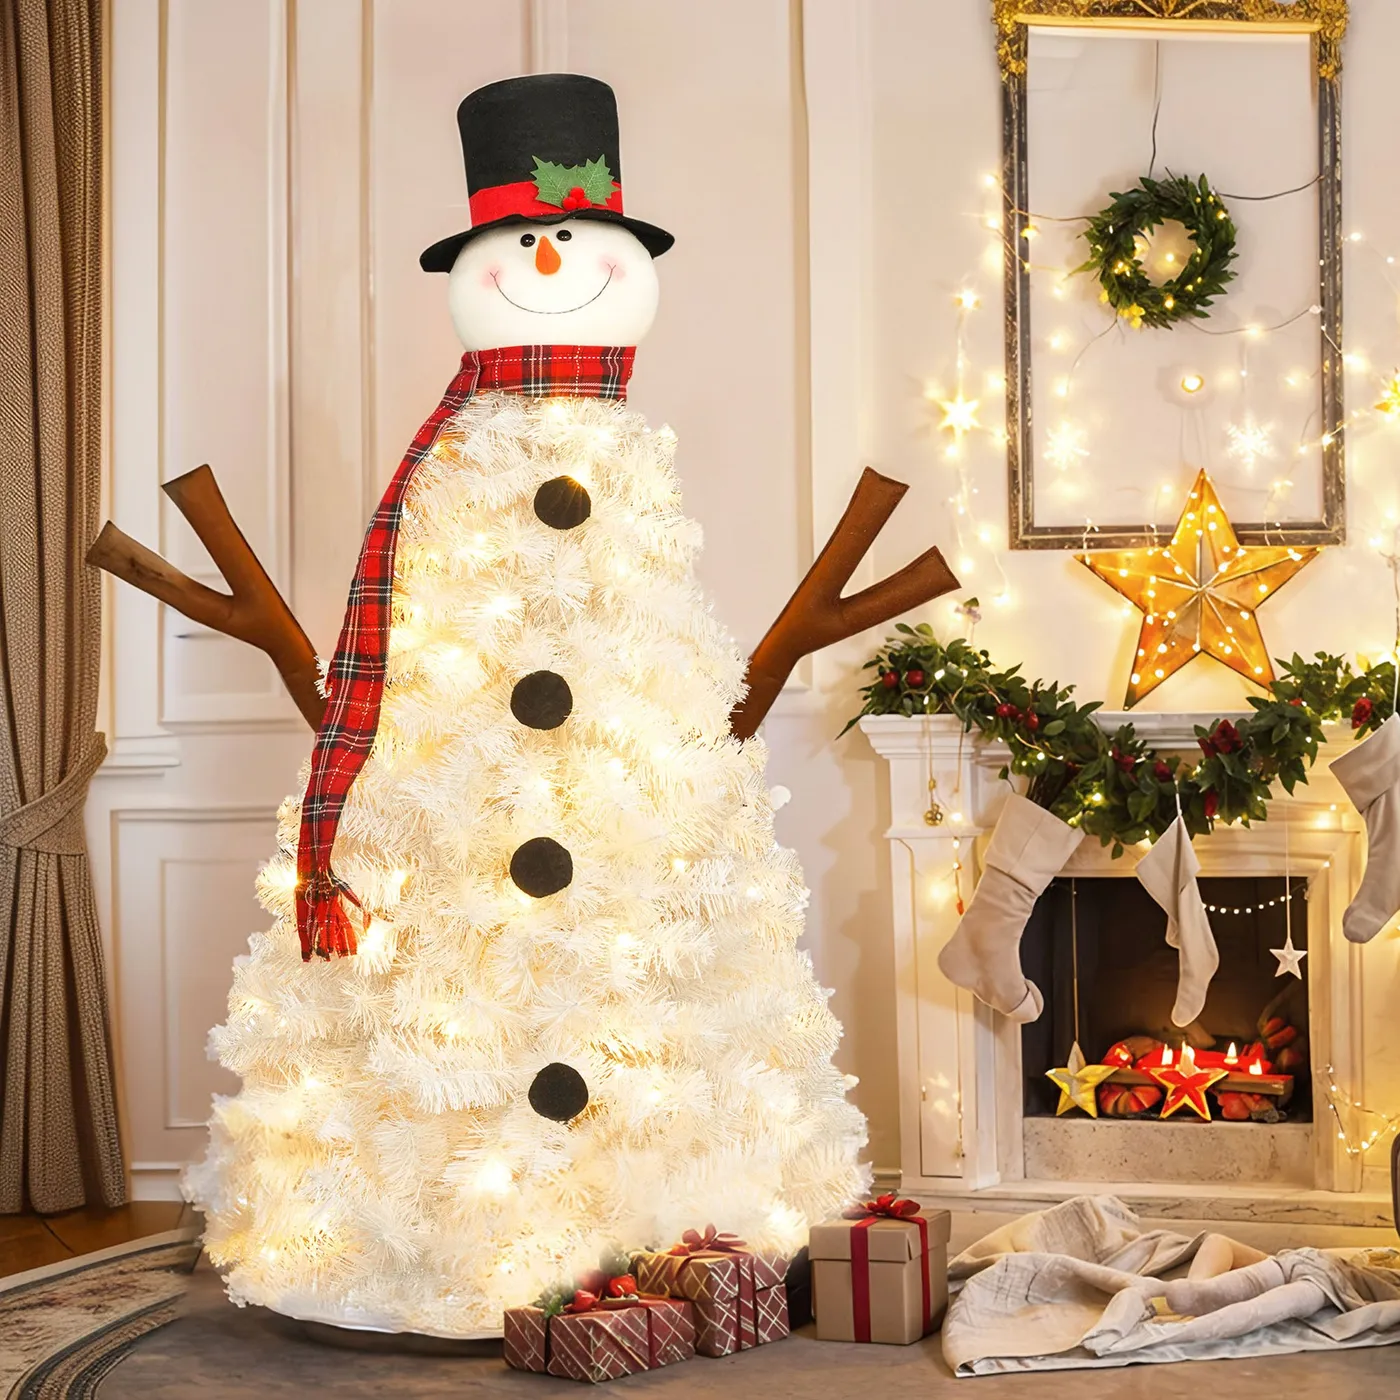
Character trees are having a moment because they photograph better than they display — and in 2026, that’s a real design consideration. People decorate for the camera now, and a silhouette tree reads instantly in a vertical phone shot. The risk is that it’s a one-note piece. It works here because it’s paired with a fully decorated mantel and warm architectural lighting, so the snowman is a punchline rather than the whole story. Expect it to stay for at least two more seasons.
24. Light-Up White Ceramic Village with a Vintage Car
Ceramic light-ups are the one place where buying new actually makes sense — vintage ones often have cracked wiring.
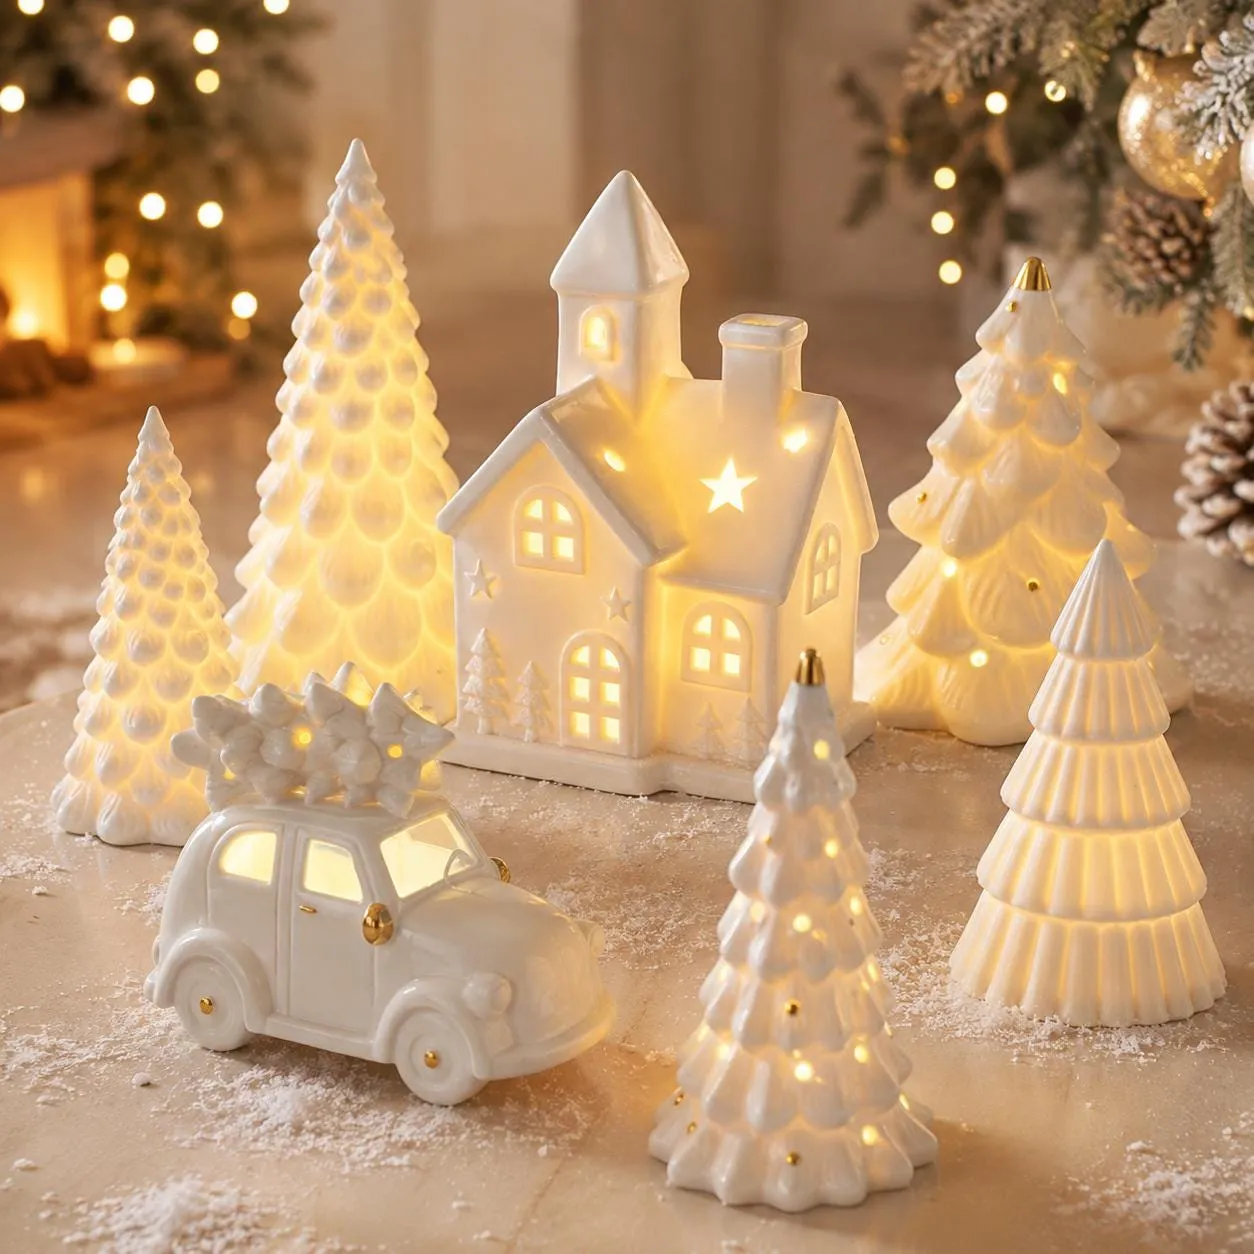
- Light-up ceramic house: $25–$55
- Set of three light-up trees: $30–$60
- Ceramic vintage car with trees: $20–$40
- Faux snow, 20 oz: $8–$14
- Battery pack or spare bulbs: $6–$12
Total: $89–$181 for the full set. One house plus two trees gets you 80% of the look for about $55.
The bulbs inside these are usually incandescent C7-style, and they burn out one at a time — which means your village develops a dark window every season. Buy a spare pack of bulbs when you buy the house; they’re cheap now and impossible to find in December. The ceramic wipes clean with a damp cloth, but never submerge a light-up piece. Check the cord each year before storage — the wiring is the weakest part.
25. Frosted Leaf Stem Edged in Fibrous Faux Snow
Fibrous faux snow — the kind that looks like cotton stretched along a leaf edge — is the most realistic fake snow you can buy, and it’s almost always applied wrong. It should catch on edges and tips only, never the flat center of the leaf. Buy loose fiber snow and a can of spray adhesive, hold the stem upside down, and dust upward so the fibers catch on the edges. One $12 bag will do an entire garland. Glitter goes on last, in a light sprinkle, or it looks like a craft project.

For mixing frosted stems into greenery, use 60% plain evergreen, 30% flocked or frosted stems, and 10% glitter or berries. The plain greens give the arrangement structure, the frosted pieces deliver the snow effect, and the glitter is the highlight. Go 50/50 and you get a muddy, uniformly white garland with no depth. The same ratio works for mantels, stair rails, and wreaths — change the berry color and you change the season.
26. Flocked Trio Against an Exposed Brick Loft Wall
Flocked trees and exposed brick are a beautiful combination and a bad one for cleanup. Brick is porous, and loose flocking settles into the mortar lines where a vacuum can’t reach it. Vacuum the trees outside before they come in, and put a mat or rug underneath. Brick rooms also run cool and dry, which makes flocking shed more as the air dries out — a humidifier helps the tree and your skin. Keep the trees at least 8 inches off the brick so branches don’t scuff it.

The loft look depends on the base, not the trees.
- Group three trees of different heights, tallest at the back corner.
- Wrap gifts in kraft paper with narrow gold ribbon.
- Stack them low and wide, not tall and narrow.
- Add one vintage lantern or crate for height variation.
- Drape a chunky cream throw over the nearest sofa arm.
Time: 30 minutes. Cost: $20–$40 for paper, ribbon, and a thrifted lantern.
27. Flocked Tree Paired with a Snowy Wood Mantel
The repeating snow line. The tree is flocked, the garland on the mantel is flocked, and the white pillar candles echo both — so the eye reads one continuous band of snow across the room. Remove the mantel garland and the tree becomes a lone object against a wall. That horizontal repeat is what makes the room feel decorated rather than merely furnished. If your mantel isn’t wood, match the snow, not the material.
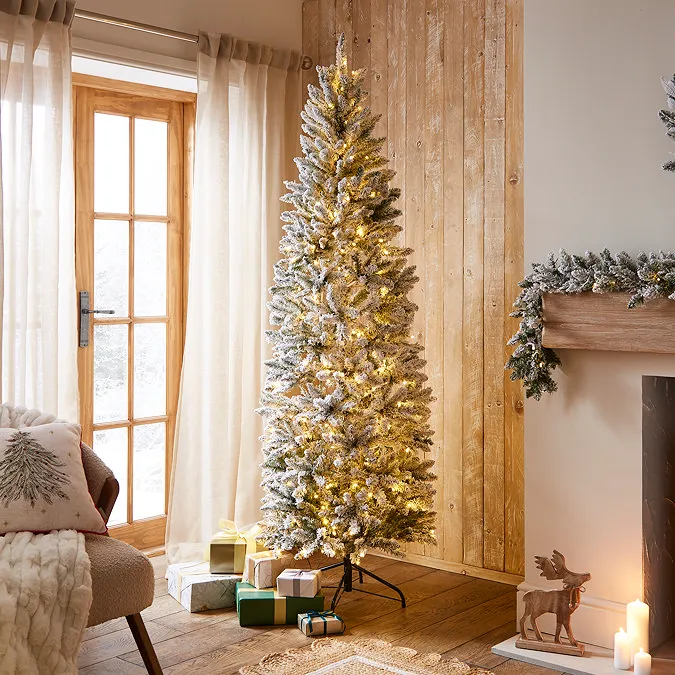
70% white and cream, 20% light wood, 10% green and brown. It’s a warm-neutral room where the flocking does all the contrast work, which is why it feels calm instead of flat. Swap the light wood mantel for dark walnut and the same decor reads moodier and more traditional. The wooden reindeer is the one brown note at eye level — that’s deliberate, and it’s what keeps the scene from turning into a whiteout.
28. Flocked Garland with Clear Balls on White Brick
Clear glass ball ornaments are the sleeper budget item here. A set of 24 runs about $15 at a craft store, and against a flocked garland they read like ice — no color needed. The chunky knit stockings are the expensive part at $35–$60 each; a chunky-knit scarf from a thrift store, folded and clipped to the mantel, gives the same texture for $5. Dollar-store pillar candles in thrifted silver holders cost about $12. The white brick does the rest for free.
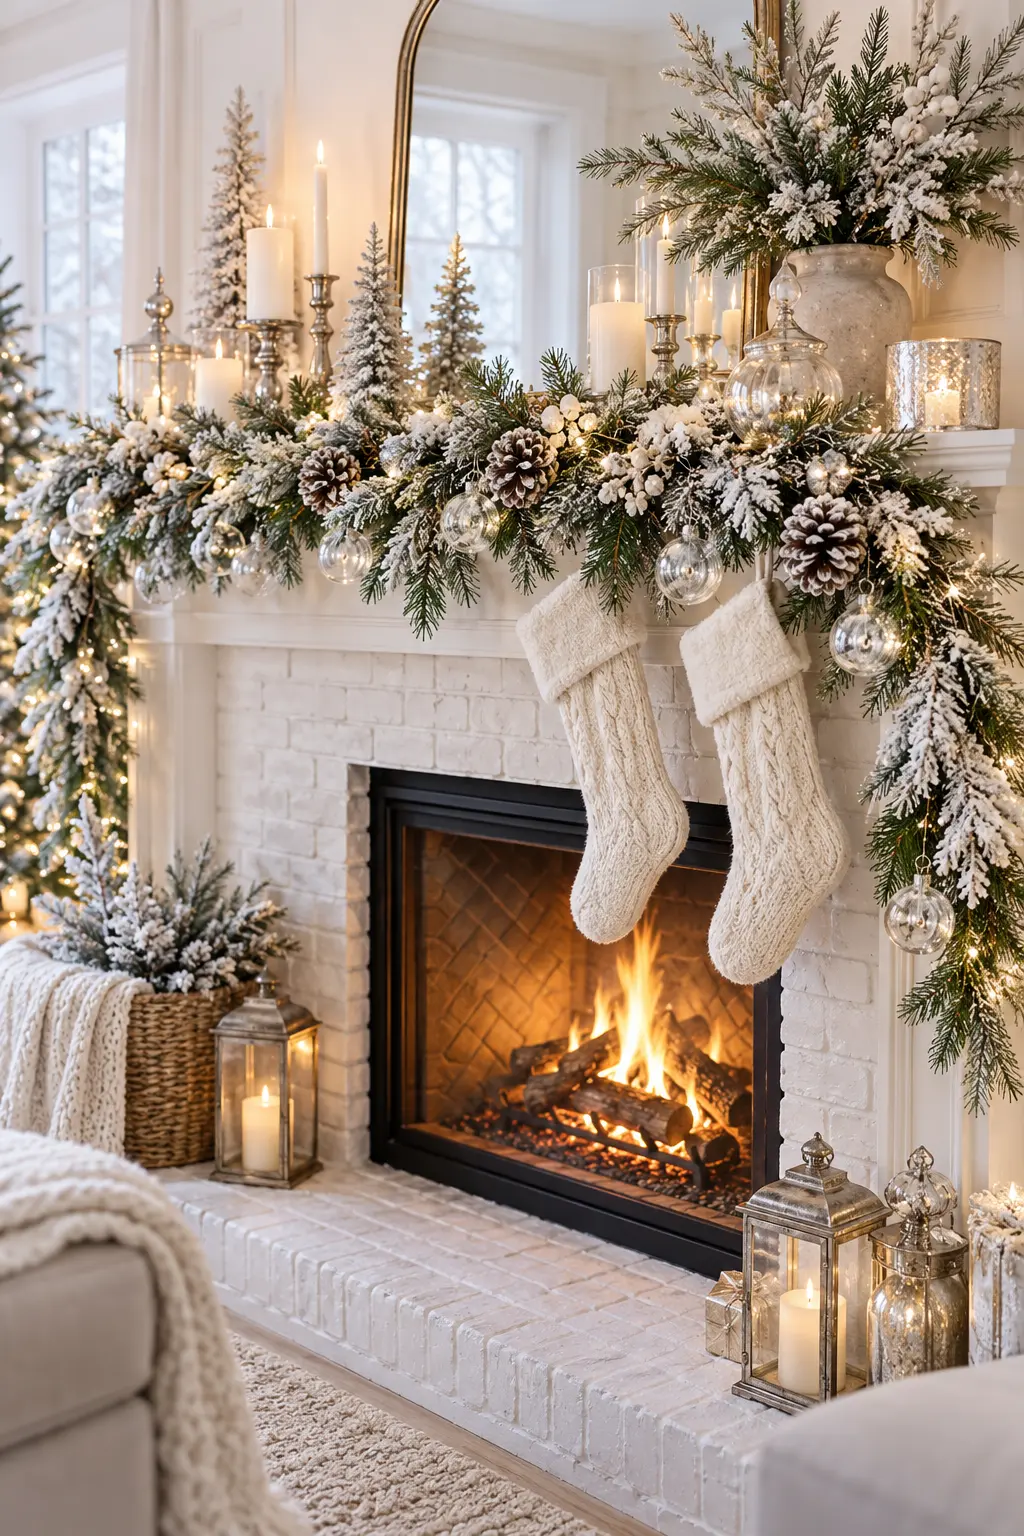
White brick shows soot from a working fireplace, and a flocked garland above it picks up that same soot over a season. If you burn real logs, plan on wiping the garland with a dry microfiber cloth in January and washing the brick with mild soap in spring. Clear glass shows every fingerprint, so handle them with gloves when packing. Knit stockings pill — hand-wash, dry flat, and they’ll last a decade instead of two seasons.
29. Red Baubles on a Fully Flocked Tree
Red on white needs scale variation or it looks like a rash. Use three sizes — 4-inch, 3-inch, and 2-inch balls — in roughly a 1:2:4 ratio, and hang the largest deep inside the branches so they glow rather than sit on the surface. Cluster them in threes instead of spacing evenly; even spacing reads as a store display, clustering reads as a home. The red finial on top is what makes the whole thing feel finished rather than interrupted.

The black metal base is the detail most people would miss and the one that makes this work. A light tree on a light floor with a light rug needs a dark anchor at the bottom or it floats. The gray sofa does the same job at mid-height, and the red throw pillow ties back to the ornaments so the room feels considered. Three values, three anchor points — that’s the trick, and it’s why this looks intentional.
30. Cascading Flocked Garland with Red Berries
A garland that cascades off one end of a mantel looks effortless and is genuinely annoying to secure. Command hooks won’t hold a heavy flocked garland for a full season once the room warms up; use small screw-in cup hooks under the mantel lip instead and accept the two tiny holes. Red berries in a white vase also need something to stop the stems from flopping sideways — a handful of glass marbles in the bottom costs $3 and solves it. Skip the berries near a radiator.
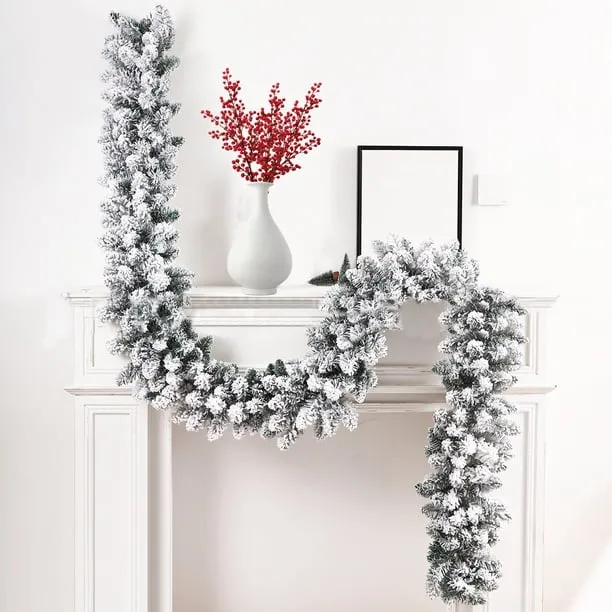
This is a long-mantel look. It needs at least 60 inches of mantel width for the garland to drape and still cascade — on a 48-inch mantel the tail crowds the firebox. Ceiling height matters less than mantel height: if your mantel sits below 48 inches, the cascade hangs into the fire zone, so shorten the tail. For shorter mantels, see Idea #28, which swags instead of cascading.
31. Painted Snowman Blocks on a Distressed Shelf
These are a weekend project, not a shopping trip.
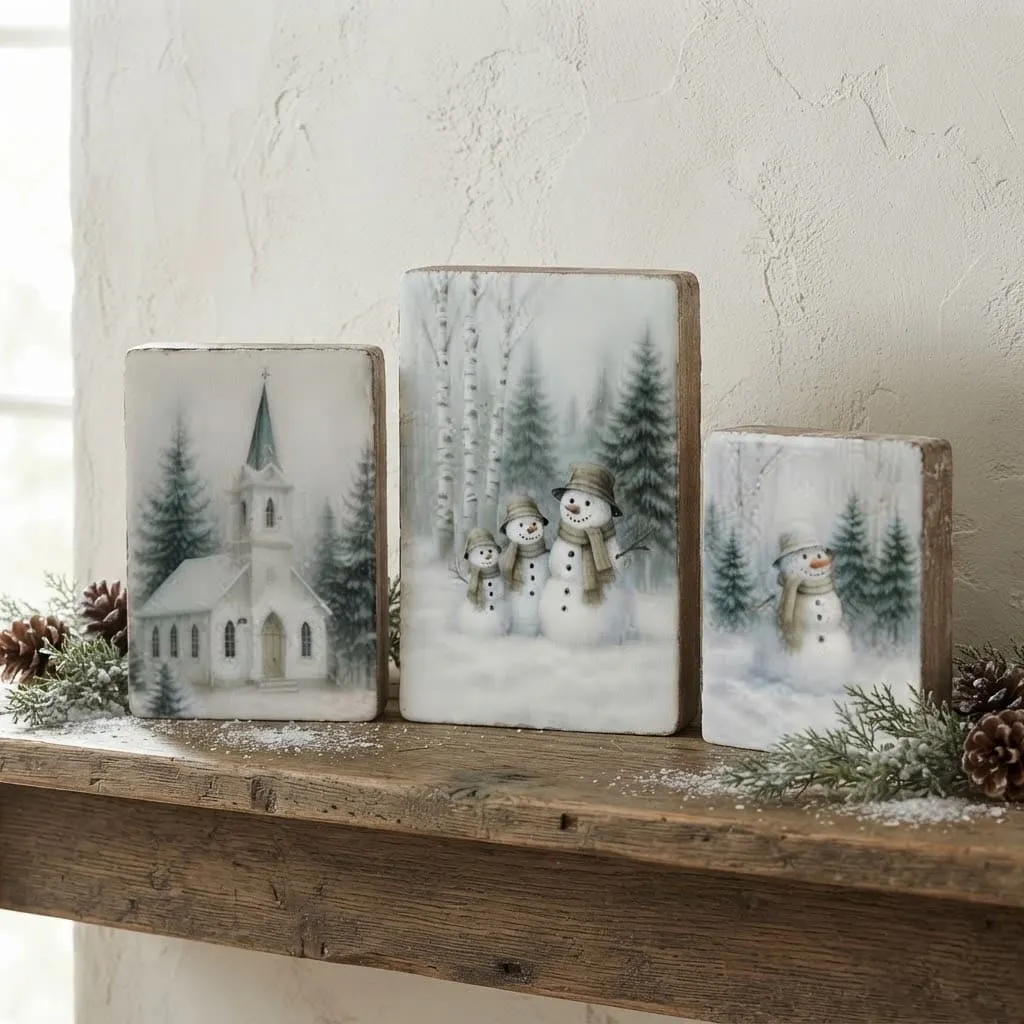
- Cut three pine blocks to 4×6, 5×7, and 6×8 inches.
- Paint the fronts cream and let them dry overnight.
- Transfer a printed church or snowman outline with graphite paper.
- Fill in with craft paint, keeping the palette to four colors.
- Sand the edges lightly, then wax or seal.
- Style with faux snow, frosted sprigs, and pinecones.
Time: 3–4 hours plus drying. Cost: $15–$25 for paint and wood.
The palette is 50% cream, 25% forest green, 15% rustic brown, 10% soft gray. That muted mix — no bright red, no pure white — is what keeps painted blocks from looking like a kindergarten project. Want them more modern? Drop the brown entirely and add black details. Want them warmer? Add mustard yellow in the church windows. Change one 10% and the whole set shifts.
Let It Snow — Just Not on Your Hardwood
Faux snow is forgiving stuff. It hides a tired tree, turns a $6 thrifted house into a scene, and makes a Tuesday night in December feel like the inside of a snow globe. Start with one surface — a tray, a mantel, a windowsill — and let it earn its place before you commit to the whole room.
📌 Save this to Pinterest for later — you’ll want it back when the boxes come out of the attic.