
Still scrolling through candy Land Christmas tree photos at eleven at night and saving every single one? You’re not alone — pastel candy trees are the most-saved holiday idea on Pinterest right now, and for good reason. We spent serious time browsing Hobby Lobby, Etsy, and Target to bring you only what’s worth your attention this year, and everything here lands somewhere between $8 for a single ornament and $340 for a full tree setup. Inside you’ll find 30 curated ideas across four moods — whimsical pastel candy Land, rustic handmade felt, pink-and-gold glam, and traditional red-and-white peppermint — with budget and luxury versions compared side by side so you can pick your price point before you pick your palette. And 2026 is the year candy trees went editorial: designers are mixing oversized faux sweets with real ribbon and flocked greenery instead of the plastic-everywhere look of a decade ago. And stay until the end — we break down the most common mistakes that can ruin these looks. 📌 Save this to Pinterest for later — you’ll want to revisit these ideas.
1. Pastel Candy Tree With Oversized Lollipops and Cupcakes
What makes a candy tree read as charming instead of chaotic is scale contrast. Those oversized lollipops, cupcakes, and ice cream cones are three or four times the size of a standard bauble, so your eye grabs them from across the room and only then notices the smaller striped candy canes. The pale pink, mint, and powder blue palette keeps it from tipping into carnival territory, and the tall white floral picks at the crown lift the silhouette instead of letting it go flat. Ground the whole thing with gifts in neutral patterned paper and gold ribbon and the tree stops being decor and becomes a scene.
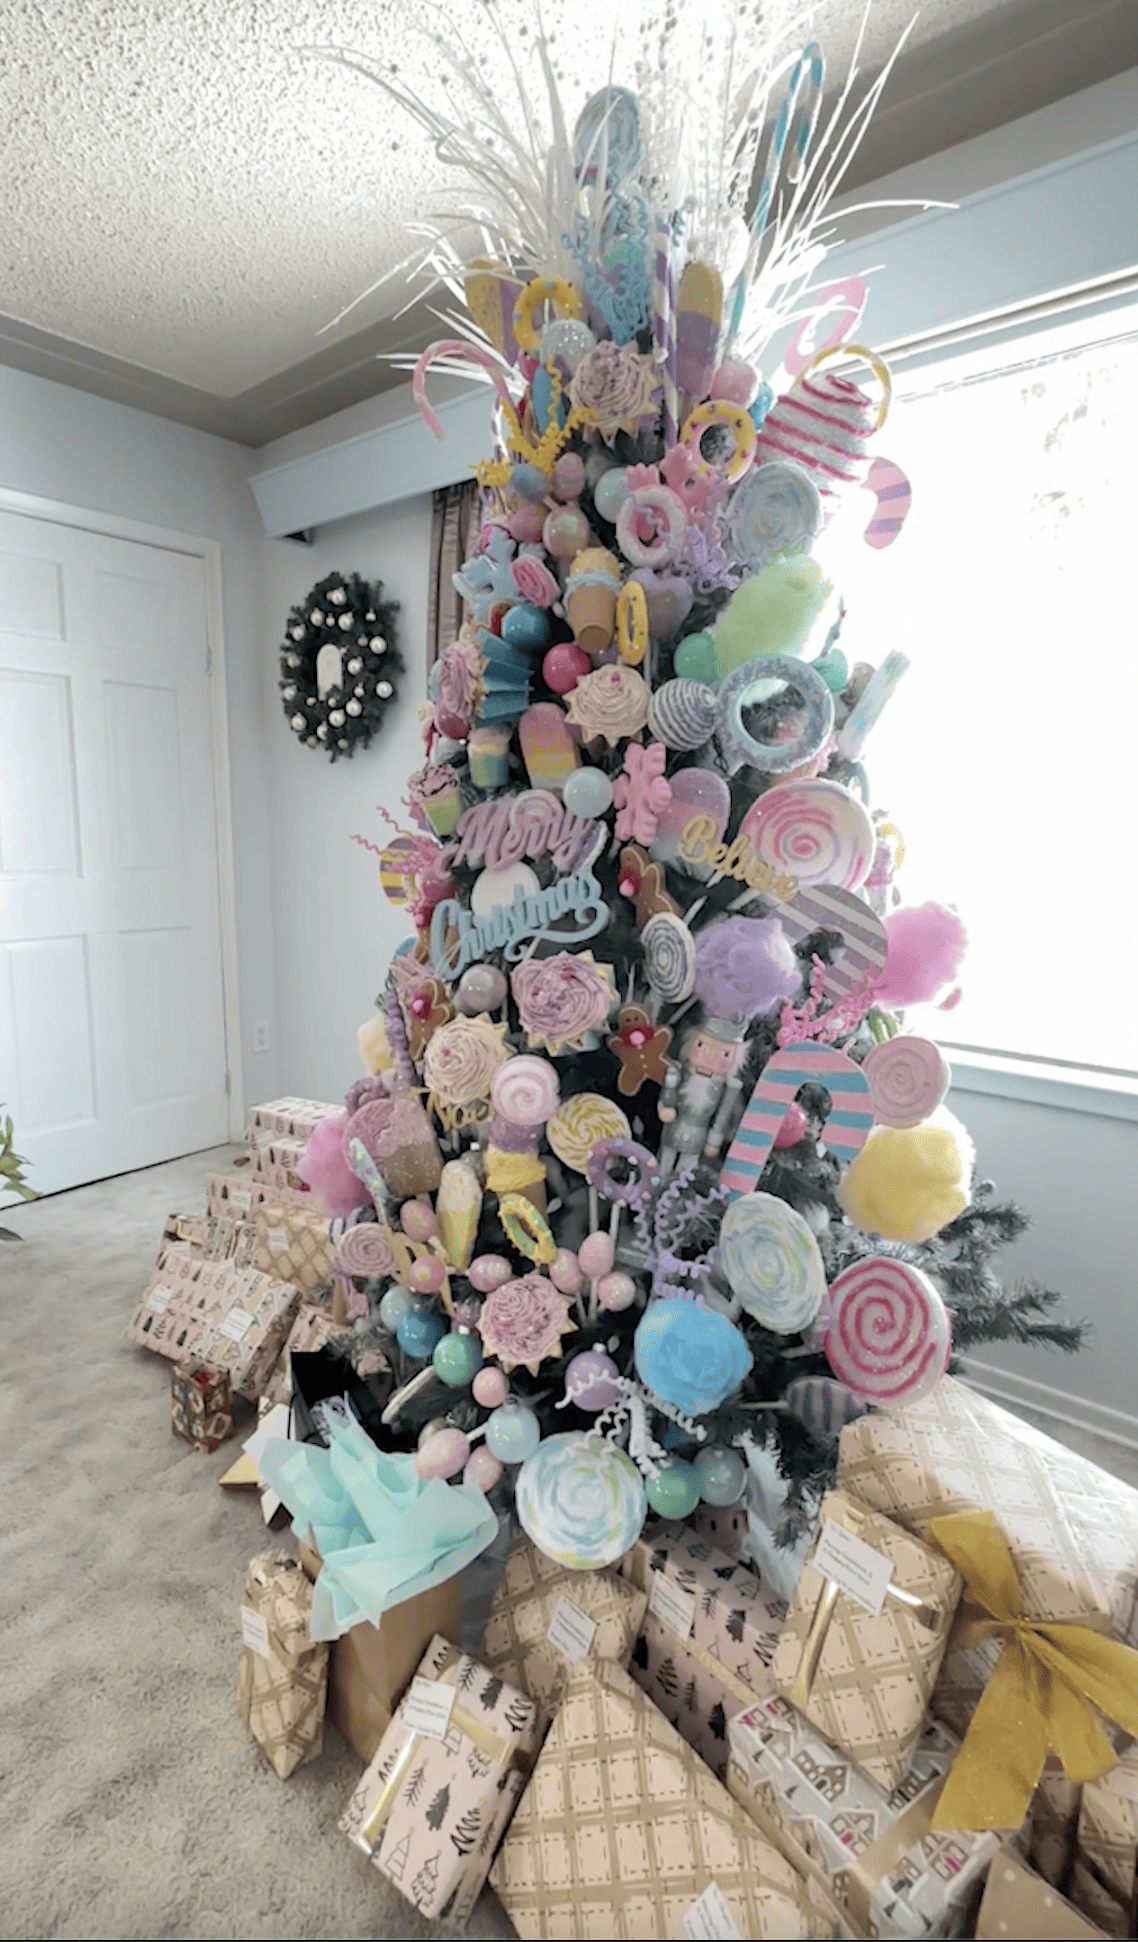
- Tree (7.5 ft) and plush tree skirt: $180–$420
- Lighting, four warm white strands: $30–$70
- Textiles, ribbon, gift wrap and ribbon: $55–$120
- Oversized lollipops, cupcakes, candy canes, floral topper: $140–$380
- Total: $405–$990. Budget alternative: skip the oversized pieces and build with a $60 pastel ornament set plus dollar-store swirl suckers at $1.25 each — about $150 all in.
Here’s the rule I give clients: ornaments go on the outer third of the branch only. Anything deeper than that disappears behind needles once the lights come on. Save your small filler pieces for the interior and put every oversized candy where it can catch light from two directions — ideally a window on one side and a lamp on the other. On a 7.5-foot tree with roughly 3-inch ornaments, plan on 90 to 110 pieces total, and buy two extra of anything you love.
2. Handmade Felt Candy Cane With a Rustic Twine Loop
- Cut two matching candy cane shapes from stiffened felt — one red, one cream — using a 5-inch paper template.
- Lay quarter-inch cream felt strips diagonally across the red shape and glue them down flat.
- Sandwich the two cane shapes with a tan felt border strip between them and hand-stitch the edge with a simple running stitch.
- Leave a 3-inch loop of natural twine at the curve and knot it tight.
- Stuff lightly with poly-fil before the last few stitches so the cane keeps its shape.
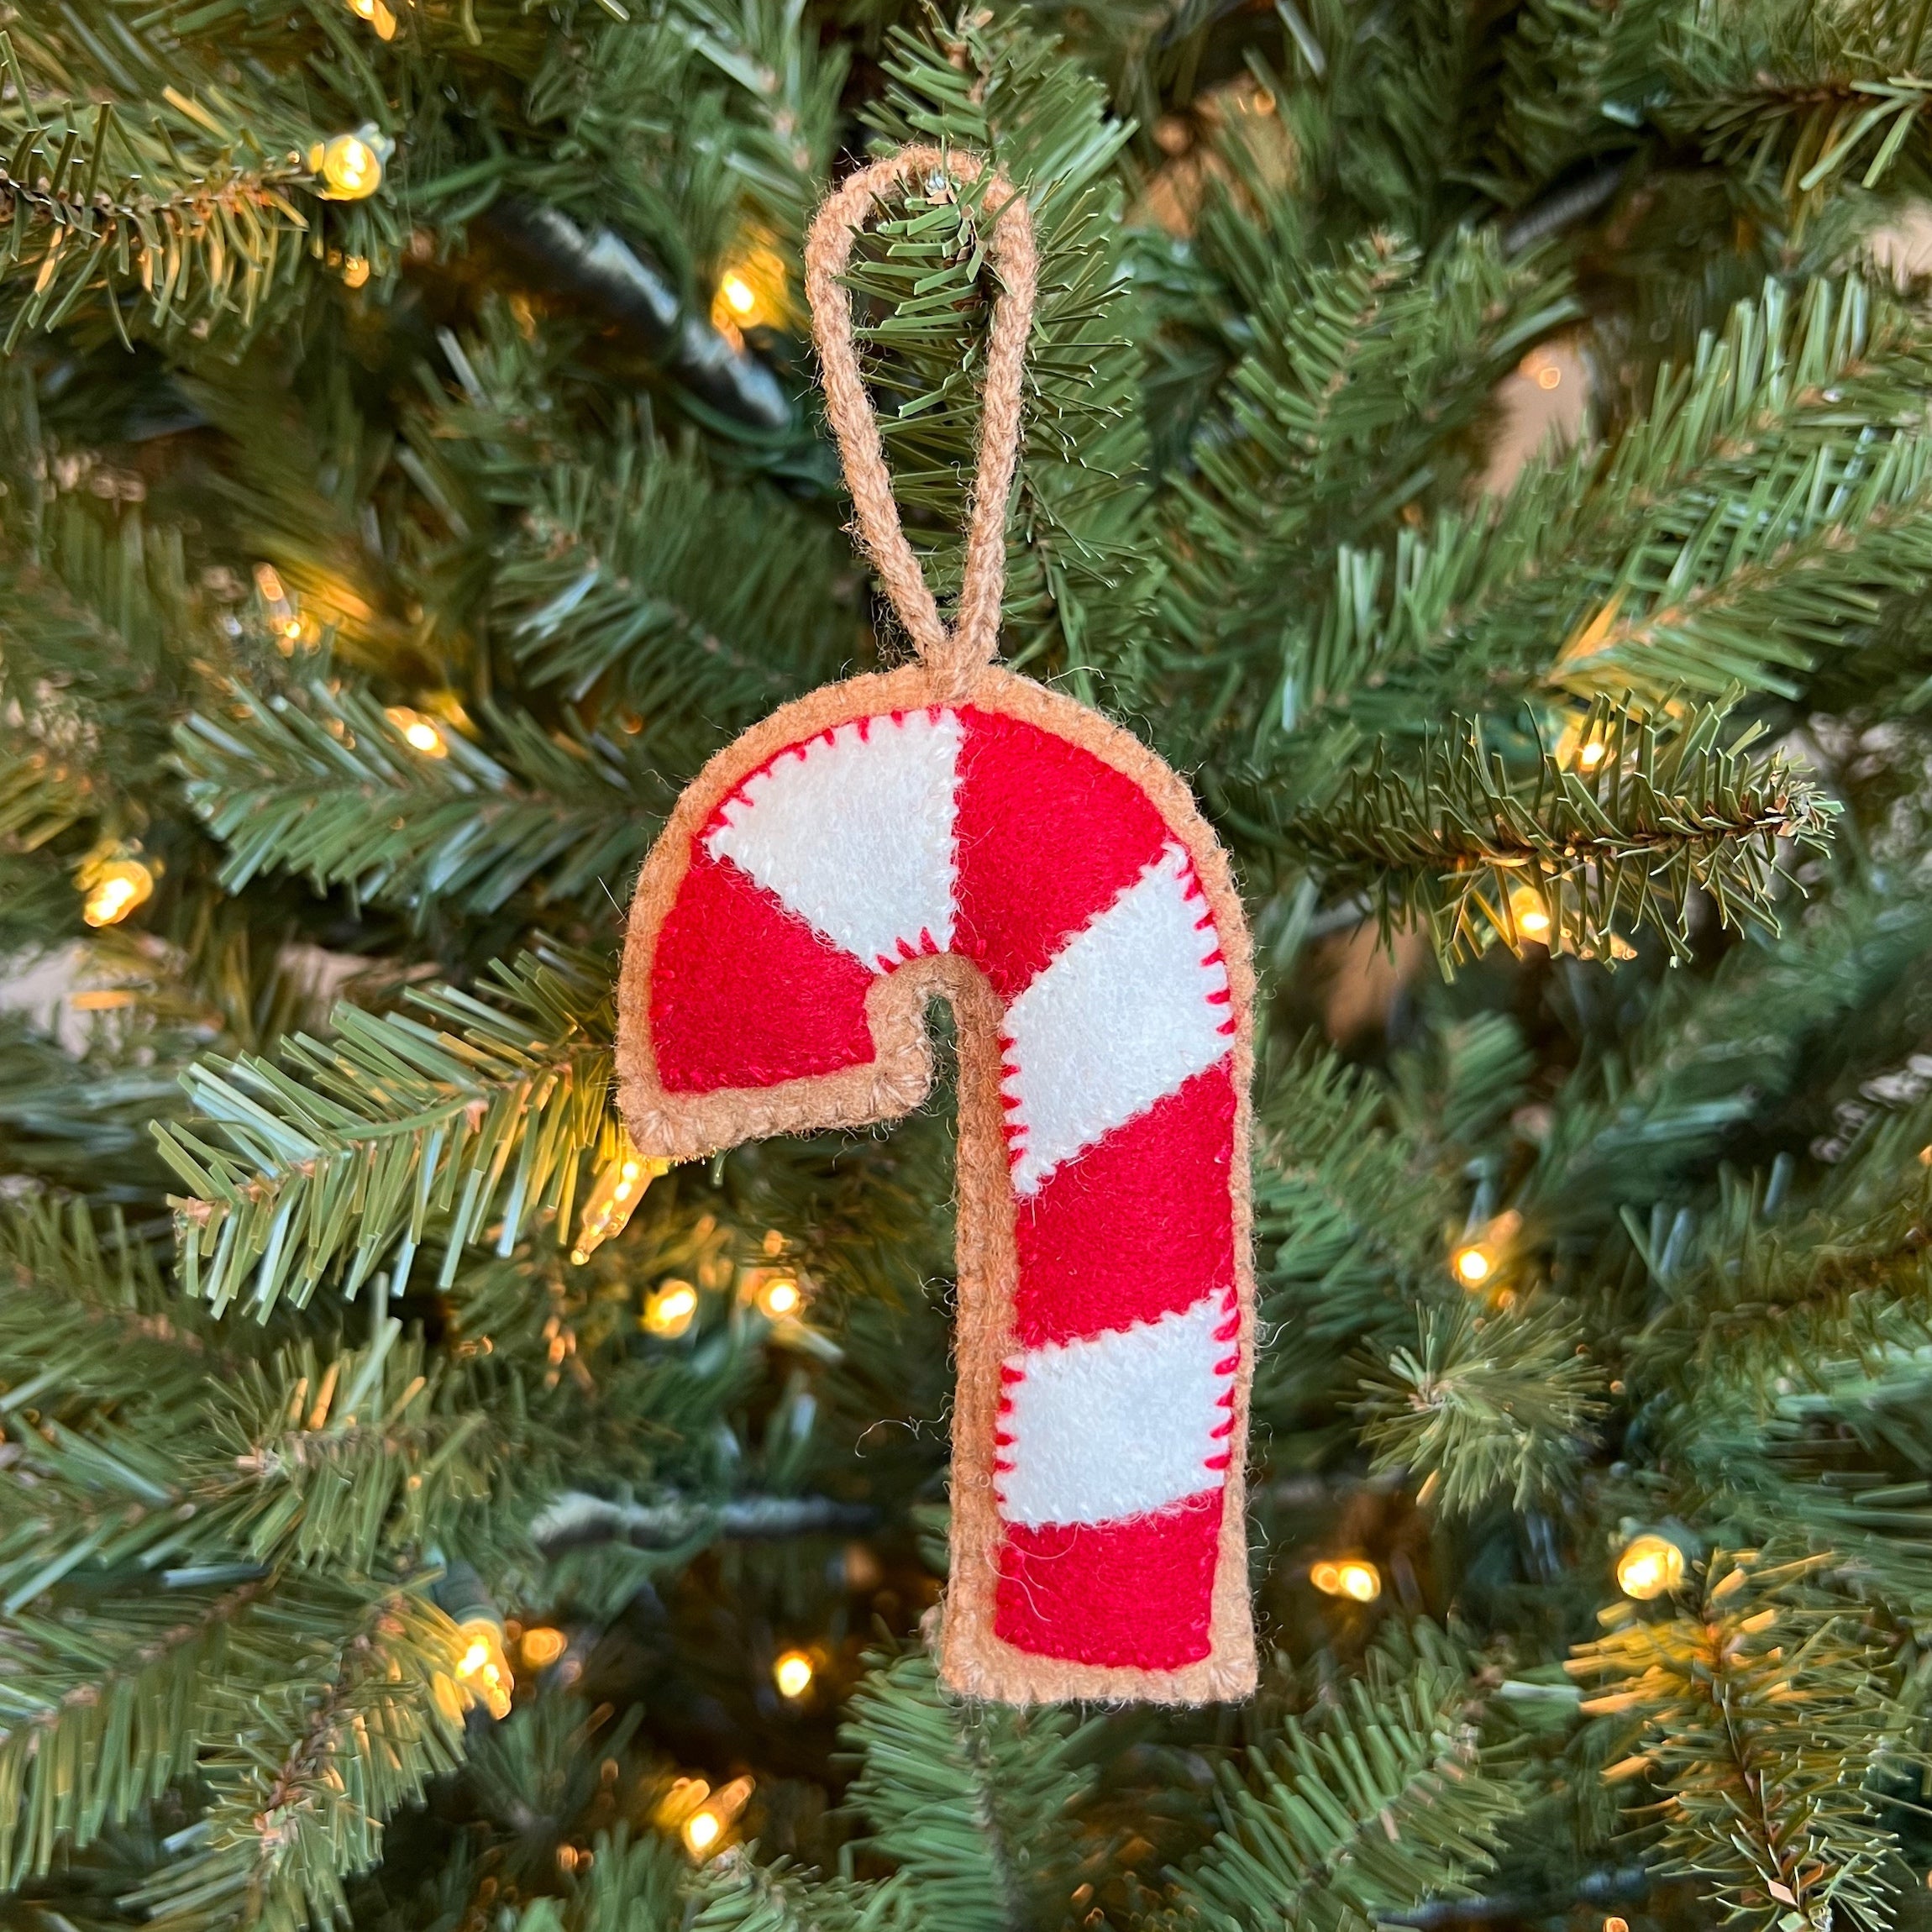
About 45 minutes per ornament once you have a template, and materials run under $4 for two. That tan border with visible stitching is the detail separating handmade from homemade.
Felt is forgiving in almost every way except three: heat, moisture, and pets. A felt cane stored in a hot attic will shag and pill, and a humid basement will leave it smelling like one. Keep them in a labeled zip bag with a cedar block and skip the garage. If you have cats, hang felt ornaments above the 5-foot mark — that twine loop is exactly the right size for a paw to hook. Never stack them in a bin without tissue between, because red dye transfers onto cream over a summer or two.
3. Mini Gumball Machine Ornaments on a Fluffy White Tree
You can build this without hunting down vintage gumball machines. Clear plastic fillable ornaments run about $1.25 to $2 each, and a bag of colorful round candy — or better, plastic bead candy that won’t melt or attract ants — costs $4. Spray the cap and base with pink craft paint, fill the globe, snap it closed. Twelve ornaments, roughly $30 total, and nobody will know they aren’t the $14 boutique versions. Do the pink confetti backdrop with a $6 roll of tissue paper and a $3 pack of confetti dots. Compare with Idea #7 — same white canvas, doubled up.
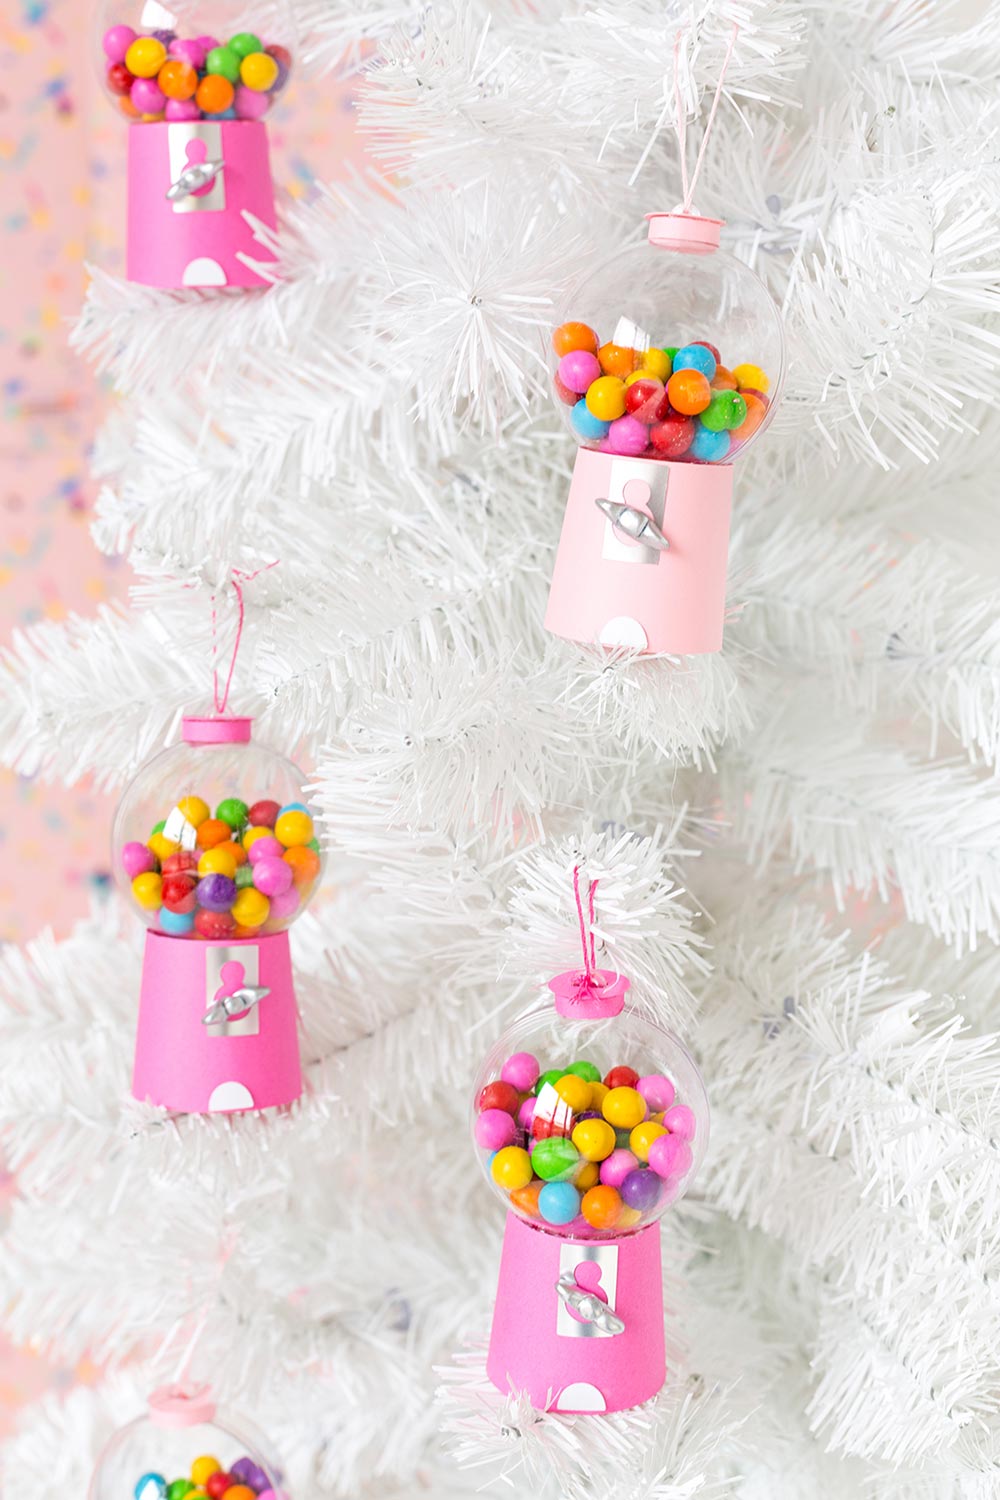
70% fluffy white tree + 20% pink (bases, backdrop, ribbon) + 10% multicolor candy. That’s the whole formula, and white does the heavy lifting so the candy colors can be bright without turning loud. Swap the pink for mint green and the tree reads cooler and more vintage; swap it for hot magenta and you get birthday-party energy instead of Christmas. Keep the multicolor candy capped at 10% — that’s the temptation point where people ruin it.
The confetti is the secret. Not the ornaments — the pink backdrop with scattered multicolor dots behind the tree. Without it, those little gumball globes float in white space and read as generic candy ornaments. With it, the tree looks like it’s sitting inside a party and the colors inside the globes suddenly feel intentional. A pink tablecloth draped over a board behind the tree gets you 80% of the effect for about $10.
4. Gingerbread Village Meets Pink Peppermint on a Green Tree
Pink on green is a complementary pair, and that’s why this tree has life without a single bright red ornament in sight. The plush gingerbread houses bring brown and cream into the mix, giving the pink something warm to sit against instead of floating in pastel nothingness. Then the pink-and-white striped ribbon weaves vertically while the oversized swirled lollipops repeat that same spiral shape at three scales — small candy cane picks, mid-size lollipops, giant lollipops. Repetition of one shape at three sizes is the oldest trick in ornament design.
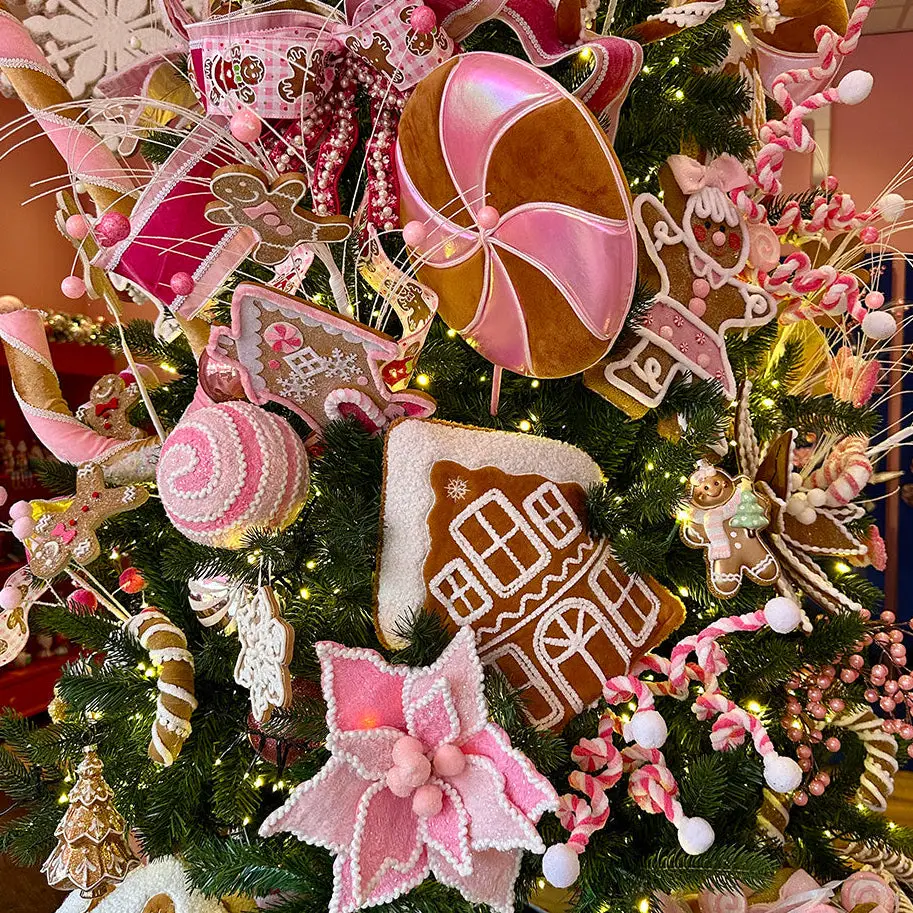
If you’re weaving ribbon, stop thinking of it as a garland and start thinking of it as a stripe. Run it in a loose S from top to bottom, tucking it under roughly every third branch and never pulling it tight — tension is what makes ribbon look like a craft project. On a 7.5-foot tree you’ll need about 12 to 15 yards of 2.5-inch ribbon for one full pass. Do two passes for that confectionery density, and buy wire-edge ribbon so it holds the curve.
This density needs room to breathe. A tree this full reads best with a 9-foot ceiling and roughly 12 by 14 feet of floor, placed so you can walk at least three-quarters of the way around it. In a smaller space, halve the lollipop count and reduce the ribbon to one pass — it still reads as candy-themed because the oversized pieces carry the concept. Under 8 feet of ceiling, use a 6.5-foot tree and keep the topper low and airy.
5. Gold Tinsel Tree Loaded With Pastel Sweets
55% gold tinsel + 30% pastel candy ornaments + 15% soft pink textile (skirt, curtains). Gold behaves like beige with sparkle, which is exactly why pastel lollipops sit so comfortably on it. Swap the gold for silver tinsel and the pastels turn cool and slightly icy; swap tinsel for champagne ribbon and the tree reads more formal. The pink plush skirt and pink-and-white striped curtains are doing 15% of the work but they’re the reason the tree looks like it belongs in the room instead of parked in it.
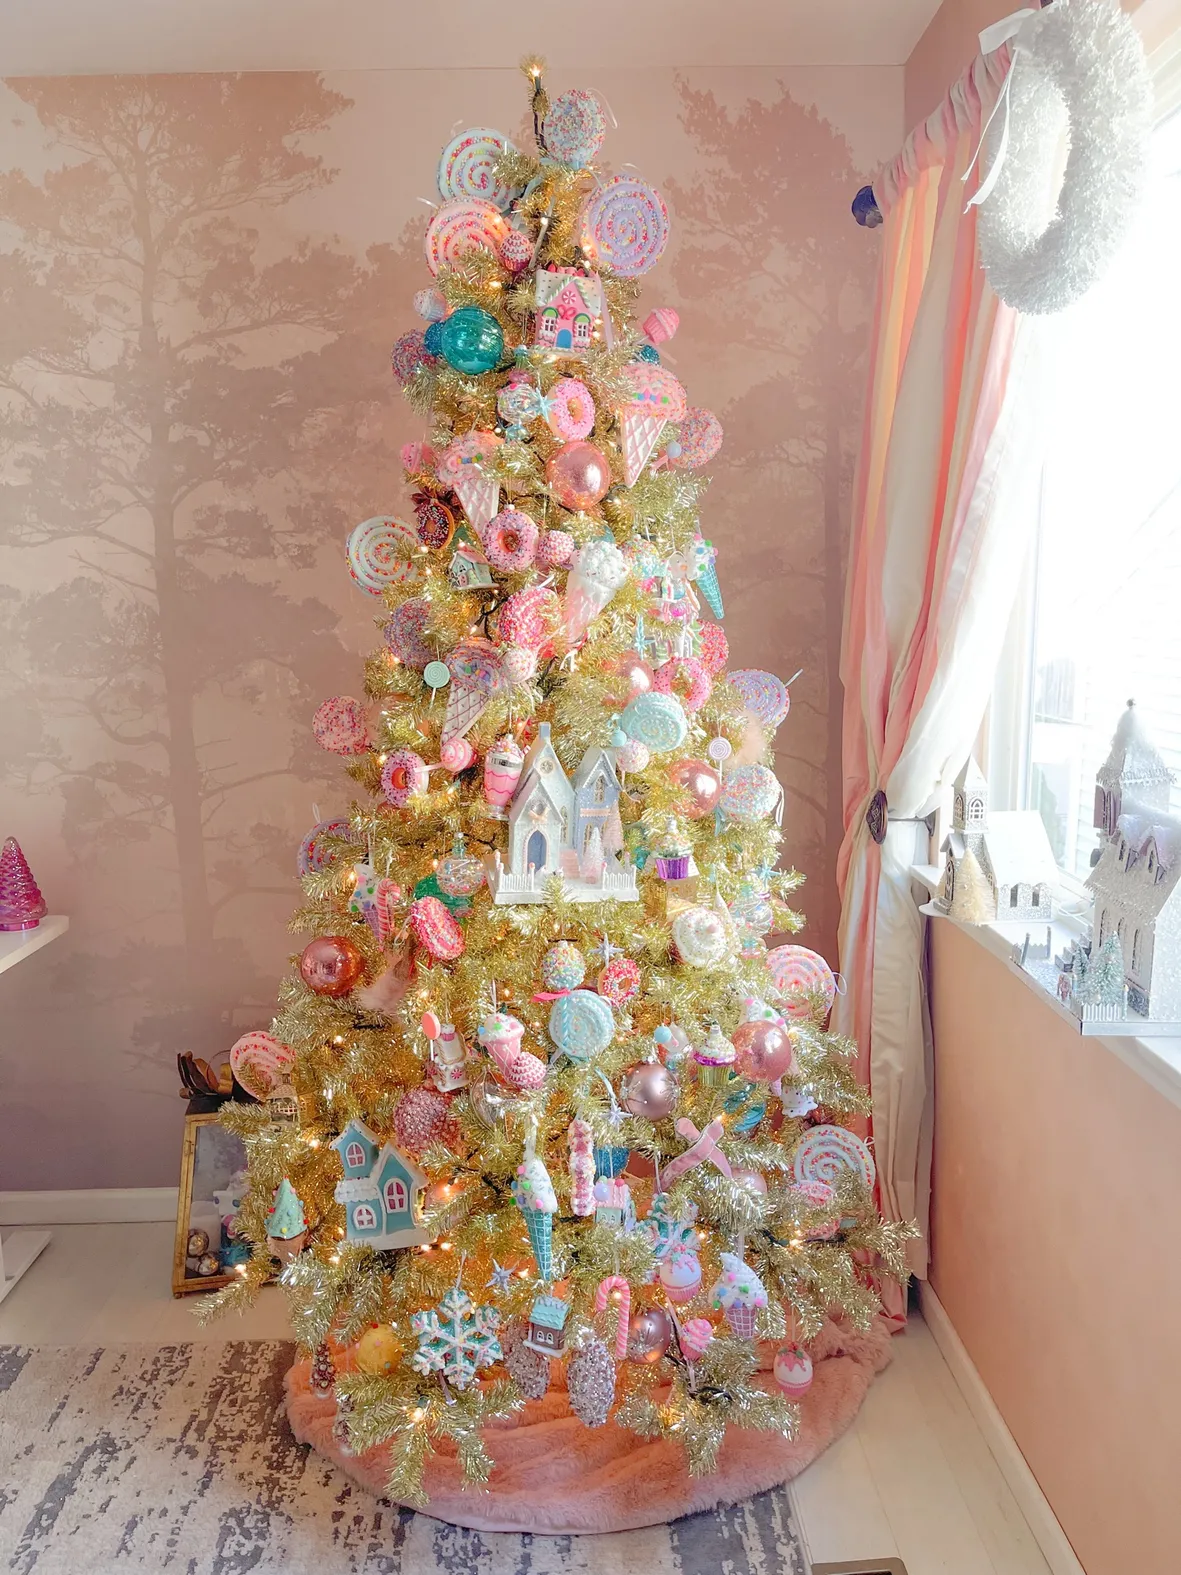
Tinsel is back, and it’s not the 1970s version your grandmother had. The 2026 revival is full, matte-gold, and deliberately vintage-adjacent — the metal reads as a neutral and pastels read as candy against it. Pinterest searches for tinsel trees have been climbing as the maximalist holiday look replaces the all-neutral Christmas of the late 2010s. The upside: tinsel doesn’t date the way a character ornament does. The catch is that cheap tinsel sheds, so buy the wired kind and expect to vacuum twice in December.
6. A Gingerbread Lady Figurine Holding a Peppermint Lollipop
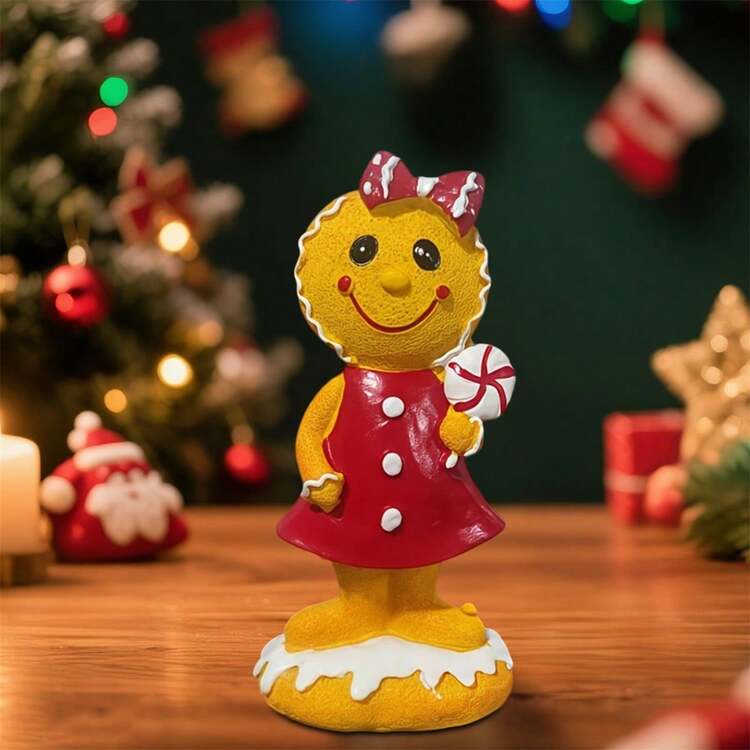
The icing trim on that red hair bow. That’s the detail separating a $6 craft-store figurine from something you’d leave out through January. Raised white piping on the bow and the polka-dot buttons on the dress are what tell your eye this is decorated, not just molded. Without them she’s a yellow blob holding a lollipop; with them she reads as confection. The lesson transfers: when choosing gingerbread decor, look for raised icing detail rather than flat painted color, and you can skip the pricey handcrafted versions entirely.
- Find a shallow dish or wooden tray about 10 inches wide for the base.
- Spread a half-inch layer of faux snow batting and fluff it with your fingers so it doesn’t look like a pancake.
- Press the figurine in slightly off-center — never dead center — and rotate her a few degrees toward the room.
- Add two small pine sprigs behind her right shoulder for height.
- Set the tray on a wooden table with a warm lamp at least two feet away so the light grazes across the figure.
Twenty minutes, about $12 if you already own the figurine, and that single warm light is what makes her read as glazed rather than plastic.
7. Twin White Flocked Trees Framing Arched Windows
Twin trees are a commitment to symmetry, so measure before you buy. You need a wall at least 10 feet wide with 26 to 30 inches of clear space between the two trees — any closer and they read as one lumpy mass. A 9-foot ceiling lets you run two 7.5-foot trees with room for a real topper. If your windows sit closer together than that, one fuller tree centered will always beat two squeezed ones.
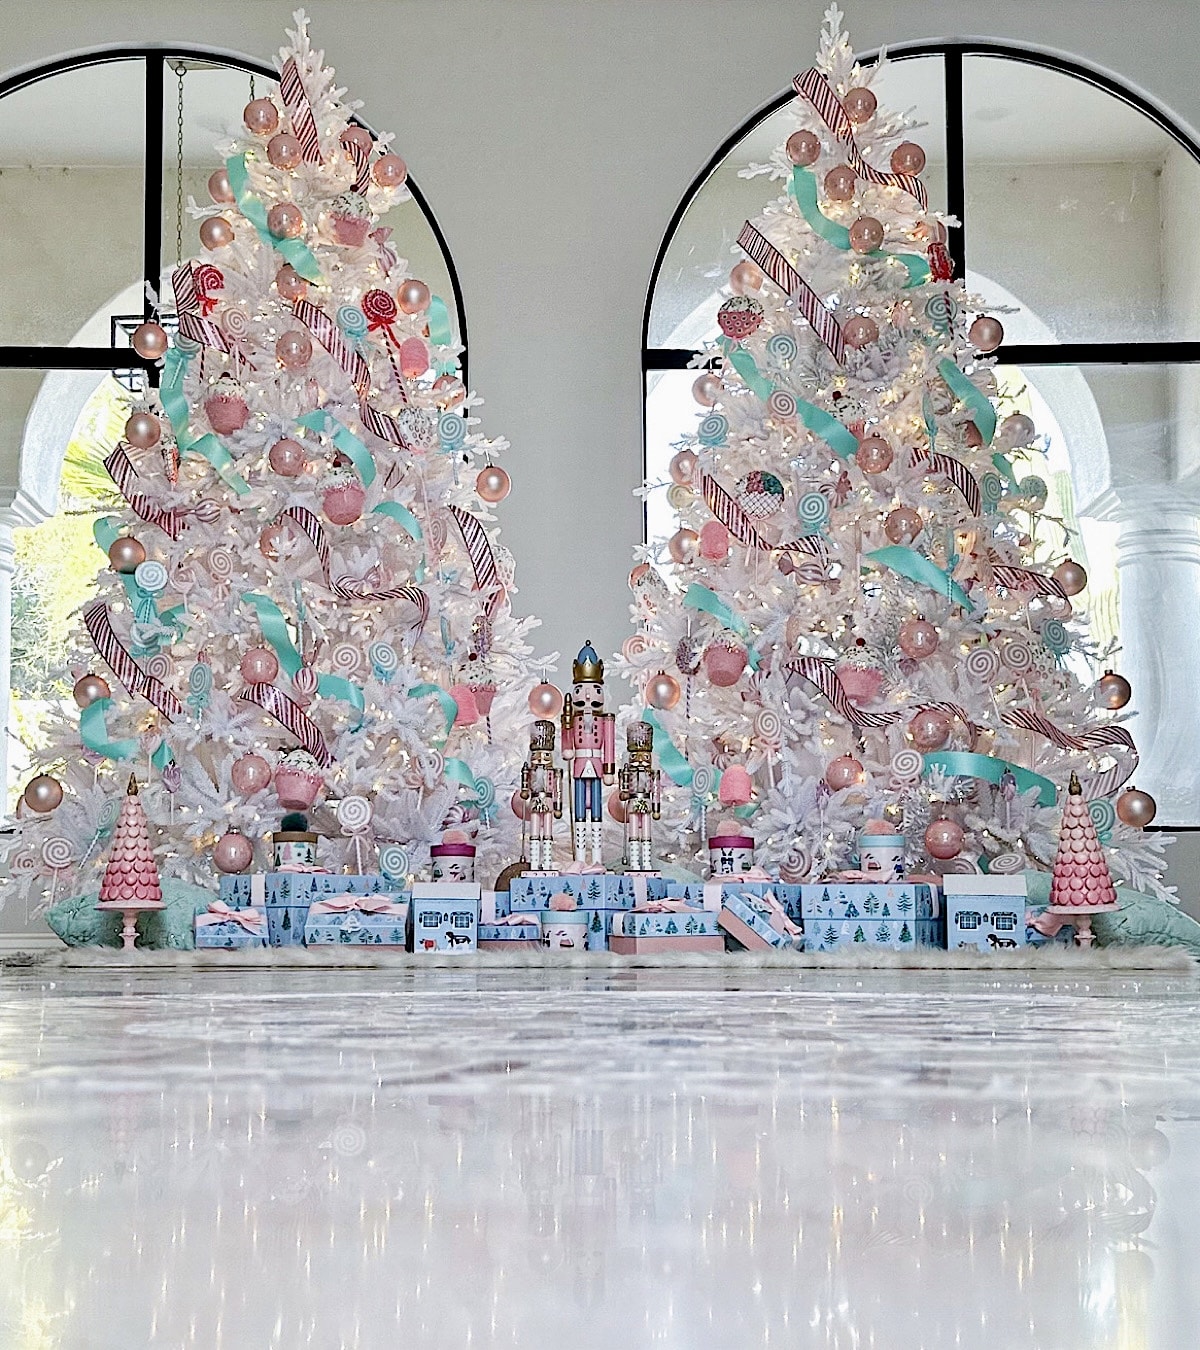
Buy two of literally everything, in the same quantity, and hang them in mirror order. The ribbon on the left tree mirrors the ribbon on the right, it doesn’t match it. The mistake people make is treating the second tree as overflow storage for ornaments that didn’t fit the first — that’s what makes twin trees look like a garage sale instead of a design. Budget on about 100 ornaments per 7.5-foot tree, then add 10% overage and split it evenly.
- Two 7.5 ft white flocked trees: $300–$900
- Lighting, eight warm white strands: $60–$140
- Teal ribbon, two tree skirts, curtains: $90–$260
- Ornaments, 200 pieces in pink, candy, and neutrals: $240–$600
- Nutcracker figures and matched gift boxes: $70–$220
- Total: $760–$2,120. Budget alternative: buy two 6-foot flocked trees on post-holiday clearance and build the ornament count over two seasons — roughly $400 all in.
8. Green Tree, Candy Canes, and a Plush Santa at the Base
That plush Santa at the base is adorable and also the first thing a dog will claim. With pets or toddlers, either put him on a raised stand or accept that he’s a chew toy. The bigger issue is weight: oversized lollipop discs are heavier than they look, and hung on a thin artificial branch they’ll pull the tips down over three weeks. Reinforce load-bearing branches with a small zip tie before hanging anything over 6 ounces, and always put heavy wood and resin candy pieces low, never near the top.
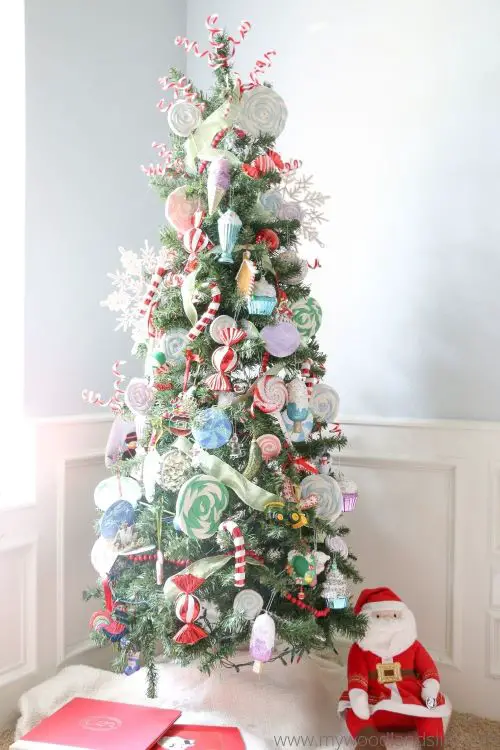
The wide sage green ribbon is the trick here. A 10-yard roll from Walmart runs about $8 and does more for this tree than any ornament. Candy cane garlands are $3 at dollar stores in early November. For the Santa, check Facebook Marketplace in January — decorative Santa figures sell for $5 to $15 because nobody wants to store them. Fill in with plain pastel ornaments from a big-box multipack at $12 for 30. This is essentially the candy version of Idea #4 — same pink-on-green thinking, fewer pieces — and you can build it for about $85.
9. Flocked Tree With Striped Bows Beside a Fireplace Mantel
Flocking sheds. Accept it now. Expect a fine white dust on the floor within a week of setup and plan to vacuum the surrounding two feet every few days through December. Store a flocked tree in a bag, not a box, and never vacuum the branches themselves — use a soft brush attachment on the lowest setting if you must. Wooden bead garlands are the easiest thing here to live with: they wipe clean, don’t fade, and never tangle. The brass bells will tarnish, so give them a dry rub in January.
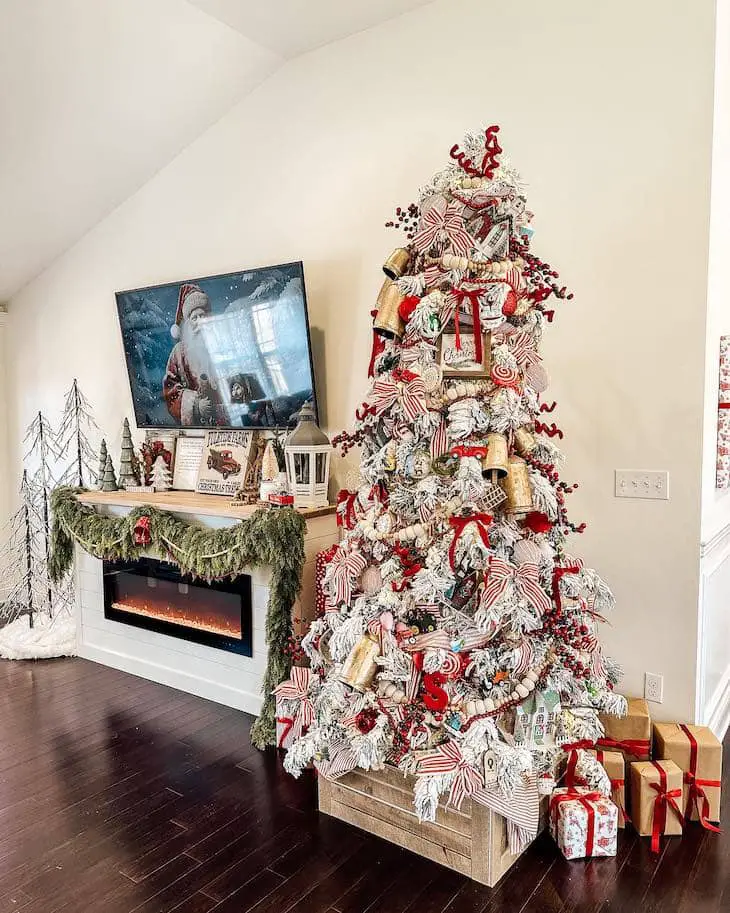
Striped bows and brass bells are the same idea in two materials — one soft and graphic, one hard and shiny — and repeating that rhythm down the tree gives it a beat. The flocked branches mute the green so the red-and-white stripes become the loudest thing in the room, which is why this reads traditional instead of busy. The wooden bead garland adds matte texture between all the shine, giving your eye somewhere to rest.
- Measure ceiling height minus tree height — you need at least 6 inches of clearance for a topper.
- Confirm an outlet within reach without an extension cord crossing the room.
- Check the tree base width against your floor space; flocked trees need a wider stand.
- Test every light strand before a single branch goes up.
- Decide where the tree lives for six weeks and protect that floor before setup.
10. A Tall Gingerbread Church for the Entry Table
Tabletop displays die without dedicated light. A single small puck light placed six inches in front of and slightly below the gingerbread church will rake across the white icing and make it look three-dimensional instead of painted on. Keep it warm white, around 2700K, and never point it from above — top light flattens the piping and kills the shadow detail that makes gingerbread read as gingerbread. If you don’t want a cord, a rechargeable LED puck costs under $15 and runs about 20 hours per charge.
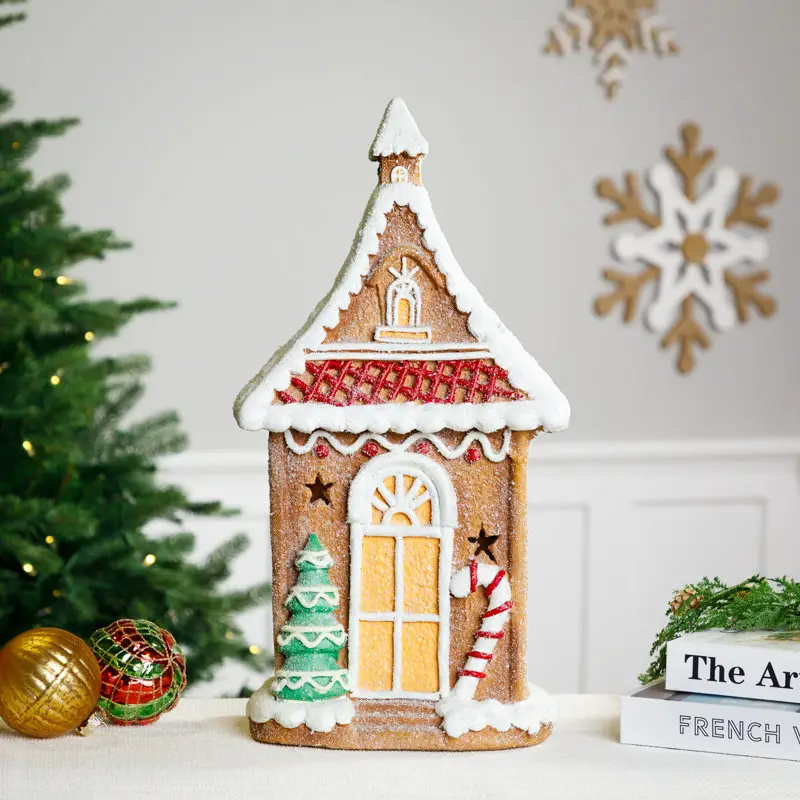
- Clear the top of a console or entry table and lay a runner in cream or natural linen.
- Place the gingerbread church slightly off-center as the tallest element.
- Stack two or three books to the left at a lower height to give the eye a step down.
- Add a miniature green tree and one shiny ornament on top of the stack.
- Finish with wooden snowflakes on the wall behind, hung 6 to 10 inches above the tallest piece.
Twenty-five minutes and no cost if you’re shopping your own shelves. The wall detail is what makes it read as a vignette rather than a pile.
11. Peppermint Ribbon Garland With Turquoise Mesh and Aqua Baubles
60% red and white (ribbon, peppermint picks, flocked greenery) + 30% turquoise deco mesh + 10% pink and aqua glitter baubles. That turquoise is the odd one out, and it’s also why this garland doesn’t look like every other red-and-white mantel on the internet. Swap it for seafoam green and you get something softer and beachier; swap it for gold and the whole thing turns traditional. Keep the sparkle capped at 10% — once glitter passes about a tenth of the visual weight, the eye has nowhere to land.
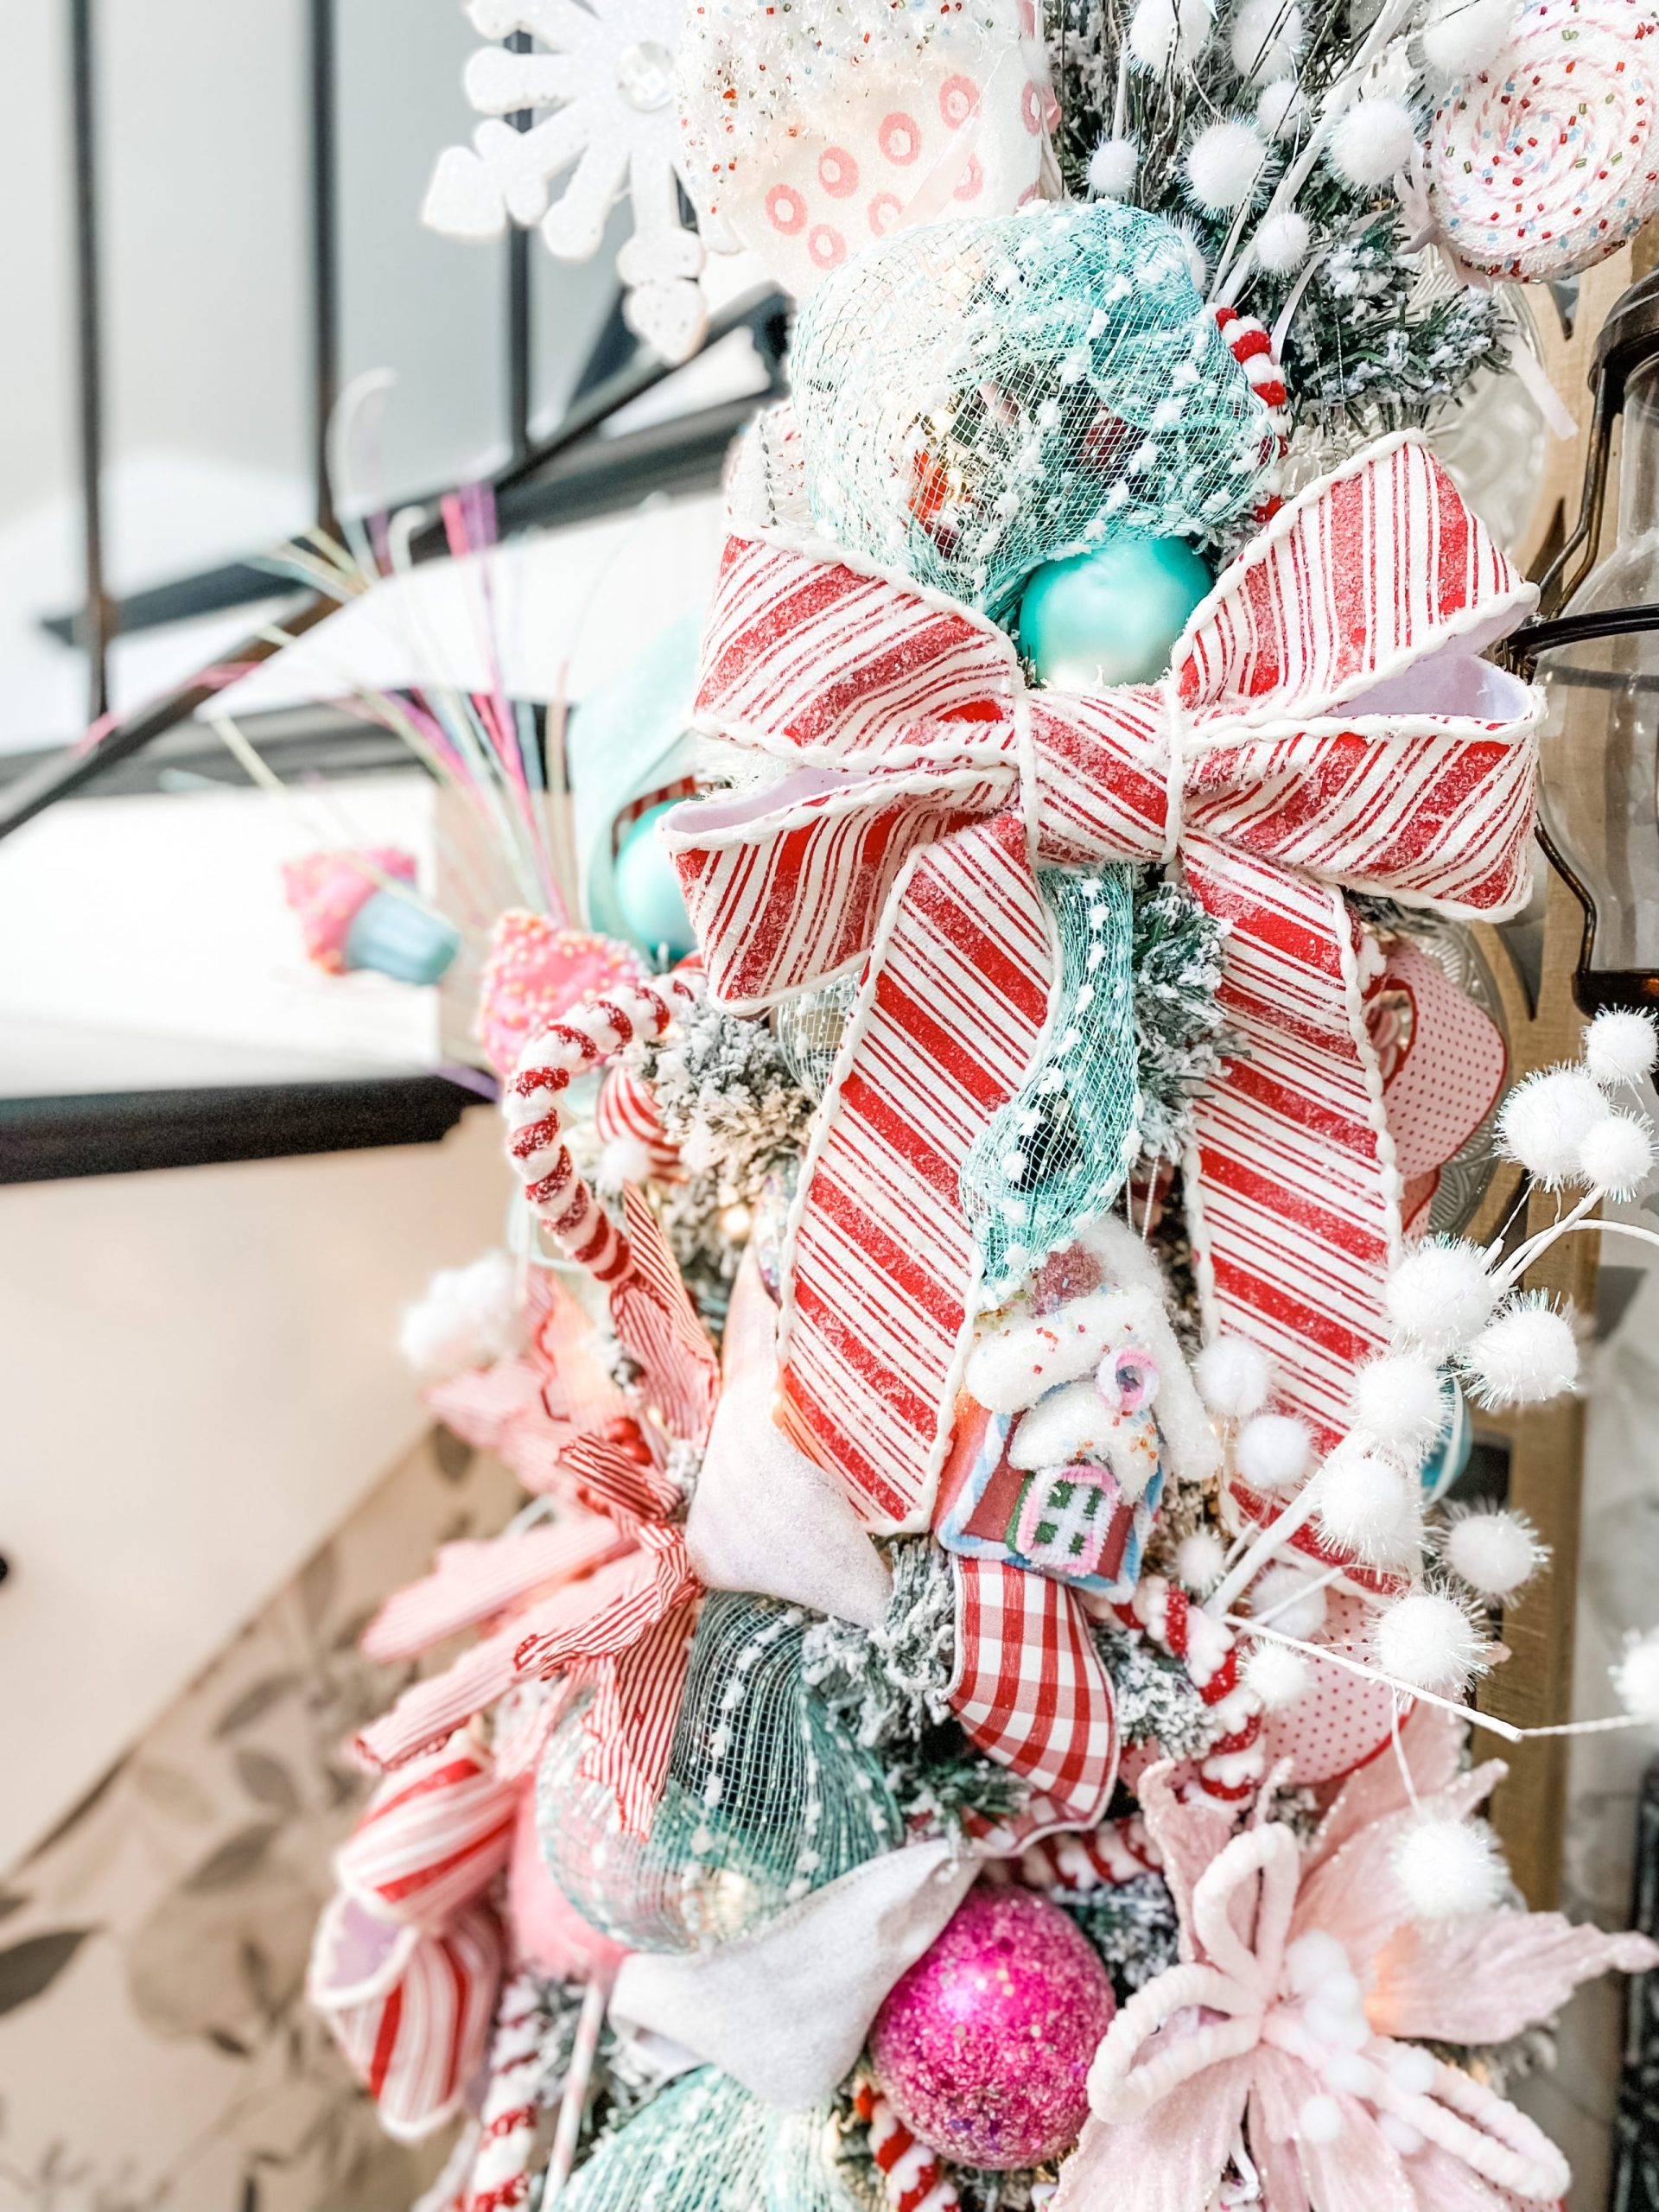
Deco mesh is the cheapest way to get dramatic volume on a mantel. A 10-inch roll runs about $6 at craft stores and $1.25 at dollar stores in November, and one roll covers roughly 6 feet of garland. The peppermint-striped bows can be made from wire-edge ribbon at $7 per 10 yards — that’s about 10 bows. Flocked greenery is the real expense at $25 to $60 for a good 6-foot piece, so check Marketplace first; people sell full garlands every January. Realistic build: $65 if you shop smart, $180 if you buy everything new.
The turquoise is the whole personality. Everything else is red and white — the bows, the peppermint picks, the candy jars. Remove the turquoise and you have a perfectly nice, completely forgettable garland. If it feels like too much of a leap, test it with a single ribbon loop before committing to the full mesh.
12. Pink and White Gingerbread Tree With Glitter Poinsettias
Two things are doing the work here, and neither is an ornament. First, the frosted branch tips — that pale dusting makes pink ornaments look like they’re sitting on snow instead of floating on green plastic. Second, the mix of finishes: matte felt gingerbread, glitter poinsettias, and smooth baubles all in the same pink family. Monochrome with texture variation is a far more sophisticated move than monochrome with one finish, and it costs nothing extra. The berry picks are the only other color in the tree, and there are maybe five of them.
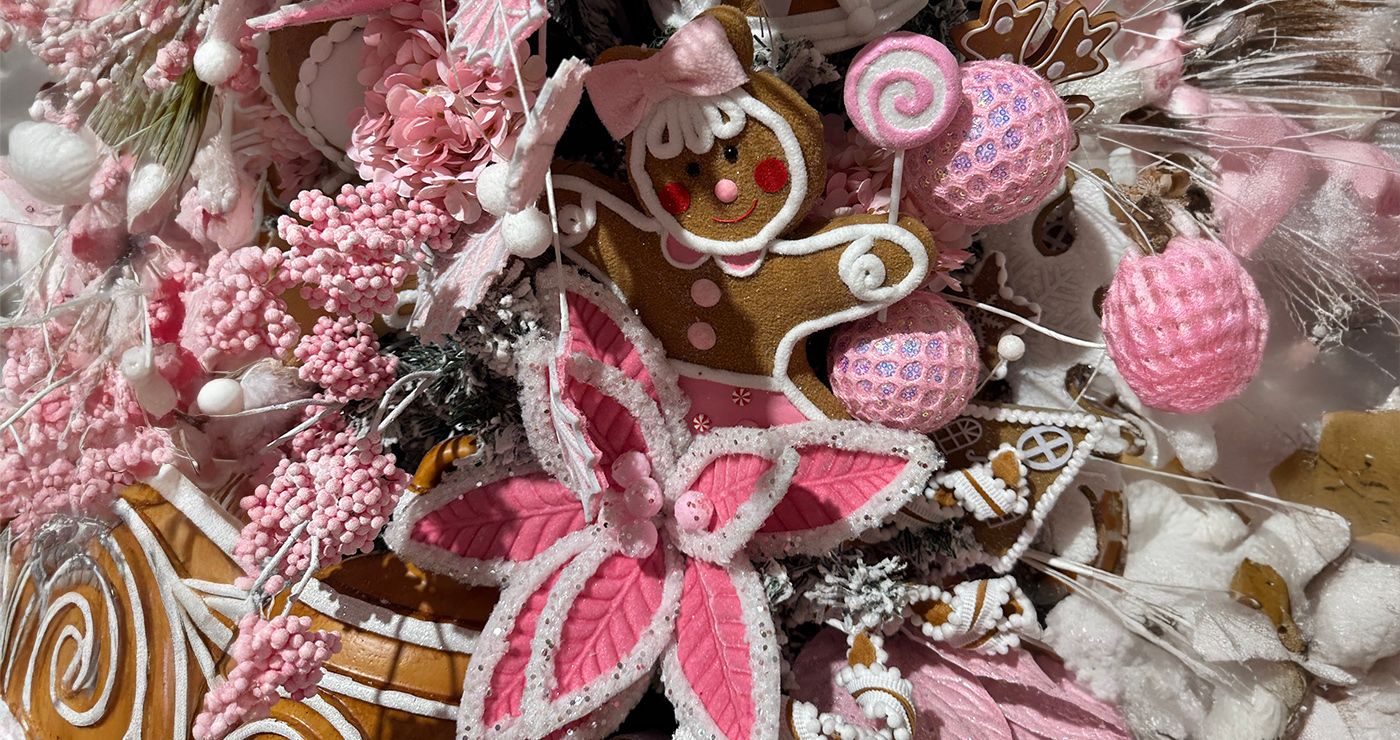
Glitter spreads. A pink glitter poinsettia will leave sparkle on your floor, your hands, and your sofa for the entire season, and the residue sticks to cream upholstery like it’s got a grudge. If your living room is light-colored, shake every glitter ornament outside before it goes on the tree and give it a quick pass with a lint roller. Store these in tissue paper, one per pocket, or the glitter transfers onto everything else in the bin. Think of this as the moodier sibling of Idea #1 — the same candy language, spoken quieter.
13. Ice Cream Cone Ornament With Sprinkles on a Pine Branch
- Start with a plain cone-shaped ornament, plastic or papier-mâché, about 4 inches tall.
- Paint the lower half light green for the waffle cone, then score a diamond pattern with a toothpick while it’s still wet.
- Coat the top two-thirds with white dimensional fabric paint in a swirled motion.
- While the paint is wet, press in tiny clay sprinkles or hole-punched craft foam bits, then cure 24 hours.
- Add a silver hanging cap and loop and hang it where warm string lights catch the texture.
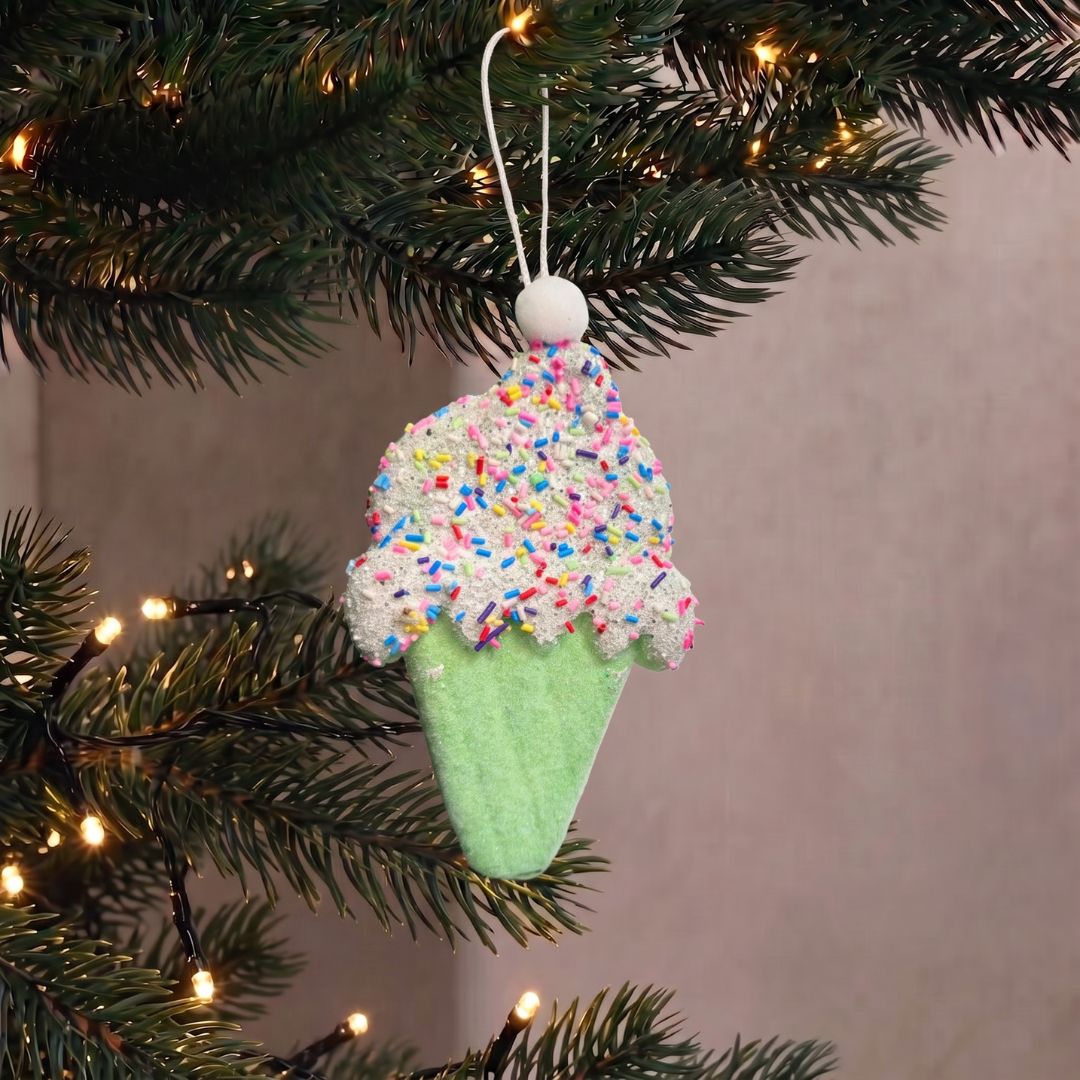
About an hour plus drying time, roughly $5 per ornament.
Novelty ornaments have a size problem most people don’t think about. A 3-inch ice cream cone looks charming on a 6- to 7.5-foot tree and completely lost on a 9-footer, where you need 5- to 6-inch pieces or three times as many of them. On a 24-inch tabletop tree, keep everything under 2.5 inches. As a rule, an ornament should be roughly 1/24th of your tree height to read clearly from across the room.
14. Shiny Pink Glass Candy Ornaments on Silver Loops
Glass candy ornaments with white glitter stripes run $6 to $14 each at boutiques, and about $4 for a three-pack at big-box stores in early December. If glass is out of budget, plastic lookalikes at Target run $10 for six and photograph almost identically once the lights are on. Thrift stores are genuinely underrated for this specific shape — candy-drop ornaments from the 80s and 90s turn up constantly for 50 cents, and the glass is often thicker. Wash anything vintage in lukewarm water with a drop of dish soap and dry immediately so the glitter doesn’t lift.
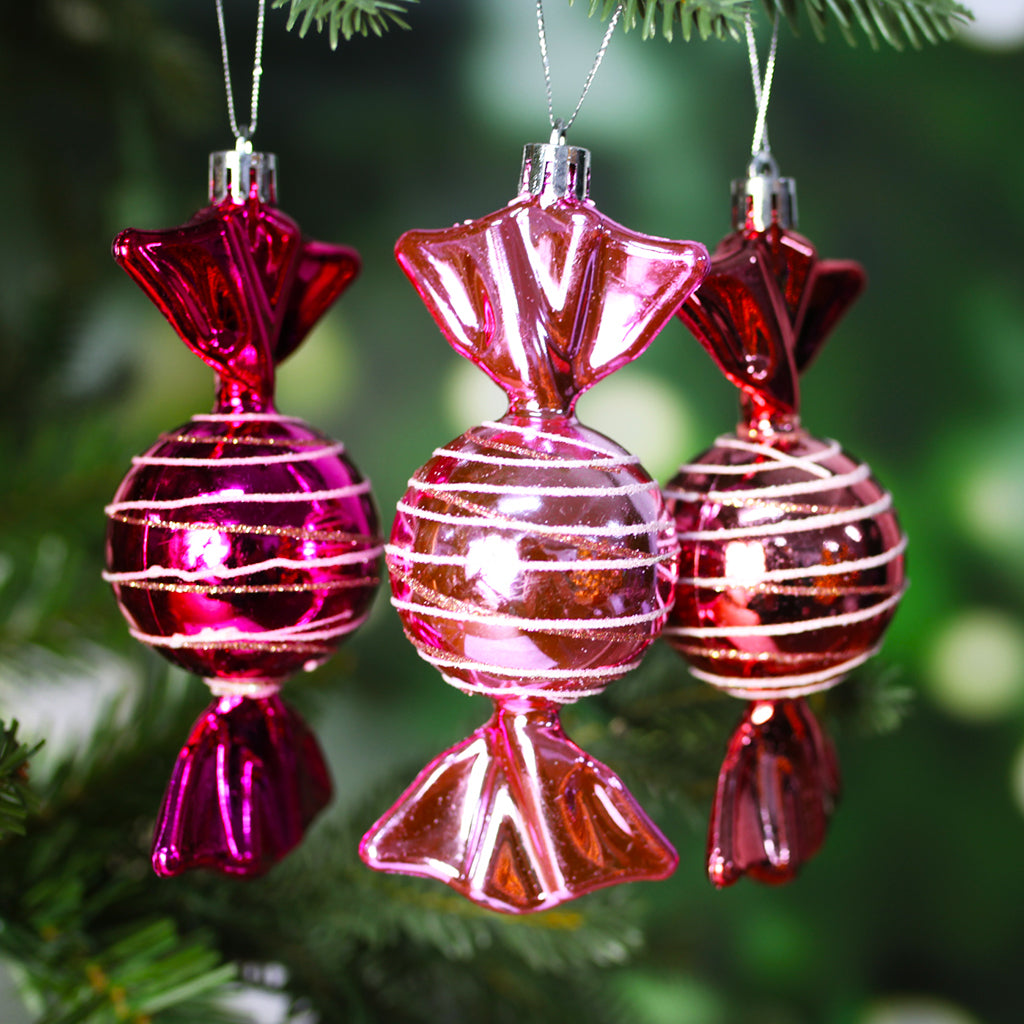
Glass candy ornaments are only worth buying if you hang them where light passes through. That means outer branches, ideally in front of a window or across from a lamp — not tucked against the trunk where they read as solid pink blobs. Cluster them in odd numbers, three or five, spaced about a hand-width apart, so they register as deliberate groupings instead of scattered singles. Always use a metal cap and loop; thin wire hooks scratch the paint around the top of a glass ornament over a season.
Glass plus tile floors plus kids is a math problem you already know the answer to. If your tree sits on hardwood or tile, put a padded tree skirt or an old rug underneath before you hang anything glass, and keep glass pieces above the 4-foot mark. If you love the look and live with a toddler, buy the plastic versions and save the glass for a tabletop display in a room with a door.
15. Gingerbread-Print Wingback Chair With a Peppermint Pillow
The chair itself is the decoration. Everything else in this corner — the tree, the peppermint pillow, the warm lights — exists to support the fact that a piece of furniture is wearing the holiday. Remove the gingerbread-print upholstery and you have a normal light blue chair next to a Christmas tree: comfortable, fine, forgettable. With it, the room commits. If you can’t reupholster, a printed slipcover or a throw draped over the back gets you 70% of the effect for $40.
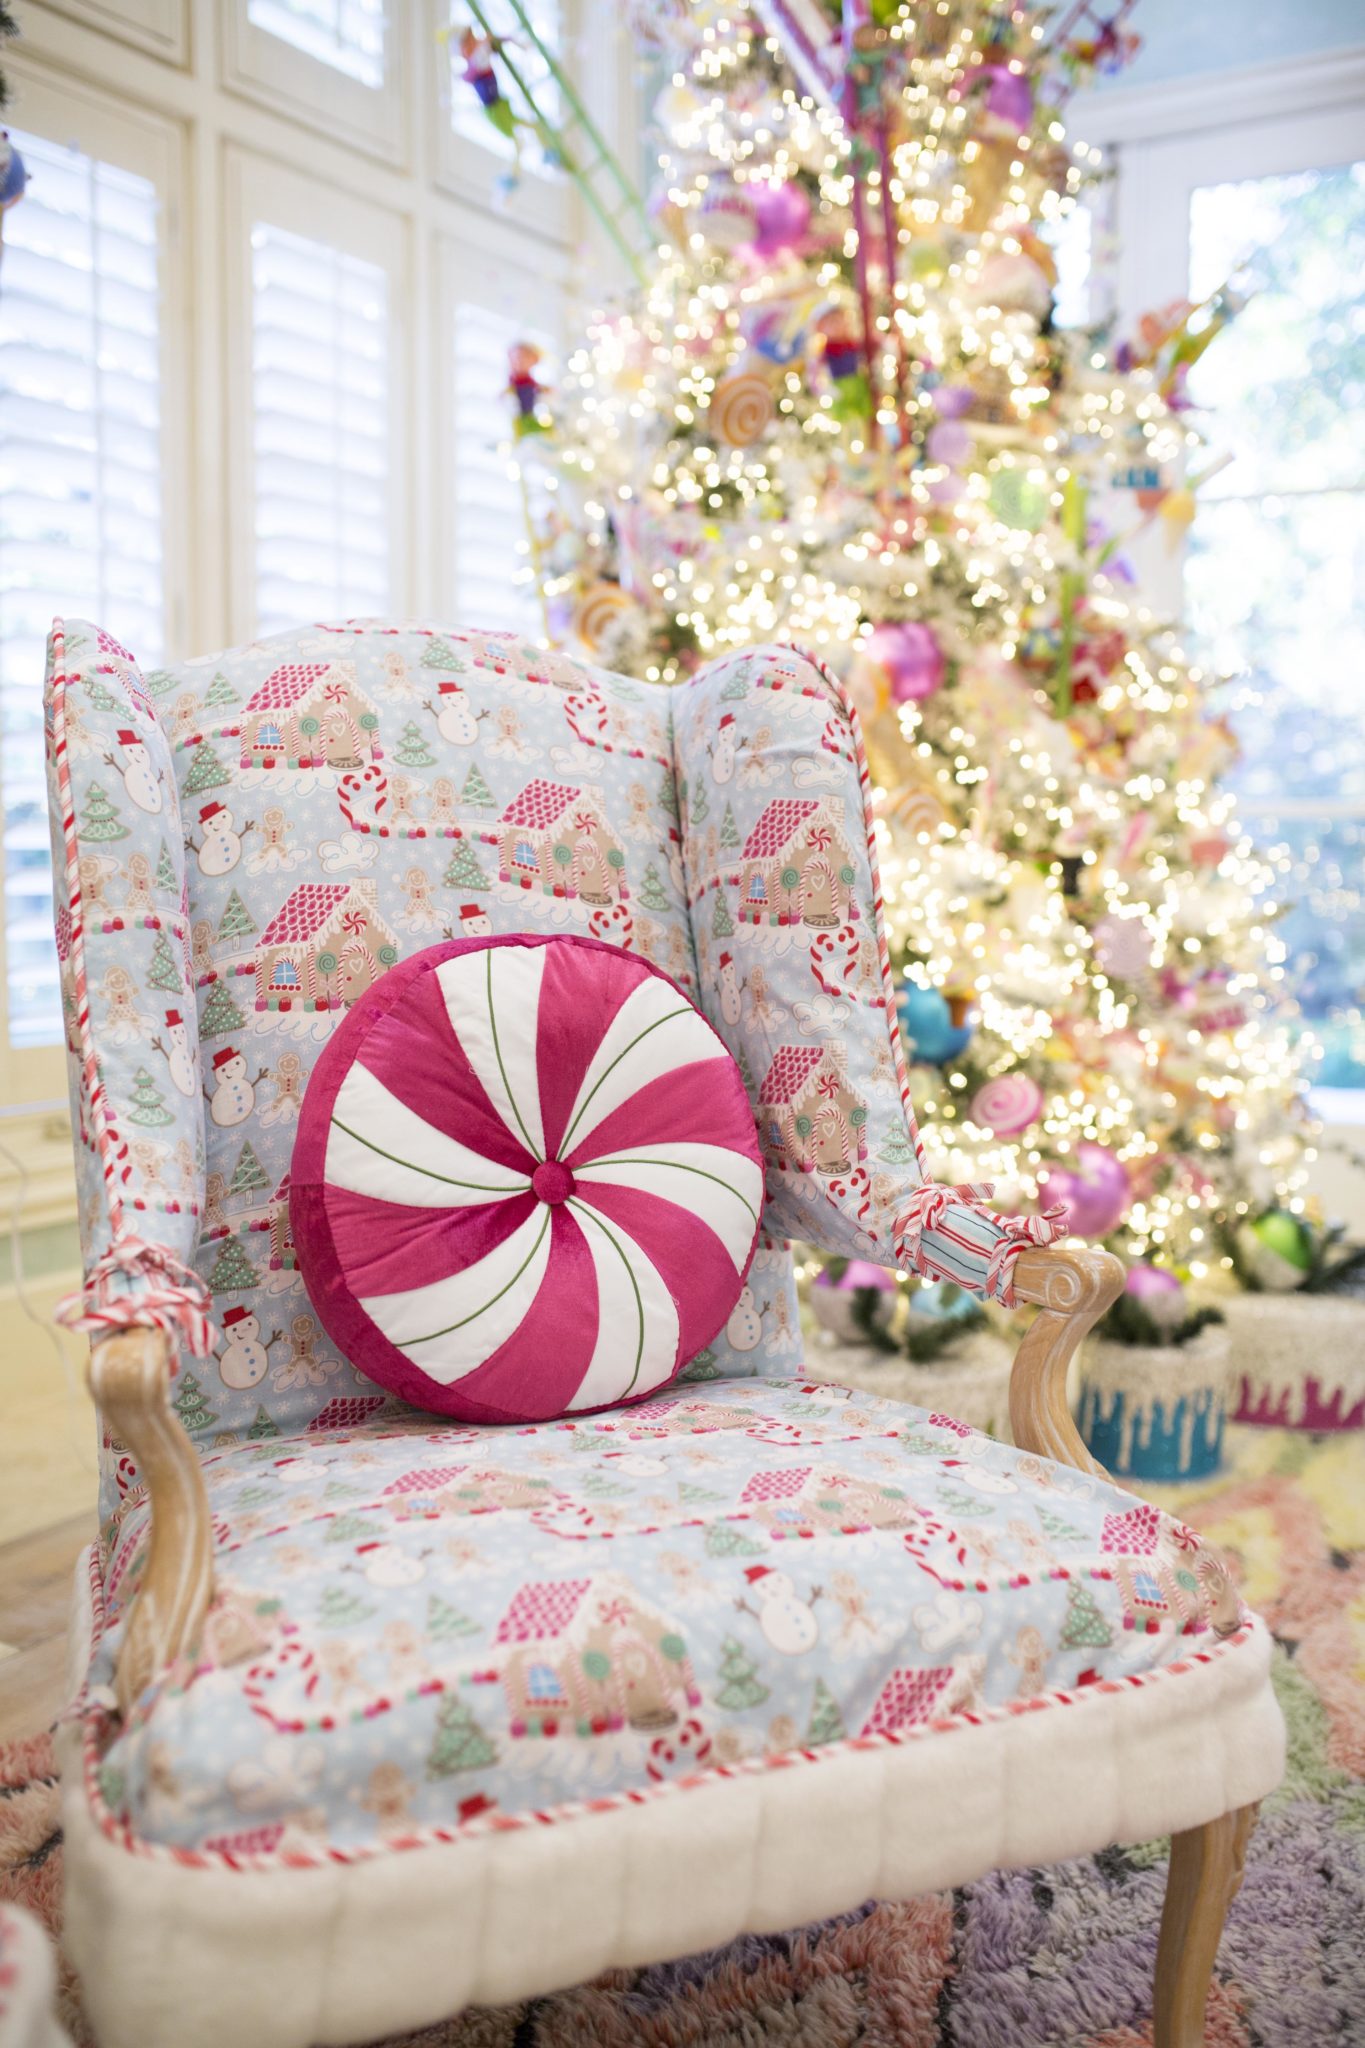
Holiday upholstery is quietly having a moment. Instead of swapping decor every December, people are buying one statement piece — a printed chair, a candy-striped ottoman, a themed accent pillow — and letting it carry the room for six weeks a year. It’s part of the broader shift toward fewer, bigger, more intentional purchases instead of a cart full of small seasonal tchotchkes. The staying power is decent because a gingerbread print is nostalgic without being tied to a specific year. Just keep it to one piece per room.
A wingback needs a real corner. Plan on roughly 32 by 36 inches of floor space, plus 18 inches of clearance in front so you can actually sit without hitting the tree. This setup works in rooms from about 10 by 12 feet and up as long as the ceiling clears 8 feet. In a smaller room, skip the wingback and put the print on a sofa pillow instead.
16. Pink Macaron Tree Topped With a Pastry Mannequin
This is dessert-core, and it’s the direction candy trees have been heading for two seasons. Oversized faux macarons, cake-slice ornaments, and mannequin head toppers styled with pastry are everywhere on Pinterest right now — partly the general maximalist swing, partly the Barbie-pink palette refusing to die. It’s theatrical, it’s built for photos, and it’s not for everyone. The good news is that it has a long tail because it’s really about scale and silhouette, not a licensed character. Compare with Idea #17 — same mannequin-topper idea, completely different energy.
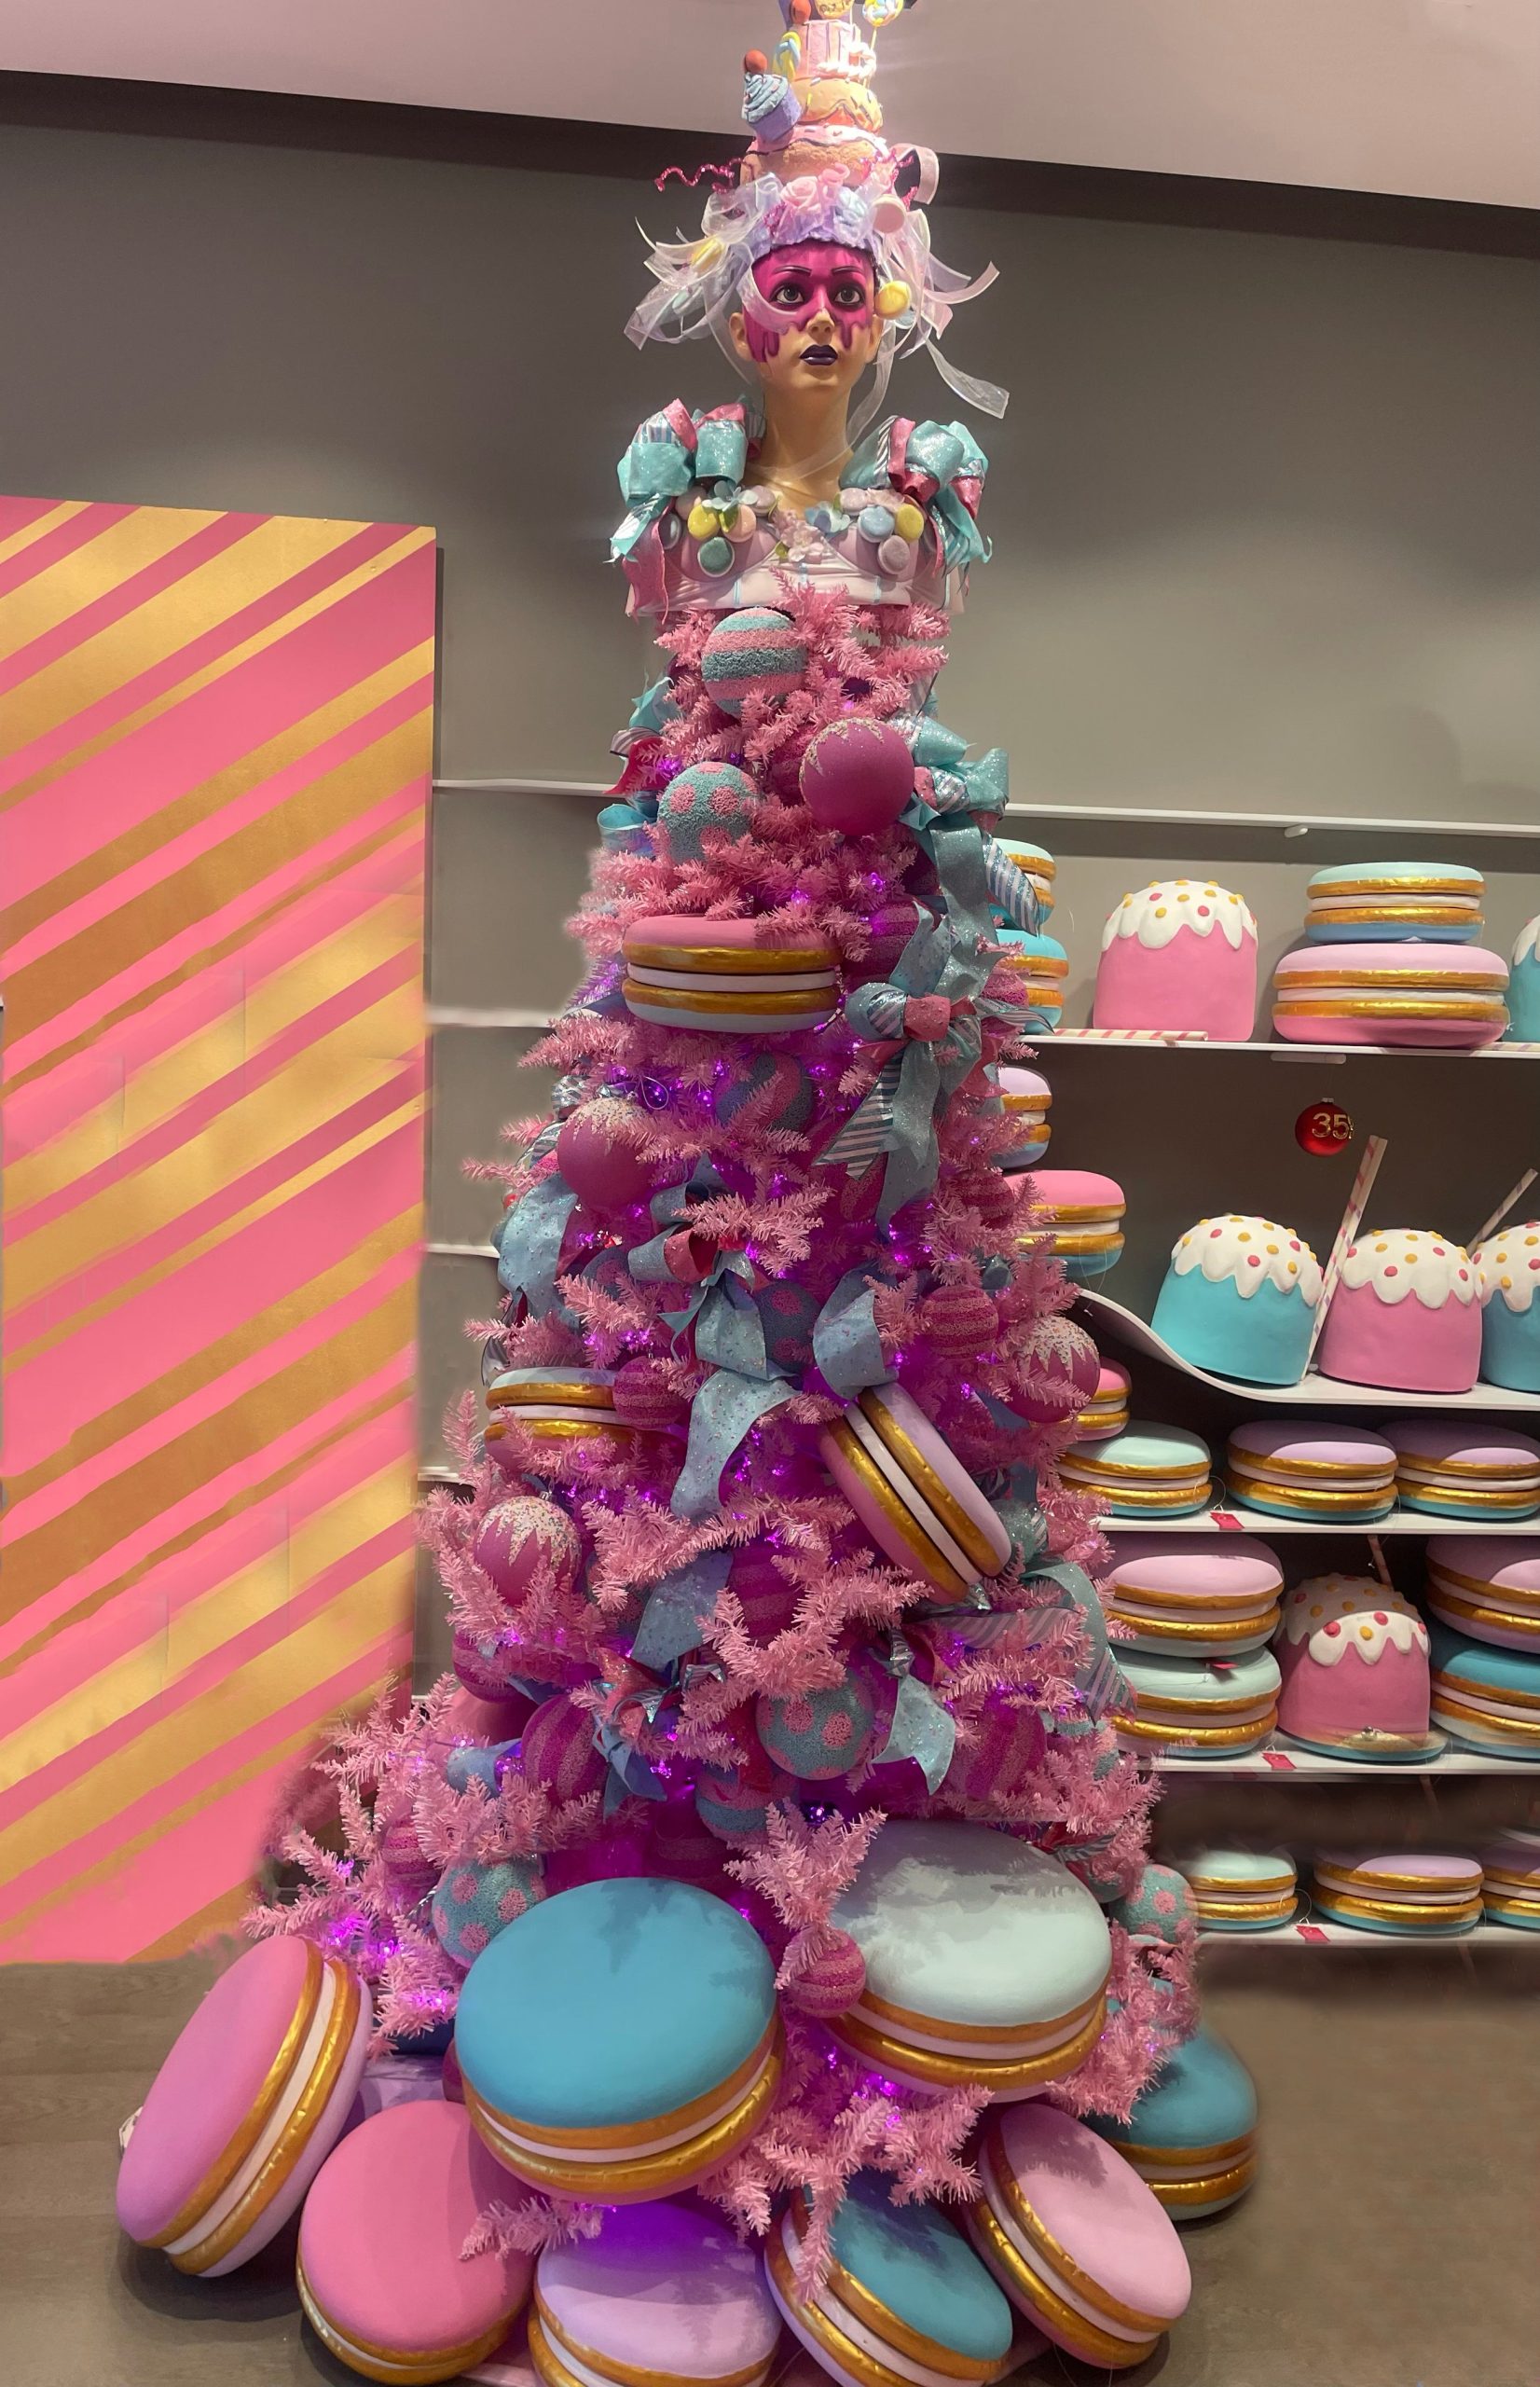
- Pink artificial tree, 6–7 ft: $90–$250
- Lighting, six warm white strands: $30–$70
- Giant macaron ornaments, 12–18 pieces: $120–$360
- Light blue ribbon bows and striped backdrop panel: $40–$110
- Mannequin head topper and pastry headpiece: $60–$200
- Total: $340–$990. Budget alternative: build the macarons from painted foam discs and use a $25 styrofoam mannequin head from a craft store — under $150 for the whole topper story.
Everything here is one color with three accents, and the scale contrast is enormous. The macarons are four to five times the size of a normal ornament, which is what makes the tree read as a sculpture instead of a decorated tree. Pink does 70% of the work, light blue ribbon keeps it from going sticky-sweet, and gold gives the eye a metallic place to rest.
17. Red Feather Tree With a Pink Mannequin Topper
Feather trees shed like a parrot in July. Those dyed goose feathers drop constantly, they hold dust, and they’re flammable — keep this one well away from a fireplace, a space heater, or a real candle. They also can’t hold heavy ornaments: a 6-ounce resin candy will bend the wire arms permanently. Stick to lightweight ornaments under 3 ounces and consider a battery strand rather than a corded one, since hiding a cord in a feather tree is basically impossible. Store it in a breathable bag, not plastic, or the feathers will mat down.
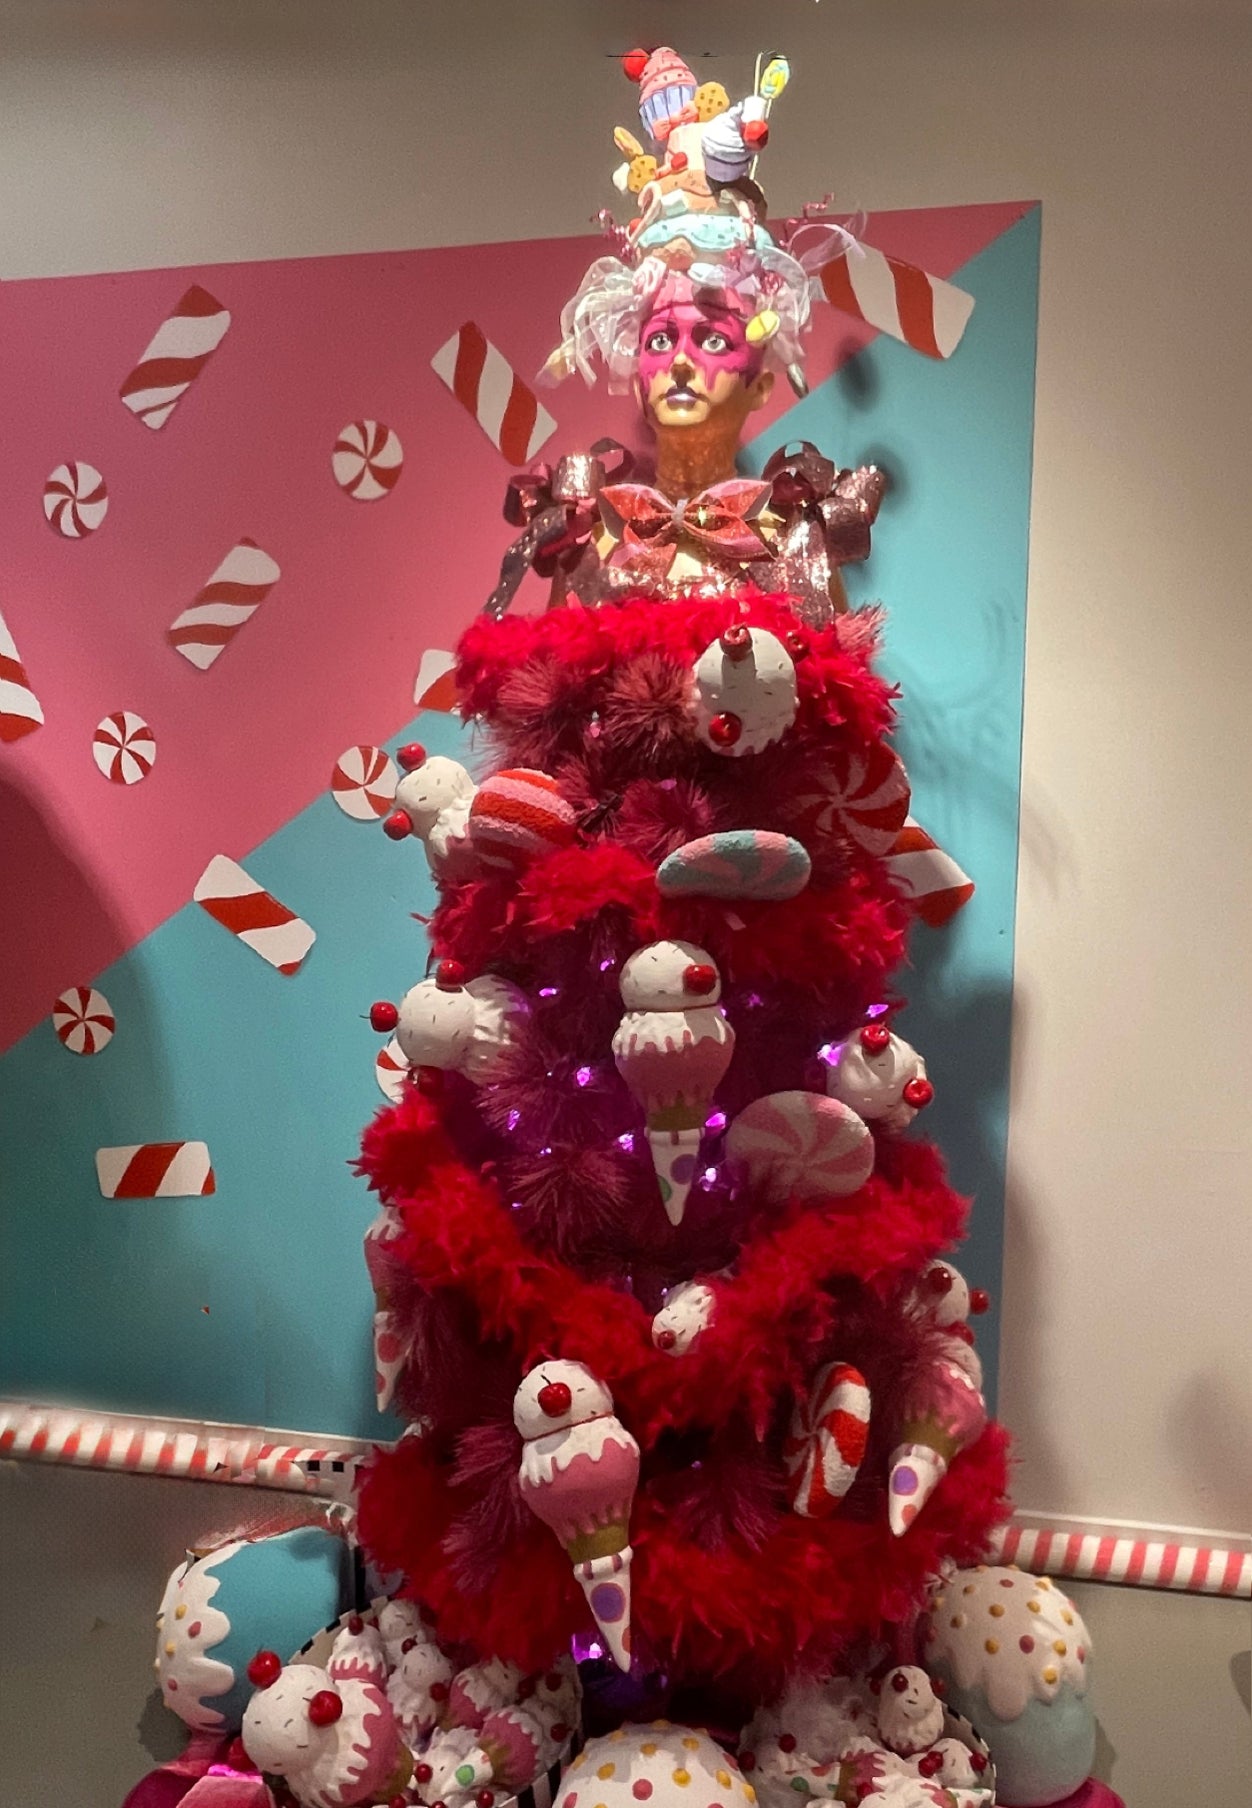
The mannequin topper is everything. Without it, this is a red feather tree with candy ornaments — charming, a little retro, and completely within the range of what everyone else is doing. The pink-painted mannequin head with a pastry crown turns the whole thing into set design, the difference between a Christmas tree and a Christmas installation. If you want to try it more gently, a candy-striped crown on a small dress form gets the same theatrical note for a fraction of the commitment.
18. Ceramic Gingerbread House Against an Exposed Brick Wall
Handcrafted ceramic gingerbread houses run $60 to $180, which is a lot for a tabletop object. Dollar stores and Target’s dollar section carry ceramic and resin houses for $5 to $12 every November, and in a lit vignette the difference is mostly weight. Thrift stores are the sleeper move: ceramic holiday houses flood in right after New Year for $1 to $3, and older ones often have better hand-painted detail. Buy in January, store them in a padded bin, and you’ll have eight houses for under $25 by next December.
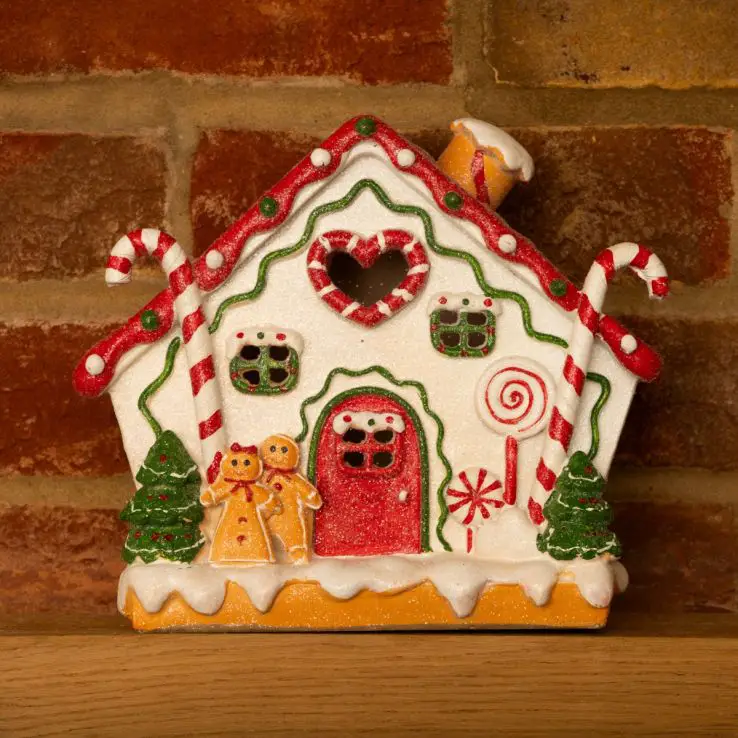
Brick is the reason this styling works — rough, warm texture behind a glossy glaze does more than any trick. If you have a painted wall instead, create that contrast deliberately: put something matte and natural-textured behind the house, like a linen runner, a raw wood board, or a chunky knit. Then follow the rule of three heights — one tall piece, one medium, one low, spaced 3 to 5 inches apart so each one reads separately.
19. A Glass Candyland Ornament With Four Gingerbread Figures
- Choose a 24-inch tabletop tree or a small decorative stand for the shelf.
- Hang the keepsake ornament dead center at eye level — about 40 inches from the floor.
- Add two plain ornaments in the same palette behind it so the keepsake has context.
- Light it from the front with a small warm LED so the glittery background catches.
- Leave it up all season and pack it in its original box, not a bin.
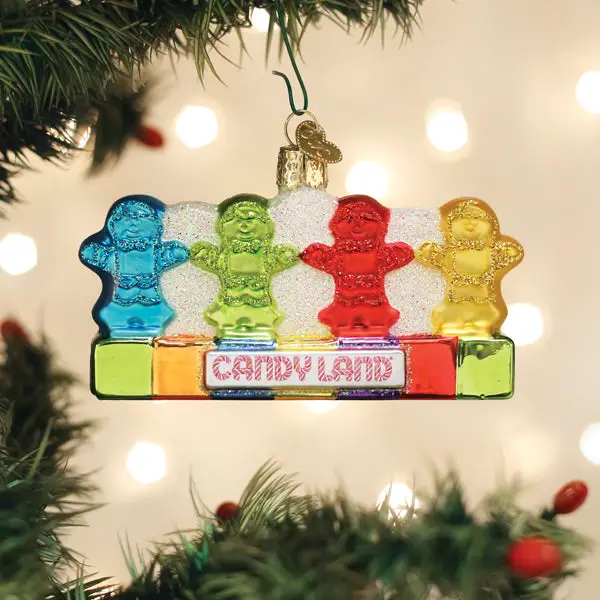
Fifteen minutes and roughly $20 if you need the mini tree. Nostalgia pieces look best when they’re clearly the point rather than one of thirty ornaments competing for attention.
Glitter-inside ornaments are deceptive. The loose glitter migrates through the top hole over time and ends up on your hands every time you touch the cap, so handle it by the wire loop only. Painted glass figures are usually hand-finished, and the paint chips if it rubs against a branch, so hang this one with clear space around it. If it’s genuinely sentimental, photograph it now — you’ll be glad you have the picture regardless.
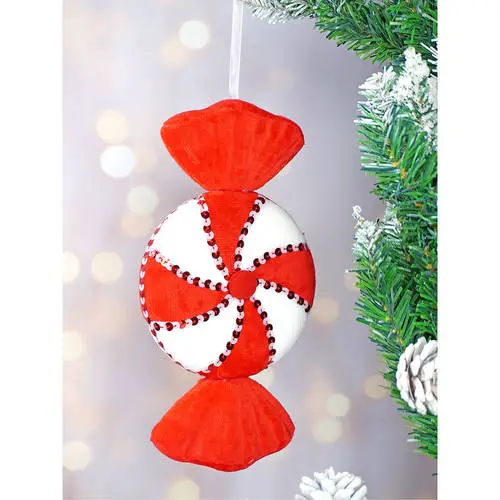
20. Sequined Peppermint Candy Ornament With Pleated Ends
Sequins are the divas of the ornament bin. They snag on pine needles, they catch on each other, and they’ll pull threads off a knit stocking if they share a box. Store each sequined candy in its own tissue pocket or paper bag, never loose. Sequin trim also dulls — a decade of Decembers turns bright silver into a soft pewter, which honestly looks fine on a vintage-themed tree. The pleated wrapper ends are usually a stiffer fabric and hold their crease well as long as you don’t crush them under heavier ornaments.
- Check the hanging loop and cap — sequined pieces often have a weak paper loop that fails at year three.
- Weigh it against your branch; anything over 4 ounces needs an outer, reinforced branch.
- Count how many of these you already own before buying more — sequined candy multiplies fast.
- Decide on one color cap for the tree; red, green, and silver sequins all at once is a lot.
21. Snowman Centerpiece With Swirled Lollipops and Marshmallows
- Line a red patterned container with a foam block cut to fit snugly.
- Push frosted pine branches into the foam in a fan shape, taller at the back, spilling slightly over the front edge.
- Set the plush snowman in the front third, slightly off-center, and pull two branches behind his shoulders.
- Cluster three red-and-white lollipop picks on the left, staggered in height by 2 to 3 inches.
- Finish with sequined candy cane picks and faux marshmallow stems, then step back and add one more lollipop.
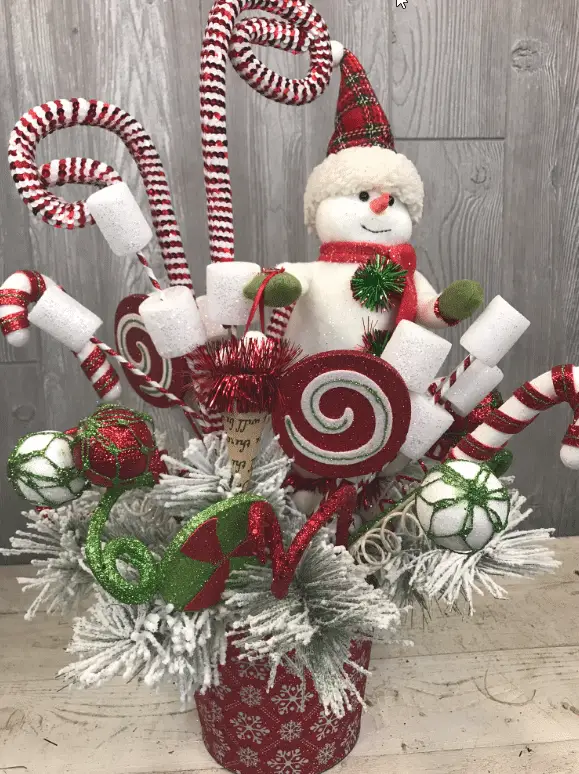
About 30 minutes and $35 in materials if you buy everything new.
- Container and foam block: $8–$20
- Frosted pine branch bundle: $12–$35
- Plush snowman figure: $10–$30
- Candy picks, lollipops, marshmallow stems: $18–$45
- Total: $48–$130. Budget alternative: dollar-store picks and a thrifted snowman bring this in under $25, and nobody at the table will know.
50% red and white (container, lollipops, candy canes, plush figure) + 30% frosted green (pine branches) + 20% silver sparkle. The green is what keeps this reading Christmas instead of Valentine’s Day — red and white alone skews sweet in a way that gets old by mid-December. It’s the tabletop answer to Idea #26, and it’s the version you can pull off in a single afternoon.
22. Peppermint Disc Ornament With a Striped Ribbon Bow
Not every ornament needs to be a statement. A 2.5- to 3-inch peppermint disc is the ideal filler for a 7.5-foot tree — big enough to read, small enough to hang sixty of without a visual traffic jam. On a 9-foot tree, go up to 3.5 or 4 inches. Frosted branch tips are what make these pop; on a plain green tree, the white swirls disappear into the needles. If your tree is unfrosted, add a layer of white picks or flocking spray first to create that contrast.
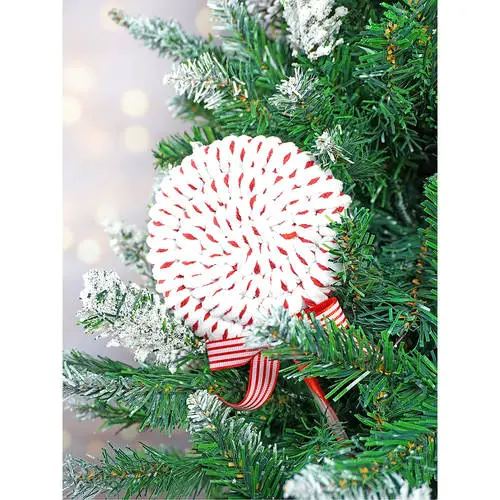
Peppermint ornaments are the single easiest DIY in the entire candy theme. Polymer clay in white and red, rolled into a log and sliced, gives you authentic swirl discs for about 60 cents each — a $12 block makes twenty. Bake, cool, add a ribbon loop. If clay isn’t your thing, unfinished wood discs from a craft store cost 40 cents each; paint a swirl with a fine brush, seal with one coat of matte varnish, and tie on a striped ribbon. Twenty ornaments for under $15, and they look handmade in the good way.
23. Striped Candy Ornament With Textured White Ends
Wrapped-candy ornaments have quietly become one of the most copied holiday shapes of the last few years. They’re simple enough to read from across a room, they photograph beautifully against bokeh, and they work in literally any palette because the shape carries the meaning. The retro quality is the point — the silhouette is basically a candy shop sign from the 1950s, and the vintage-inspired Christmas look pulled it back into circulation. Staying power: high. Unlike a character ornament, a striped wrapper never dates.
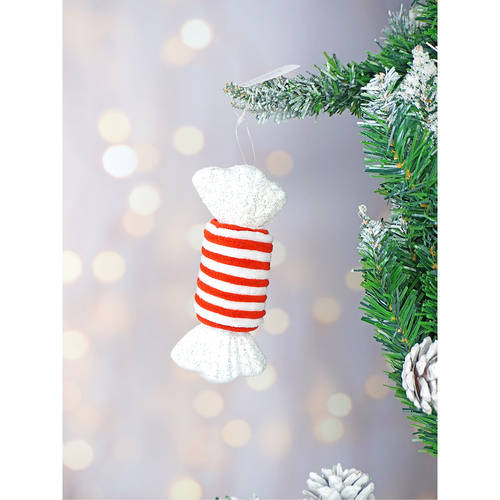
The classic red, white, and green triad works because the three colors have different jobs. Green is the background, red is the accent, white is the breathing room — without that white, the red would overpower everything. Repetition matters too: forty of these on a tree with nothing else reads as deliberate and confident. The trick to keeping classic from becoming boring is variation, same shape and palette but different textures on the white ends.
24. Gingerbread House Styled With a Buffalo Check Bow
Buffalo check is a wildly forgiving pattern, which is why it’s cheap to fake. A roll of red-and-white buffalo check ribbon from Walmart is about $4 for 10 yards, and one big bow uses roughly a yard. The gingerbread house is the spend: ceramic versions run $40 to $120, resin lookalikes run $8 to $18, and thrift shops are full of them every January. Nestle yours in frosted pine cut from a $6 garland. Total realistic build: $22 if you shop the house secondhand.
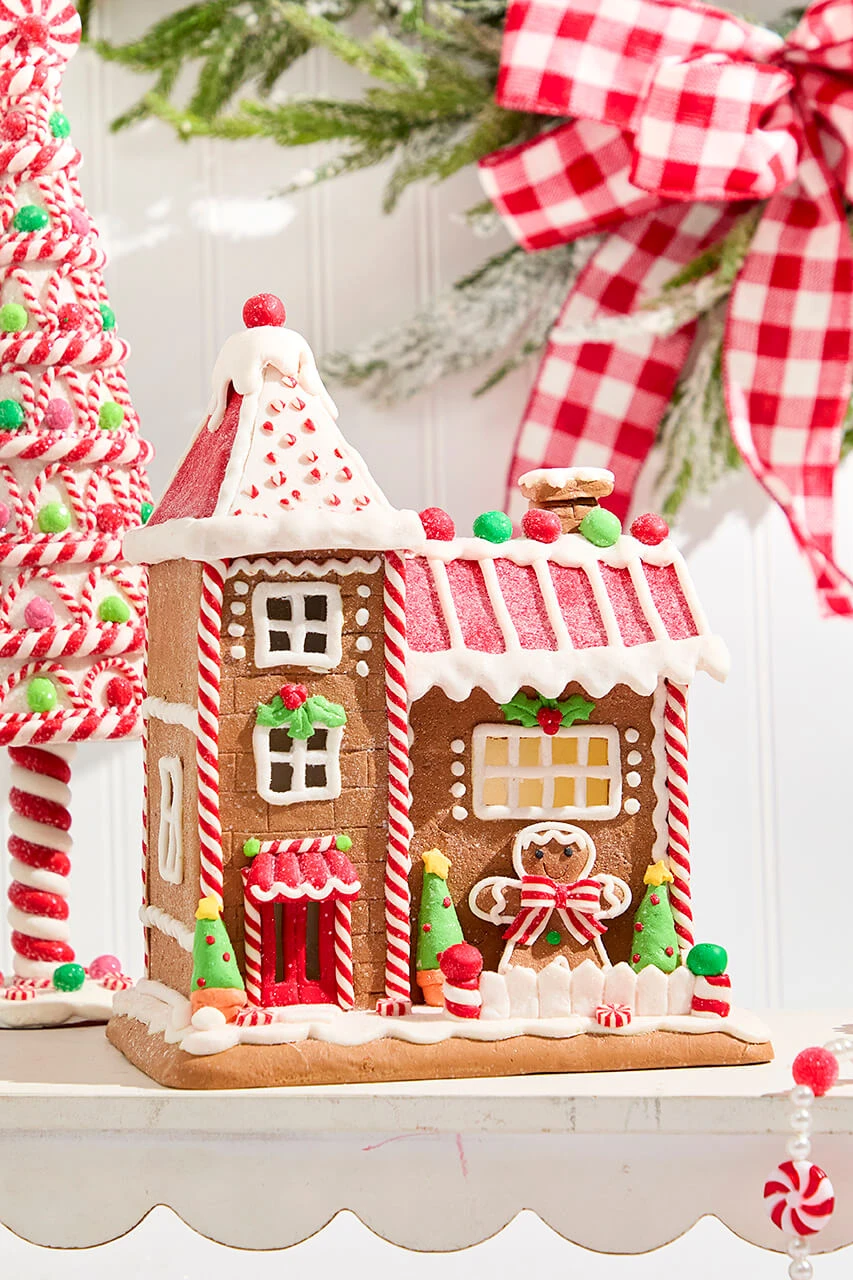
The oversized buffalo check bow is what keeps this from being another gingerbread house on a shelf. It adds scale — the bow is nearly as big as the house — and it introduces a pattern the house doesn’t have. Remove it and you have a pleasant cottage figurine; with it, you have a styled moment that photographs like a magazine page. Swap the check for wide solid red satin and the whole thing goes formal; swap it for gingham and it goes picnic. The bow is the personality.
25. Pink Lamppost and Mint Mailbox for a Candy Village Vignette
These frosted candy-village pieces started life as yard stakes, but indoors they want a table with presence. Budget 36 to 48 inches of width and a surface at least 16 inches deep — a narrow console won’t hold the lamppost without tipping. Set them at staggered heights, roughly 20 and 14 inches, and keep the pastel tree in the background at arm’s length so all three pieces read as one scene. In a hallway under 4 feet wide, use only the mailbox.
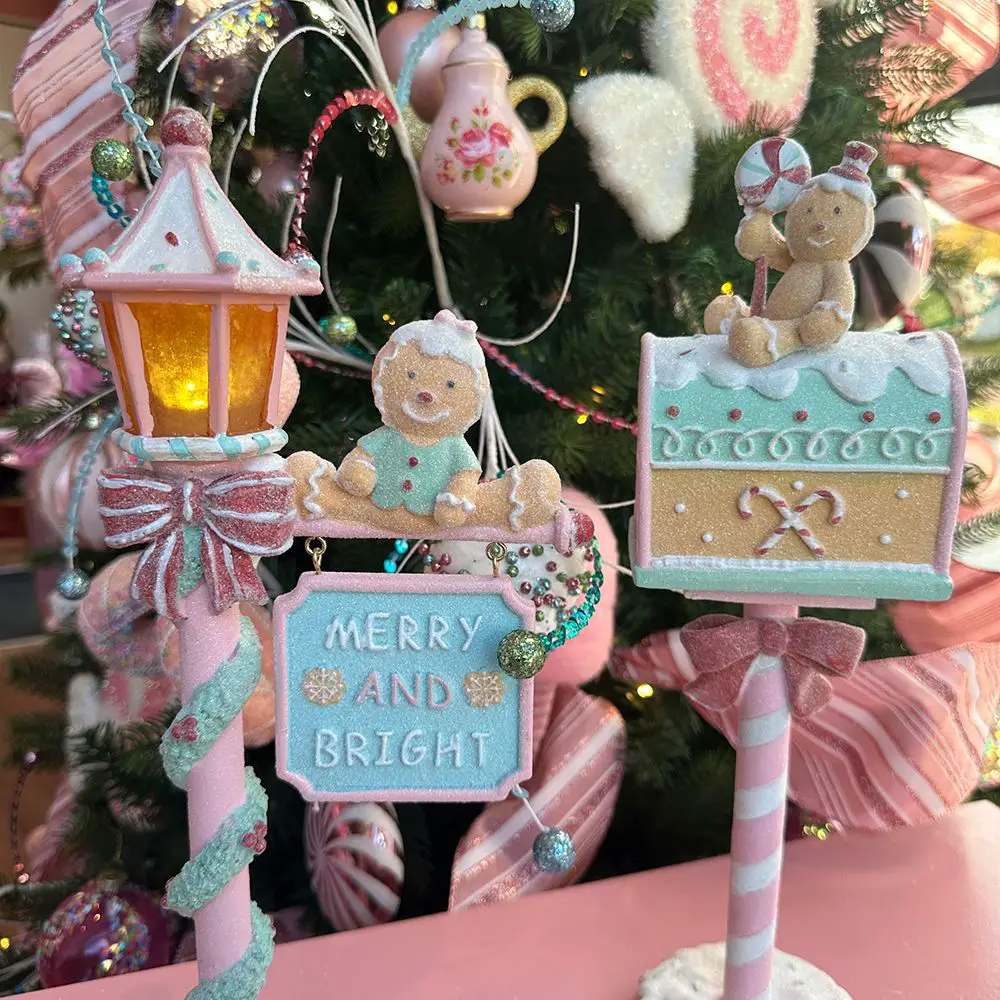
The lamppost has a bulb in it and most people never plug it in. That tiny warm glow is the entire reason the piece reads as a village street instead of a figurine. If you can’t reach an outlet, a battery pack tucked behind hides easily and runs all season. Also keep the mint and pink pieces close together but never touching — a two-inch gap lets each silhouette stay legible, and that gap is the difference between a display and a clump.
about frosted yard-stake decor used indoors: the finish chips. That sugar-crust texture is a painted coating over resin or metal, and it flakes anywhere the piece knocks against something, which is guaranteed in a storage bin. Wrap each piece in bubble wrap and keep the original box if you have it. Many of these are designed to be staked into soil, so indoors they need a weighted holder or museum putty underneath. And yes, they’re a strong look — if your house is quiet and neutral, start with the mailbox.
26. Candy Land Dining Room With a Peppermint Tablecloth
- Red and white striped tablecloth and runner: $25–$70
- Gold frame or arch plus tinsel garland: $60–$200
- Paper peppermint medallions, 12–20: $12–$30
- Balloon garland kit in red, green, and pink: $20–$45
- Tabletop gingerbread houses and candy dishes: $35–$90
- Total: $152–$435. Budget alternative: skip the arch entirely and drape tinsel across the wall in a wide swag — cuts $150 and keeps the candy-cane stripe as the hero.
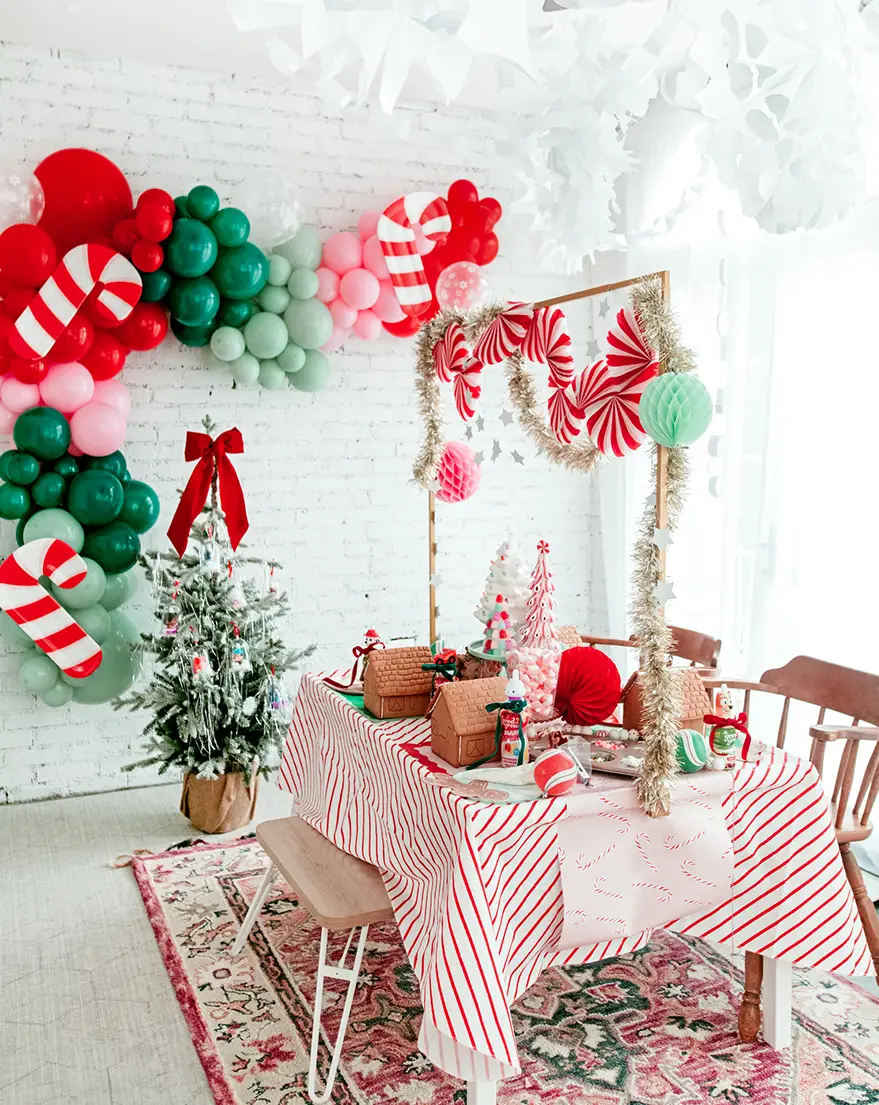
- Set the striped cloth first and iron it — wrinkles ruin the whole illusion.
- Anchor the arch or frame behind the table, centered, and weave tinsel through it loosely.
- Clip paper peppermints to the frame at uneven intervals rather than evenly.
- Build the balloon garland on the wall 18 to 24 inches above the table, using painter’s tape so you don’t wreck the paint.
- Finish the tabletop with mini gingerbread houses and a low bowl of candy — nothing tall enough to block conversation.
Two hours with a helper. Now the honest part: a striped tablecloth at a holiday dinner is a gravy magnet. Pre-treat every stain the same night with cold water and dish soap, and avoid hot water on red dye or it sets permanently. Balloon garlands deflate in a warm room within about three days, so build them the morning of the party, not the week before.
27. Glittering Pink Cupcake Ornaments With Red Bead Caps
Cupcake ornaments work best in trios, not singles. Hang three within about a 10-inch span at slightly different depths — one pressed back, one mid-branch, one outermost — so they read as a little bakery cluster, and vary the height by 2 to 3 inches between them. Always hang them near warm string lights; sprinkles and glitter frosting go dull on a dark stretch of branch. On a large tree, place these clusters at eye level where guests will actually notice them.
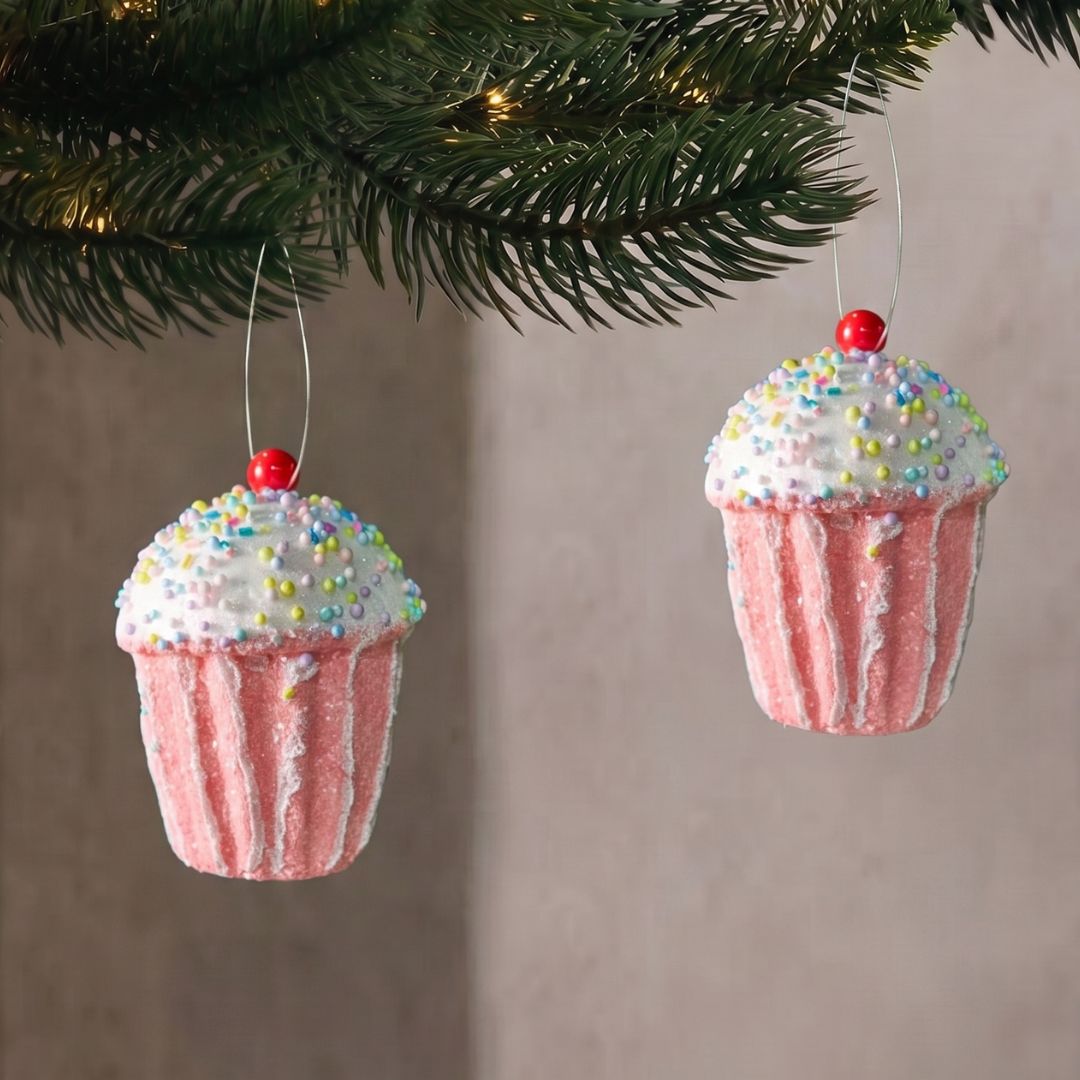
A dozen clay cupcake ornaments from a boutique will run $60 to $120. Target’s ornament aisle has lookalikes for $12 for six every November, and they’re nearly indistinguishable on a lit tree. To DIY, a pack of styrofoam mini cupcake bases is about $8, pink acrylic paint is $2, and white puffy paint for the frosting is $3 — roughly forty cents per ornament. Add a red bead on the loop and you’ve matched the photo. Pair these with the ice cream cone in Idea #13 for a full dessert branch.
28. Train Snow Globe With a Tiny Tree and Red Bow
The train shape is what makes this snow globe worth owning. A round globe with a tree inside is a snow globe; a locomotive with a tree in the dome is a scene, and scenes get talked about. Remove the train chassis and you’d never notice this piece in a display. The wheels are the detail that sells it — actual miniature locomotive wheels, painted black, sitting on a shelf like it parked there. Look for globes with a real object base instead of a plain resin disc; that’s the tell.
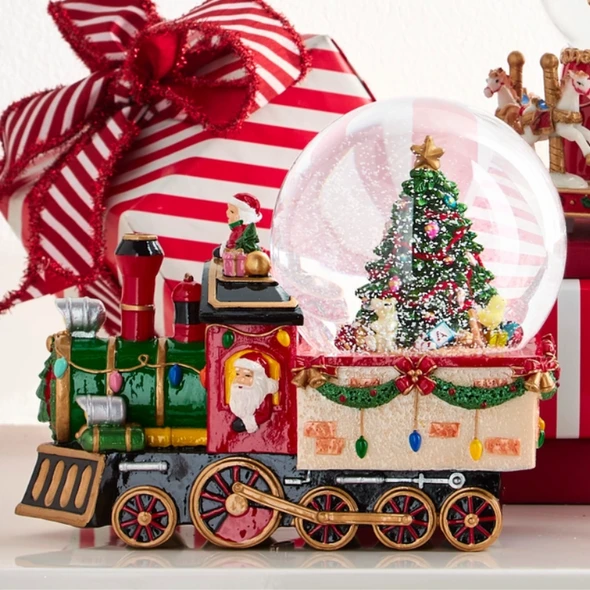
- Train snow globe, mid-size: $35–$120
- Vintage-style gift wrap and oversized bow: $12–$30
- Small flocked tree or garland sprig: $15–$40
- Warm LED accent light: $10–$25
- Total: $72–$215. Budget alternative: gift shops discount snow globes hard in early January — buy next year’s display for $10 to $20.
29. Candy-Embroidered Napkin With a Jeweled Mini Tree Ring
50% white and cream (embroidery, mat, napkin) + 30% soft pink and gray (plates, runner) + 20% candy brights (red, blue, and gold accents on the napkin and cutlery). Proportions matter: once the candy colors take more than about a fifth of the place setting, the table moves from whimsical to chaotic and the food stops being the star. Swap the pink plates for white and the table goes crisp and modern; swap the gray layer for mint and it goes full pastel.
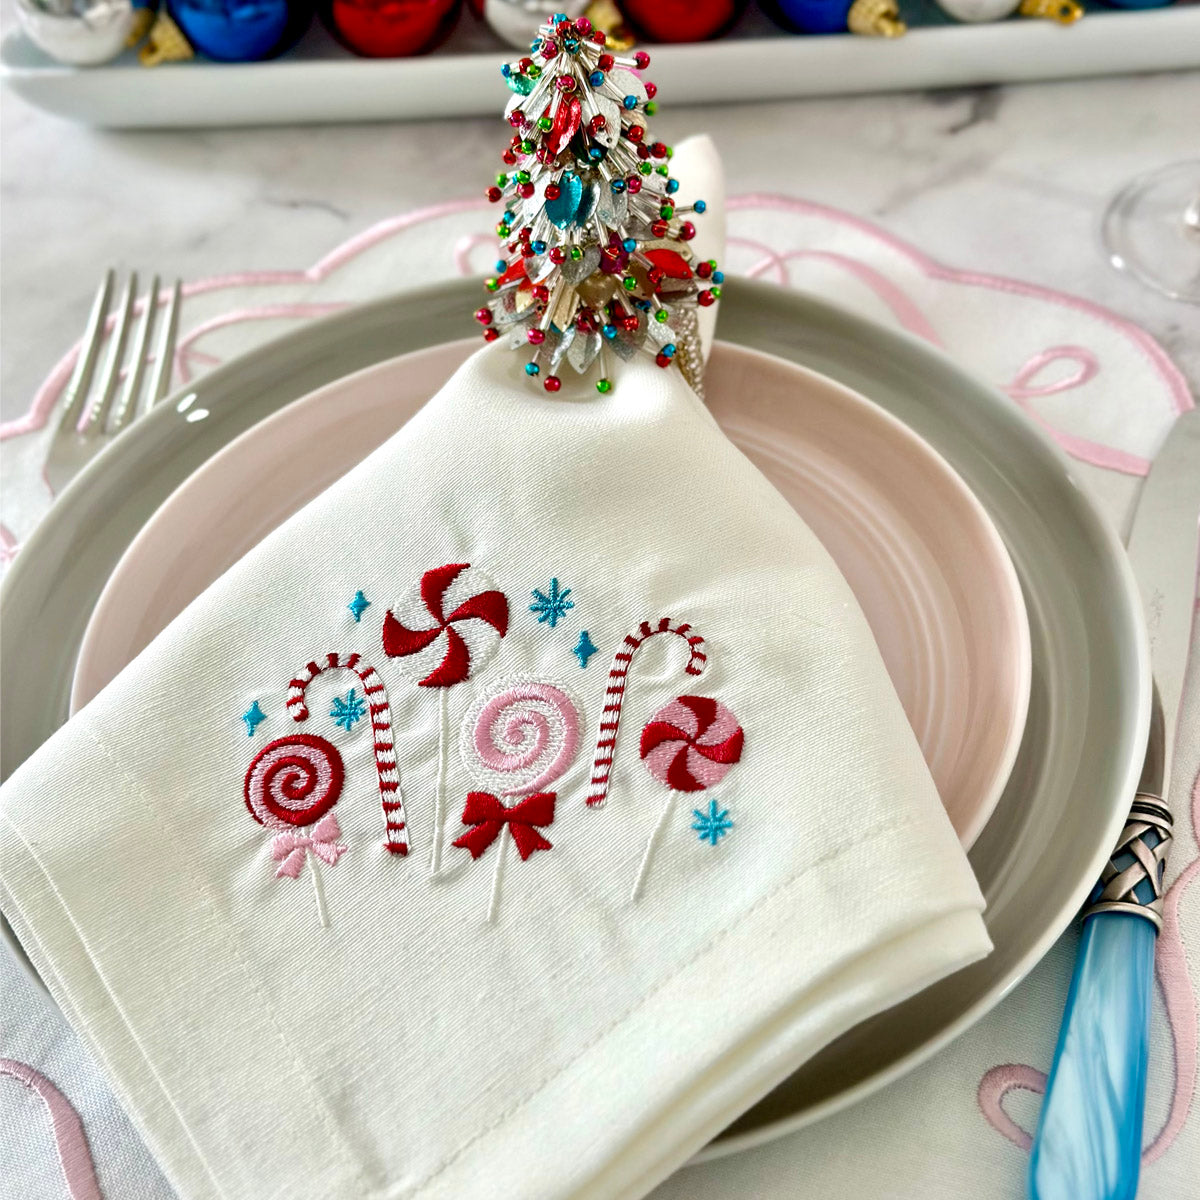
Place settings are all about the layer stack. Start with a 13- to 14-inch charger or woven mat, then a 10.5-inch dinner plate, then an 8-inch accent plate, then the folded napkin. Anything wider than 15 inches and you’re crowding the cutlery and elbows. If your table is narrower than 36 inches, skip the charger and use a runner. This setting works on tables 30 inches wide and up, and it’s the one place in a candy theme where restraint reads as luxury.
The napkin ring is the cheapest upgrade in this entire article. A jeweled mini tree ring costs $4 to $8 and does the same job as a $40 charger. Fold the napkin in thirds so the embroidery faces outward and sits flat, then slide the ring about two-thirds of the way down — not at the exact center, where it looks like a school project. If you’re setting eight places, buy ten rings. Two always disappear.
30. Glitter Peppermint Lollipop Ornament With a Red Ribbon
- Check the stick — lollipop ornaments break at the base of the stick, not the disc.
- Confirm the ornament weight against your branch strength before hanging anything heavy up high.
- Decide how many glitter pieces your tree can handle; more than about 15 turns the whole tree sparkly.
- Have tissue paper and a divided bin ready before the ornaments come down in January.
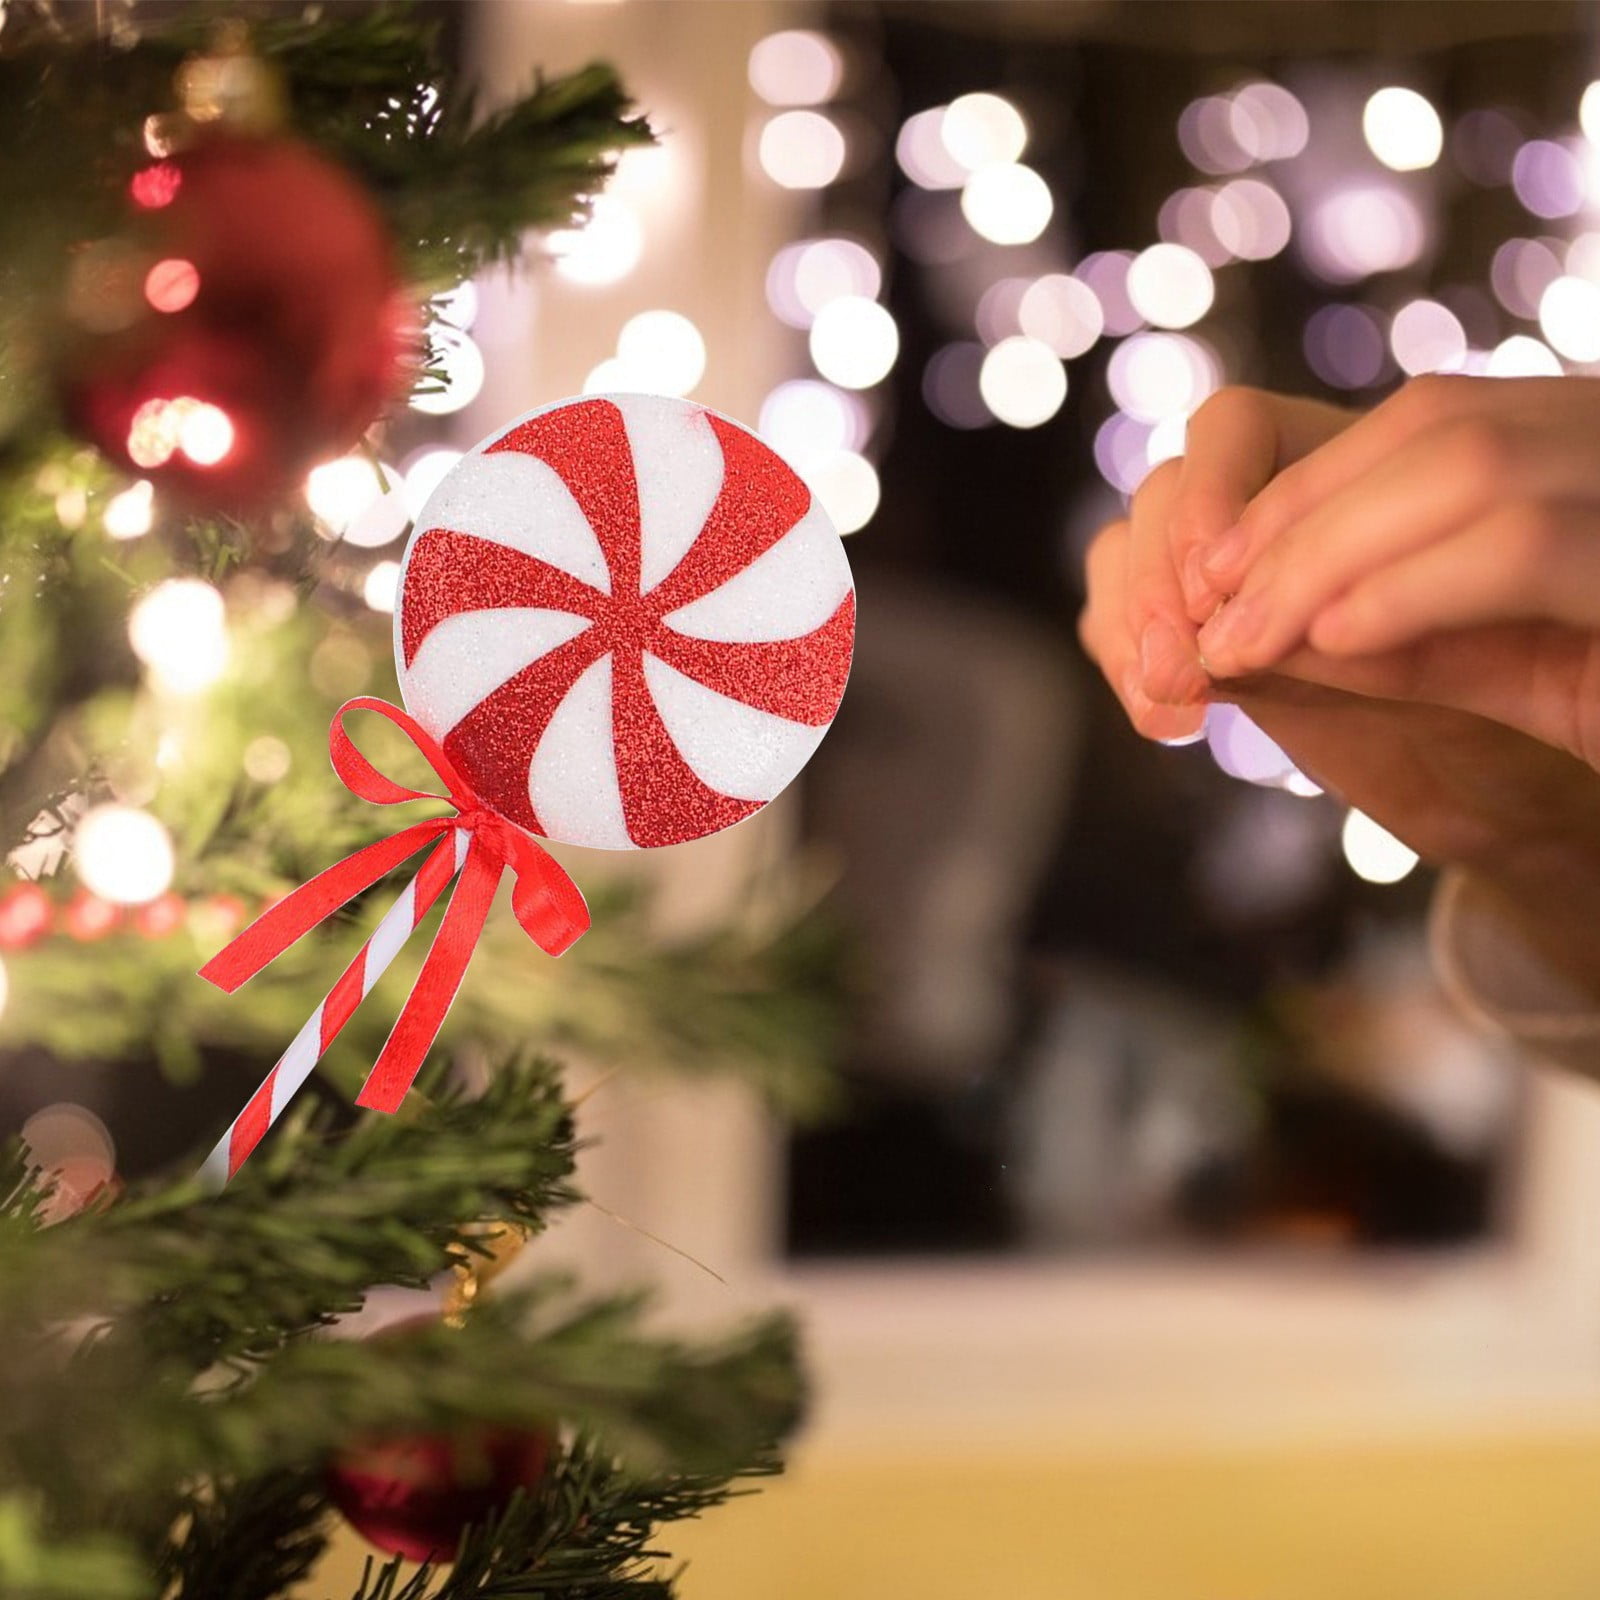
Glitter ornaments lose about 10% of their sparkle every season, and by year five a cheap one looks dusty rather than shiny. A quick pass with a dry, soft makeup brush restores some of it and clears the dust that dulls the effect. The red ribbon bow is the first thing to go — it fades toward pink under direct sun, so keep this one away from a south-facing window. If the stick bends, don’t force it: warm it gently with a hair dryer on low and hold it in place while it cools.
Your Candy Land Christmas Starts With One Branch
You don’t have to commit to the whole pastel fantasy in one weekend. Hang three oversized lollipops on the outer branch you see first when you walk in, plug in warm white lights, and live with it for a week — that’s honestly how most of the designers behind these trees started. When you’re ready for more, every idea above scales up in whatever direction your budget allows.
📌 Save this to Pinterest before you shop, and if you make one thing this year, make the felt candy cane.