
Still scrolling past buffalo plaid blocks and driftwood trees at 11 p.m., wondering which Christmas 2×4 wood crafts are actually worth your Saturday? We spent serious time browsing Hobby Lobby, Walmart, and Amazon — plus a few hardware-aisle detours — to bring you only what’s worth your attention, from $6 craft blocks to $140 statement trees.
Inside you’ll find 30 curated ideas, from rustic farmhouse block sets and folk-art painted ornaments to minimalist Scandinavian triangle trees. Budget and luxury versions are compared side by side, so you can scale any project to your garage setup.
In 2026 the 2×4 craft revival is being driven by scrappy-holiday Pinterest boards and a broader push toward handmade decor that doesn’t look store-bought. And stay until the end — we break down the most common mistakes that can ruin these looks.
A few links here are affiliate links, which may earn us a small commission at no cost to you. 📌 Save this to Pinterest for later — you’ll want to revisit these ideas.
1. Buffalo Plaid Decoupage Blocks That Look Wrapped, Not Crafted
Decoupage on raw pine drinks sealer unevenly, so give each 2×4 block one coat of matte Mod Podge and let it cure a full 24 hours before you layer the tree print on top. Press from the center outward with a brayer so bubbles push toward the edges, then seal with two more coats. Cutting your printable an eighth of an inch smaller than the block face leaves a clean wood border that makes the whole thing read intentional instead of sloppy.
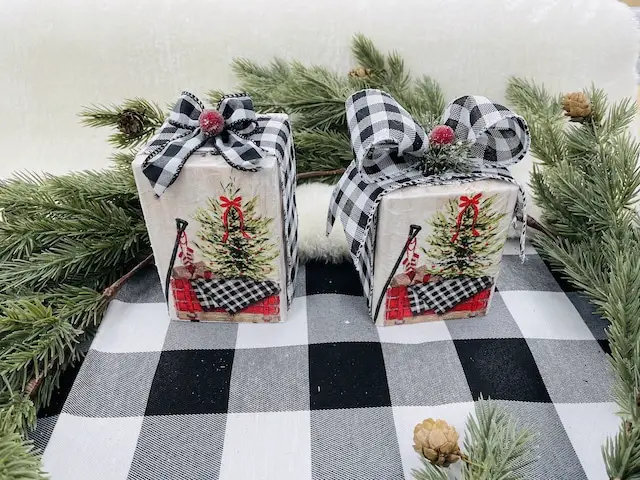
Here’s the formula: 60 percent black-and-white buffalo plaid, 30 percent natural pine showing at the block edges, 10 percent frosted red berries. Swap the plaid for a ticking stripe in a neutral room, or trade the pinecones for eucalyptus if you want it less Northwoods. That ratio is the only thing standing between a curated vignette and a dollar-store pile.
2. Three Stacked Blocks and a Burlap Scarf: A Snowman That Actually Stands
The burlap twine scarf is the entire personality here. Strip it away and you have three white blocks with a painted hat — cute, but anonymous. That scarf is what turns stacked lumber into a character, and it costs about forty cents. Wrap it once at the neck between the second and third block, tie it off, then fray the ends with your fingernails so it doesn’t look machine-cut.

This one lives or dies on your paint job. Acrylic craft paint on raw pine soaks in and dries chalky unless you prime first — one thin coat of white primer, dry, then two coats of flat white. And keep it indoors. Burlap pulls humidity on a covered porch and starts smelling like a barn by January. On a shelf away from the heat vent, it holds up for years.
3. Two Triangle Frames Bridged With Painted Planks
For the frame itself:
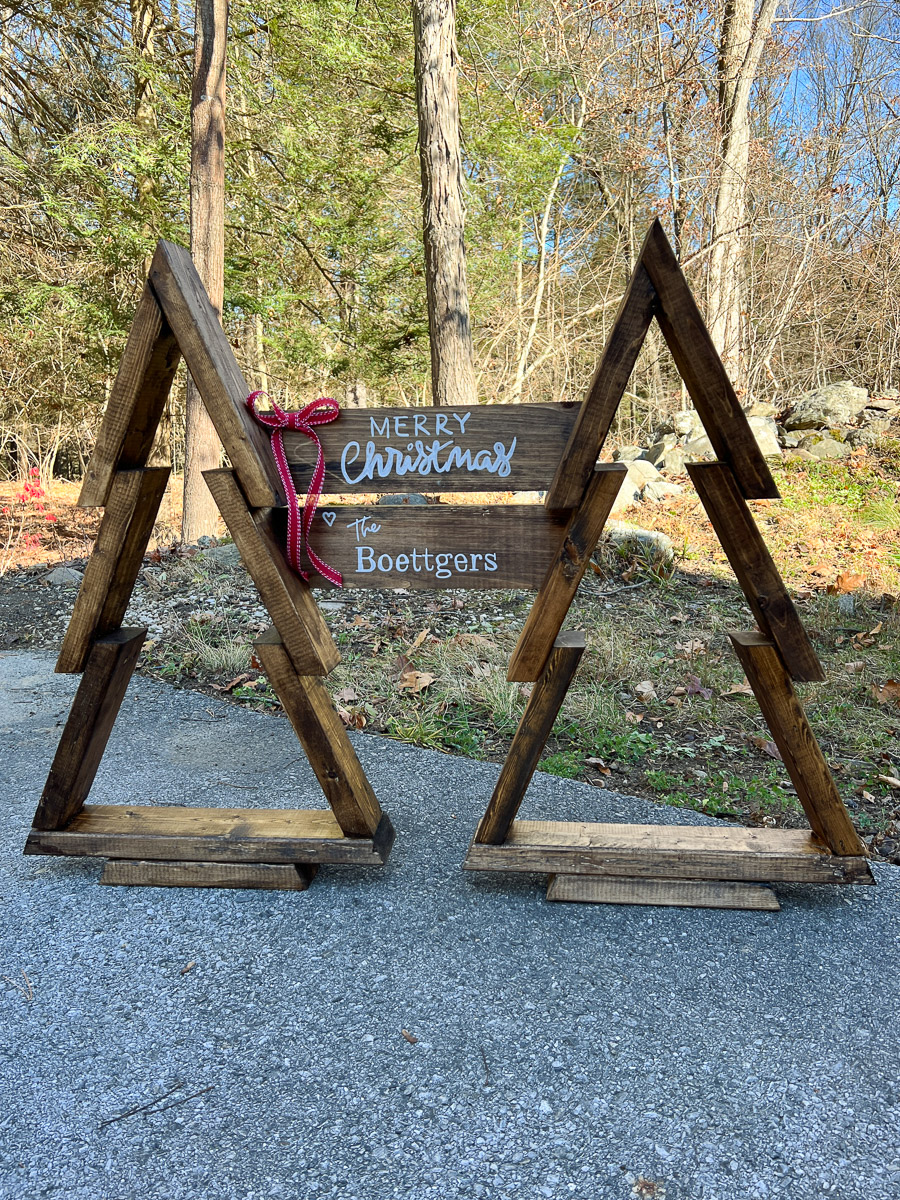
- Cut six 2x4s at 45 degrees, three per side, each 4 inches shorter than the last.
- Stain every cut before assembly so you aren’t chasing drips in the joints later.
- Screw the angled ends together from the back with 2 1/2-inch exterior screws.
- Bridge the two frames with three horizontal planks at the top, middle, and base.
- Stencil your lettering in white exterior enamel.
Budget about two hours plus drying time and $40 in lumber.
Oversized wooden trees are having a moment because they photograph like a real tree but store flat against a garage wall. The two-frame version is the one people actually finish — a single frame tips over in wind, while a pair stands on its own.
4. Gold-Wrapped Block Presents Topped With Cinnamon and Jingle Bells
Here’s what the materials actually cost:
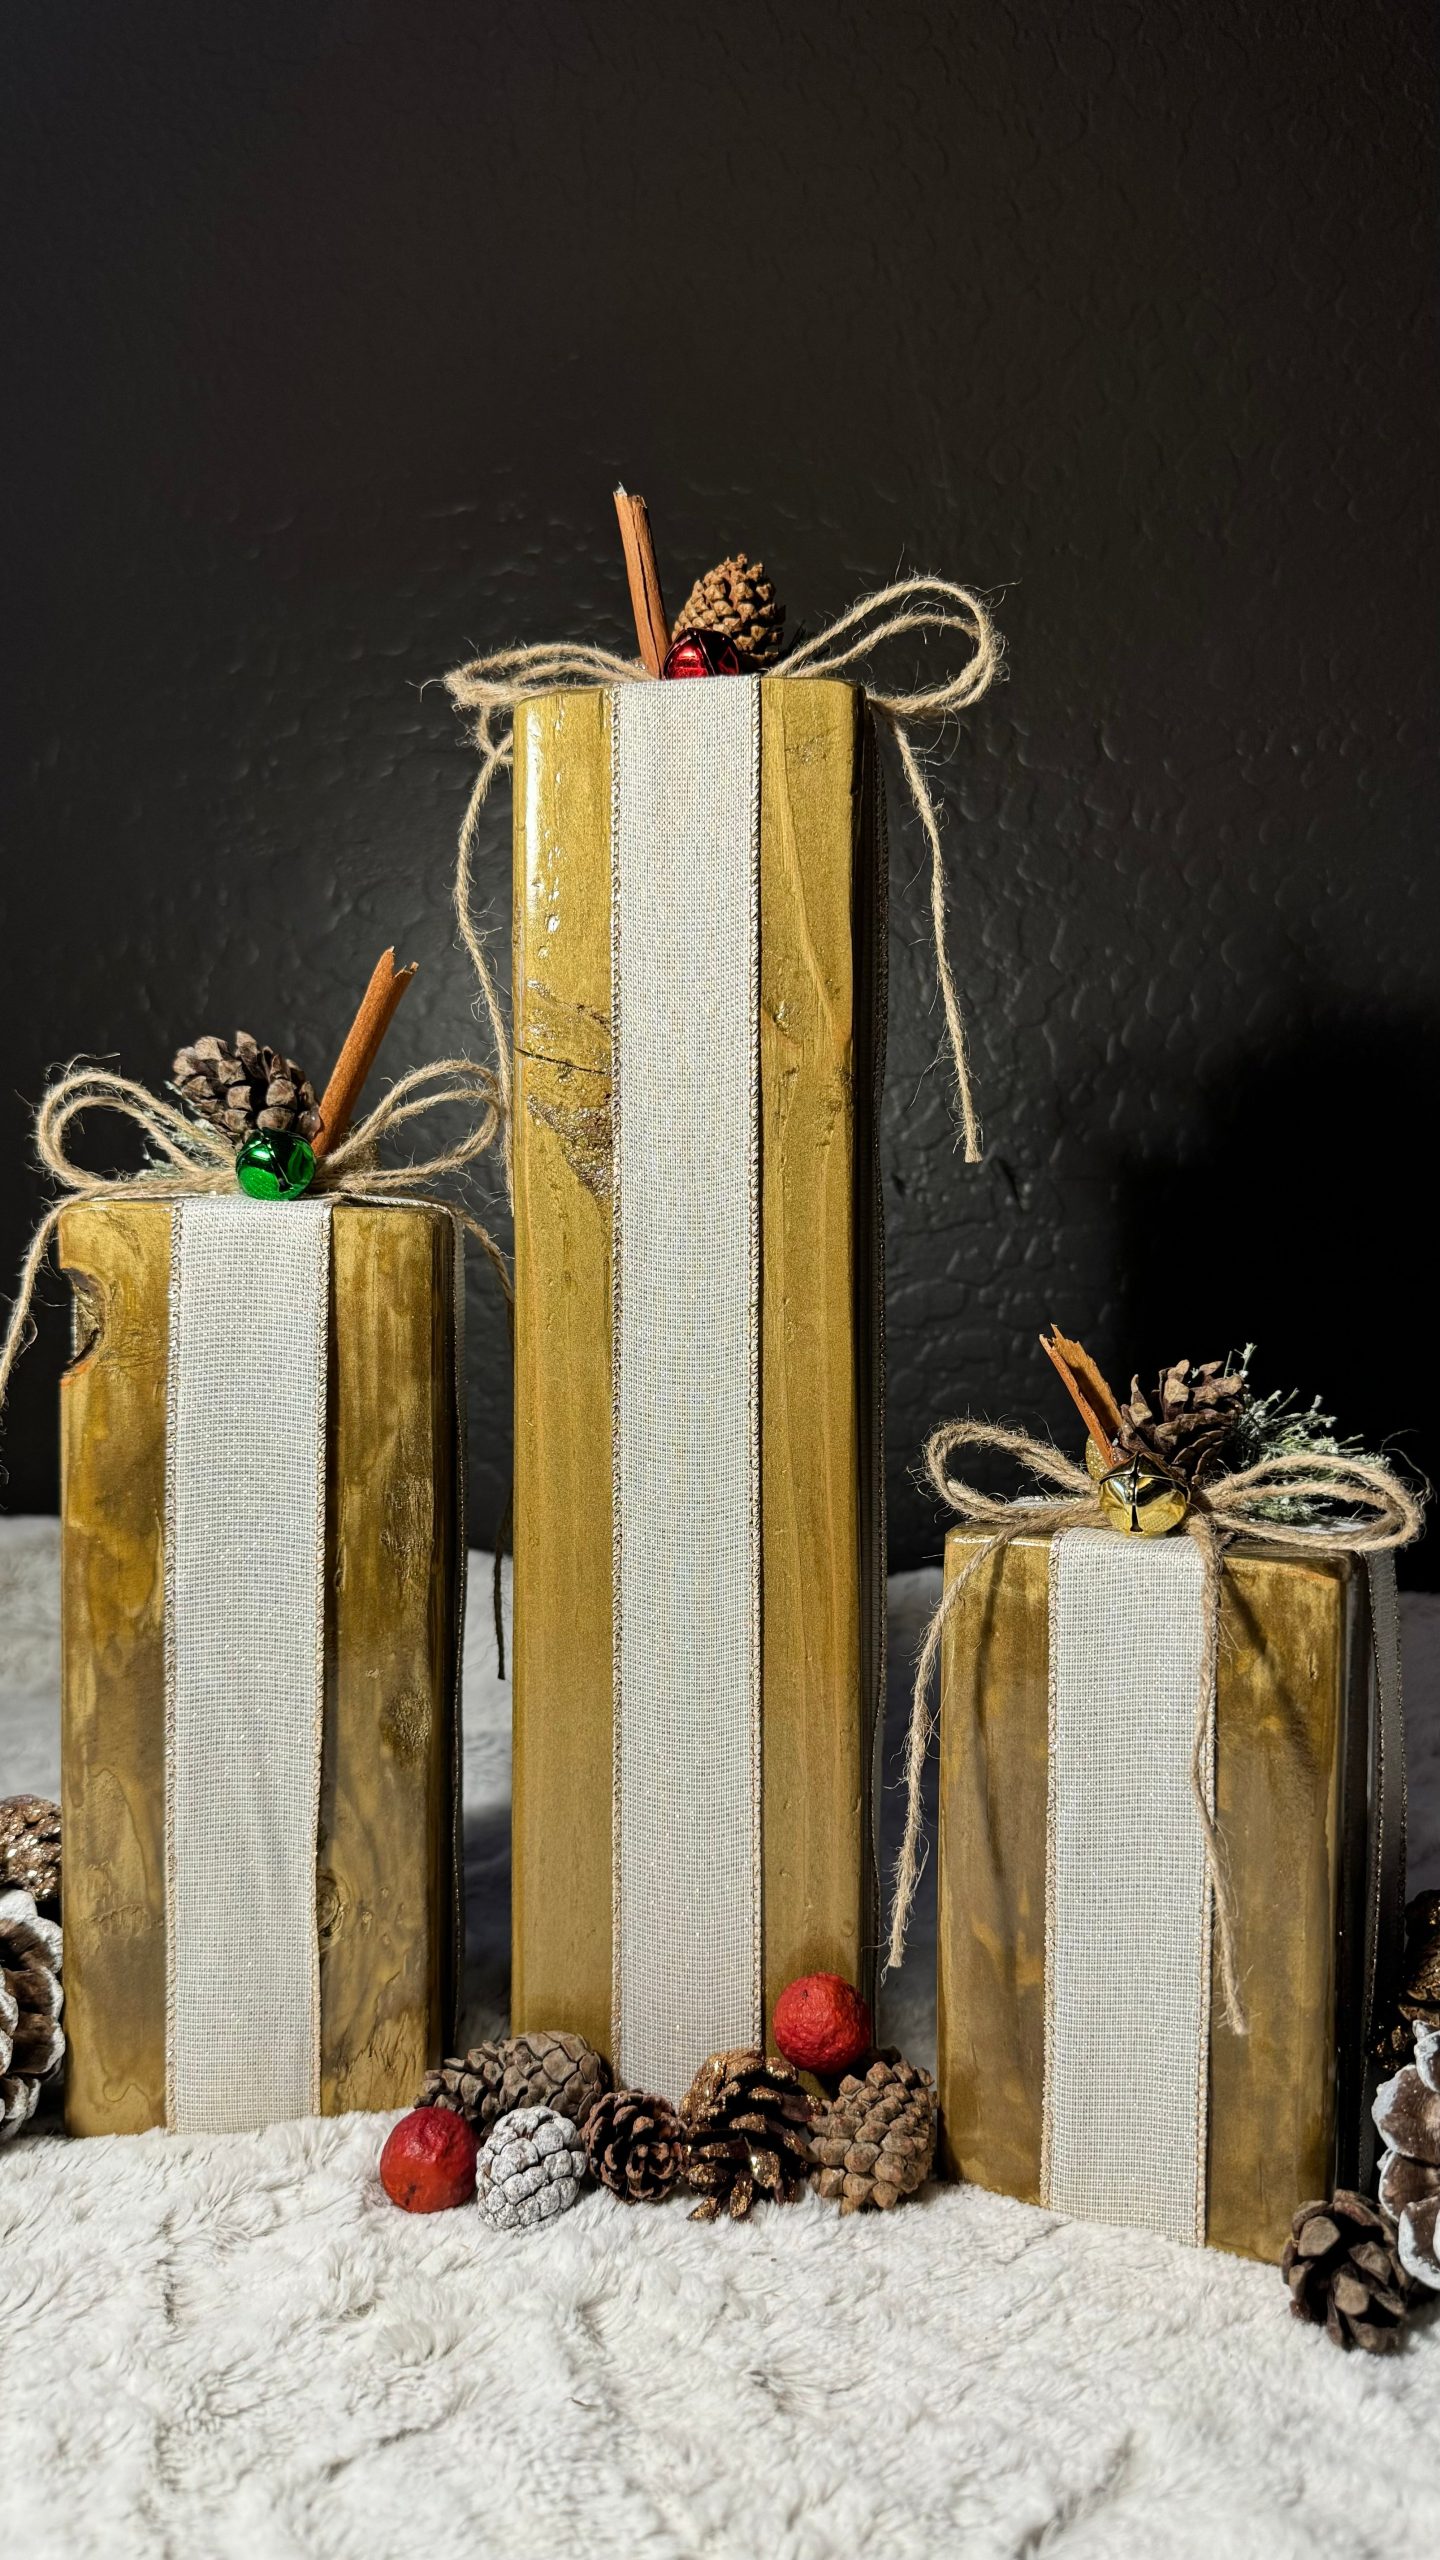
- Wood: three 2×4 offcuts, $0–$6
- Paint: gold metallic spray, $8–$12
- Ribbon and twine, $6–$10
- Toppers: mini pinecones, cinnamon sticks, jingle bells, $8–$15
- Red berries and filler pinecones, $5–$9
Total: roughly $33–$52. Get the same look for less by skipping the spray entirely — a cream chalk paint you already own plus a $4 spool of jute reads just as festive.
Three heights, one width. That’s the trick. The eye reads a trio as a collection rather than clutter, and varying the heights keeps it from looking like a fence post. The cream ribbon running vertically does something sneaky too: it stretches each block upward, so a 6-inch block reads closer to nine. Always group in odd numbers.
5. A Driftwood Wall Tree That Lights Itself
This needs a blank wall roughly 4 feet wide and 5 feet tall to breathe. Narrower than that and your longest branches crowd the window trim. Ceiling height isn’t the issue — floor space is what you’re saving, which is why it works so well in entryways, hallways, and apartments under 700 square feet. For a bigger room where you want something freestanding, compare with Idea #9.
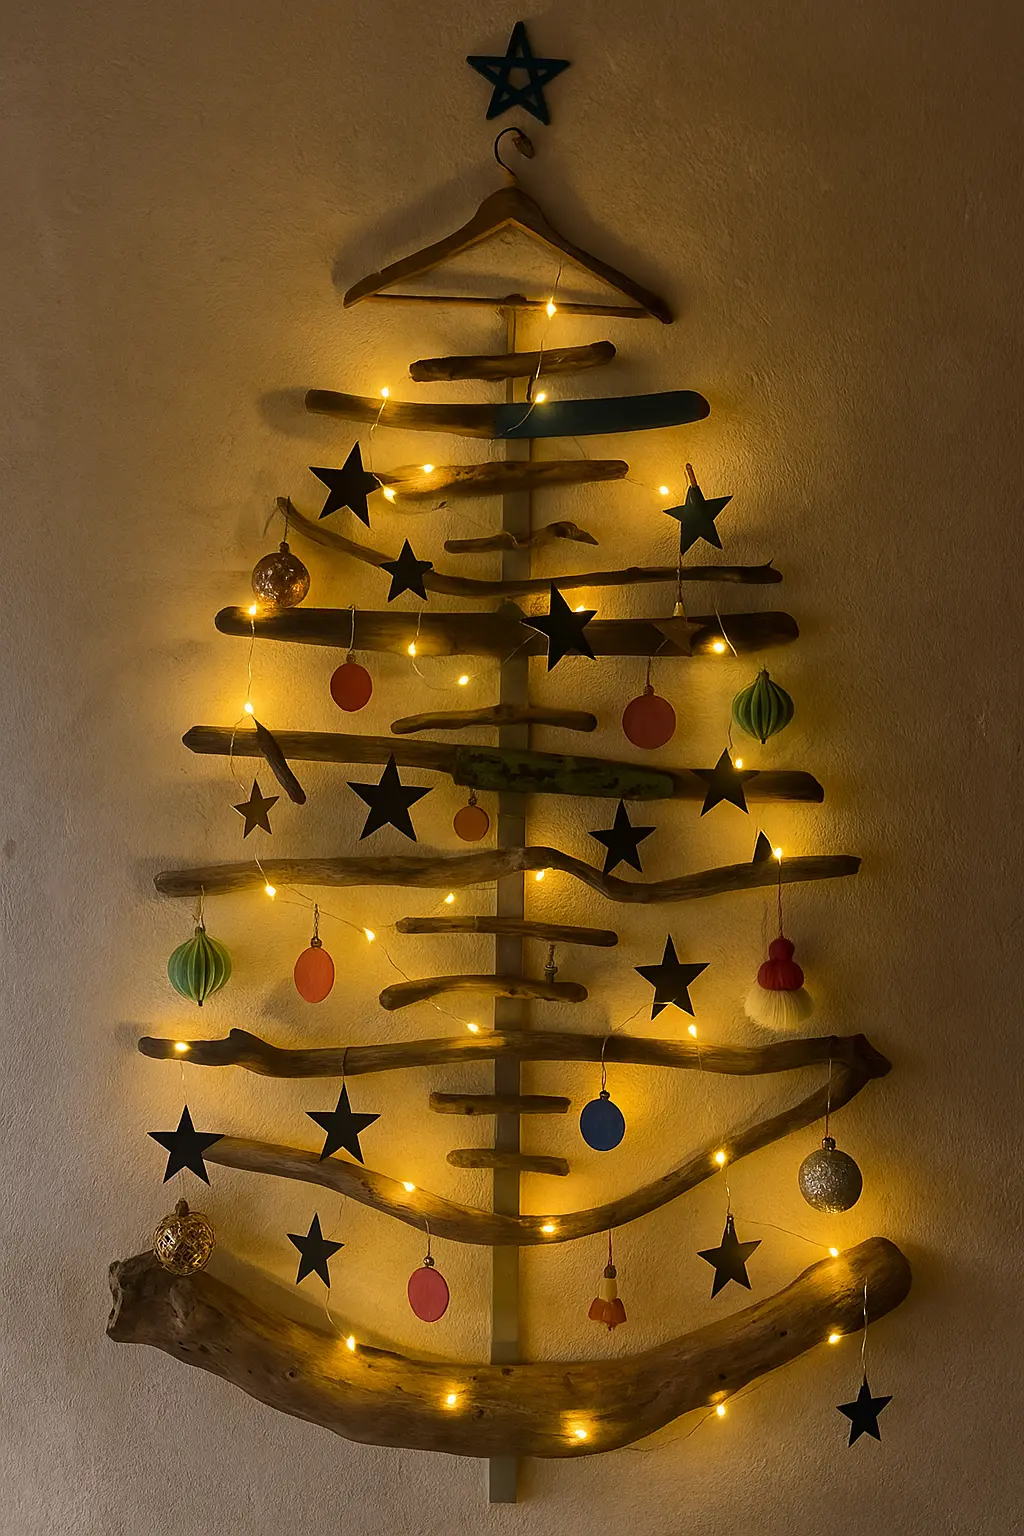
Hang the driftwood on a French cleat, not a nail. Stacked branches get heavy fast, and a 24-inch cleat spreads the load across two studs. Run your string lights with the plug at the bottom left so the cord drops straight down behind a console or basket instead of cutting across the wall. Total install, about twenty minutes.
6. Triangle Blocks With Tiny Natural Wood Star Toppers
You don’t need a wood shop. A 2×4 at any big-box store runs under $5 and they’ll rip it for you, or grab pre-cut craft blocks at Walmart for about $1.50 each. The stars are the only specialty piece — a 25-pack of wooden star cutouts is $6 at Hobby Lobby or $8 on Amazon. Leftover paint covers the green, and a thrifted candle holder becomes the trunk base. The whole set lands under $20.
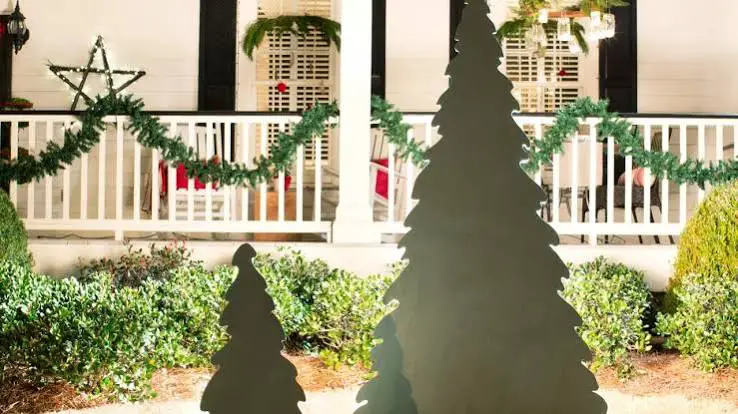
The stars matter more than they look. Tiny, unpainted, and slightly off-center. A painted star would disappear into the green; a natural wood star pops against it and rhymes with the trunk base below. That’s a full circle the eye completes without being told to.
7. The Pallet Wall Tree With Paper Dots and Fabric Hearts
Two principles are doing the heavy lifting. First, repetition — nine horizontal slats, all the same width, create a rhythm that reads as a tree before a single ornament lands. Second, mixed material weight: paper dots sit flat, fabric hearts add dimension, and the dried orange slice brings translucency. Three textures, one silhouette — use only paper and it looks like a bulletin board.
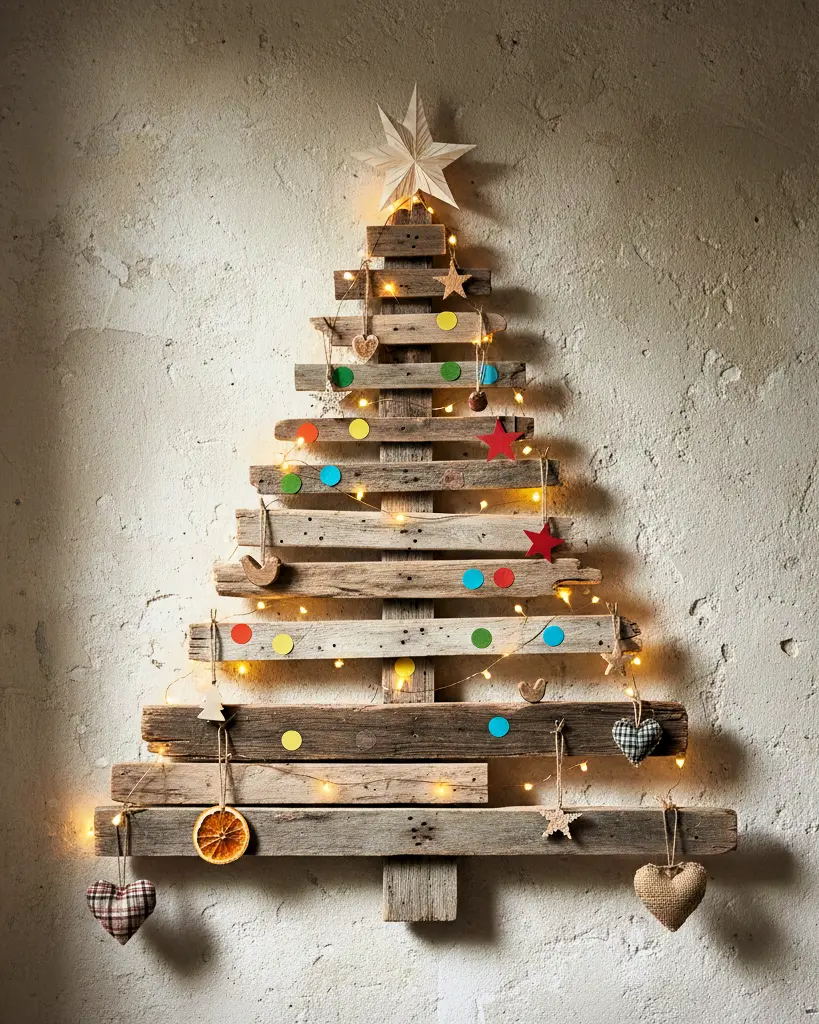
Unfinished pallet wood sheds. Expect a light dusting of splinters and grit on the floor for the first few weeks, so vacuum underneath weekly. Paper dots fade within a season if they face a bright window, which is why this belongs on an interior wall or with the dots rotated every December. Wipe the wood with a dry microfiber cloth; water raises the grain.
8. Four Stained Blocks Spelled N-O-E-L, Topped With Real Candles
Before you commit:
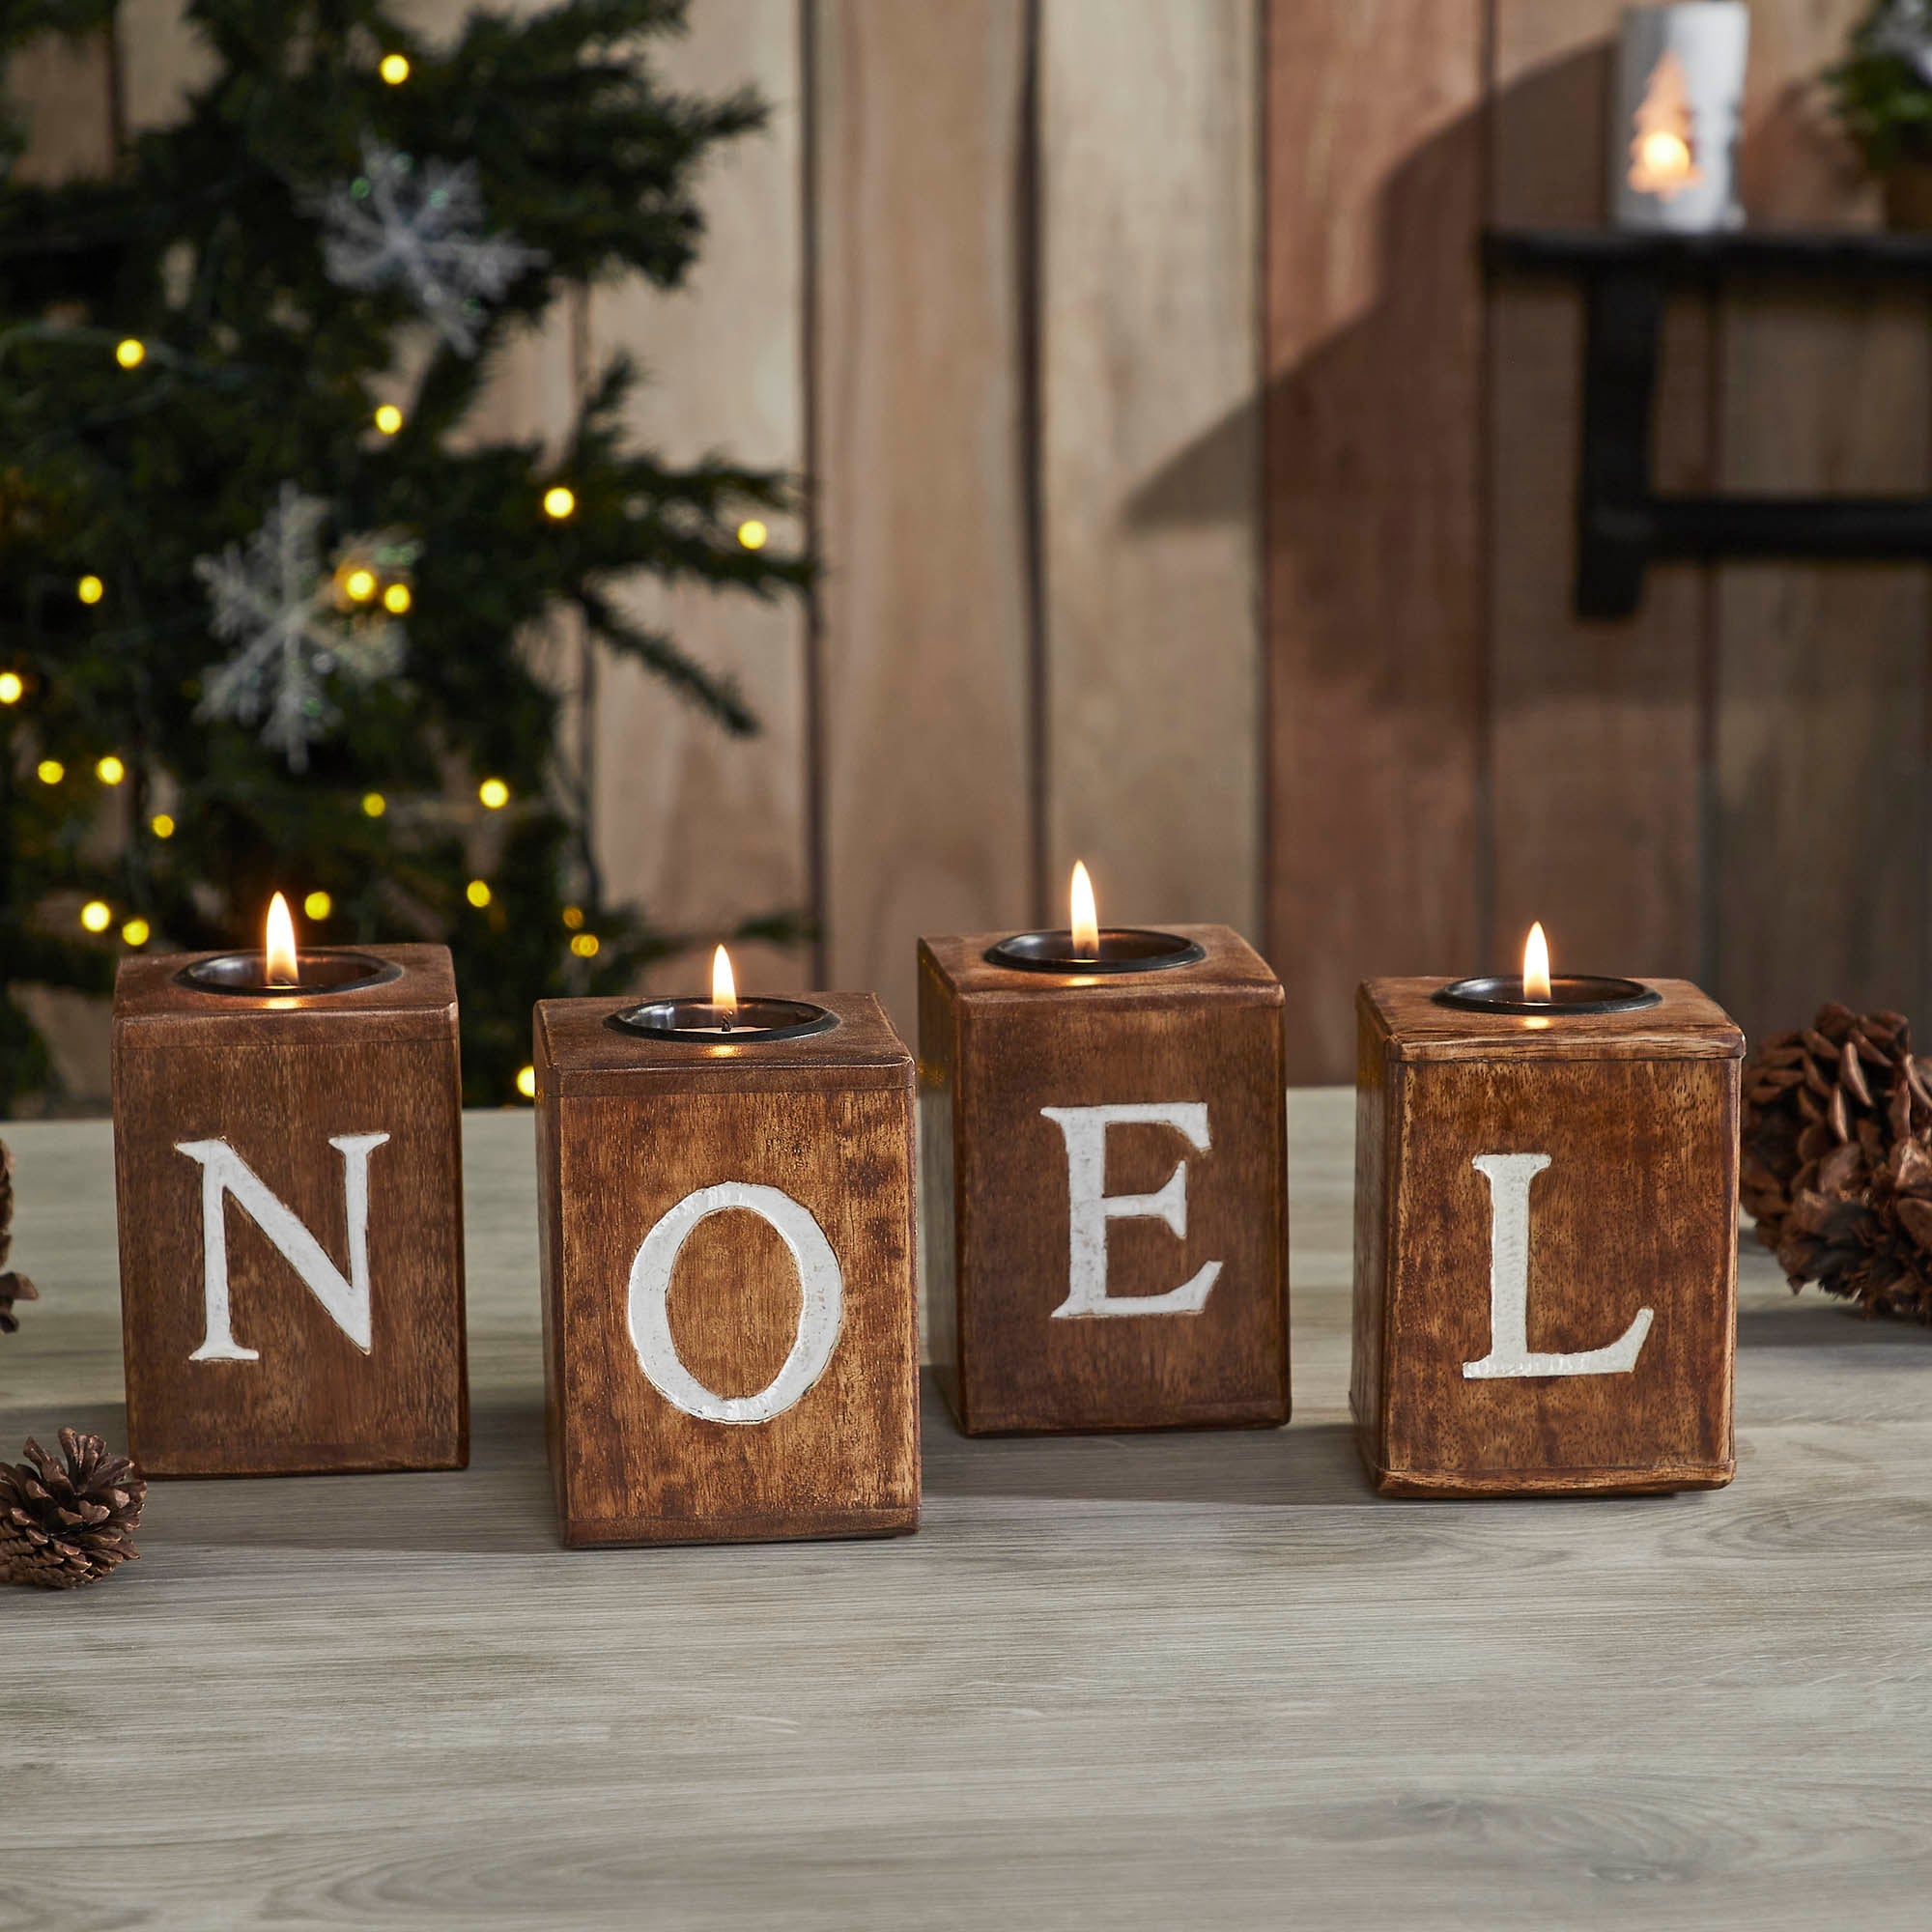
- Check your block height against your candle — a 3-inch tea light in a 4-inch block leaves a nice rim.
- Verify at least 8 inches of clearance above the flame and nothing flammable overhead.
- Measure your mantel or table run first; four 4-inch blocks with gaps need about 20 inches.
- Confirm your drill bit matches the metal cup diameter, usually 1 1/2 inches.
Then build it:
- Cut four 2×4 blocks to 4 inches and sand to 220 grit.
- Stain with medium walnut and wipe back after five minutes.
- Drill a 1 1/2-inch recess about 3/4 inch deep in each top.
- Drop in the metal candle cups and press flush.
- Stencil N-O-E-L in white serif lettering and seal.
Under an hour of work, about $25 in materials.
9. Tiered Slat Trees on Stakes for the Front Bed
These go in the ground, so weather decides how long they last. Untreated pine 2x4s gray out and check within one winter; seal them with exterior poly or spar urethane and they hold two or three seasons. Push the stake at least 8 inches deep so a wet snow doesn’t lay them flat, and skip this entirely if the wood would sit within a foot of your foundation.
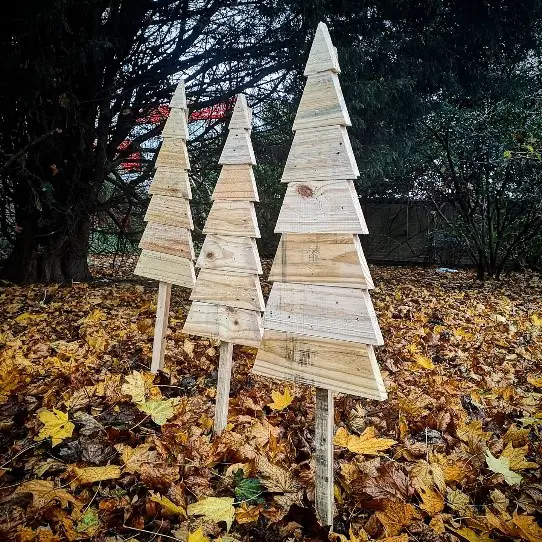
Seventy percent raw wood, twenty percent shadow, ten percent greenery. The magic isn’t paint — it’s the gaps you leave between slats. Those horizontal voids let dark soil and leaf litter read through, which is what keeps an unpainted tree looking deliberate instead of unfinished.
10. Distressed Gift Blocks With Bells and Bead-Tipped Twine
Rough numbers for the set:
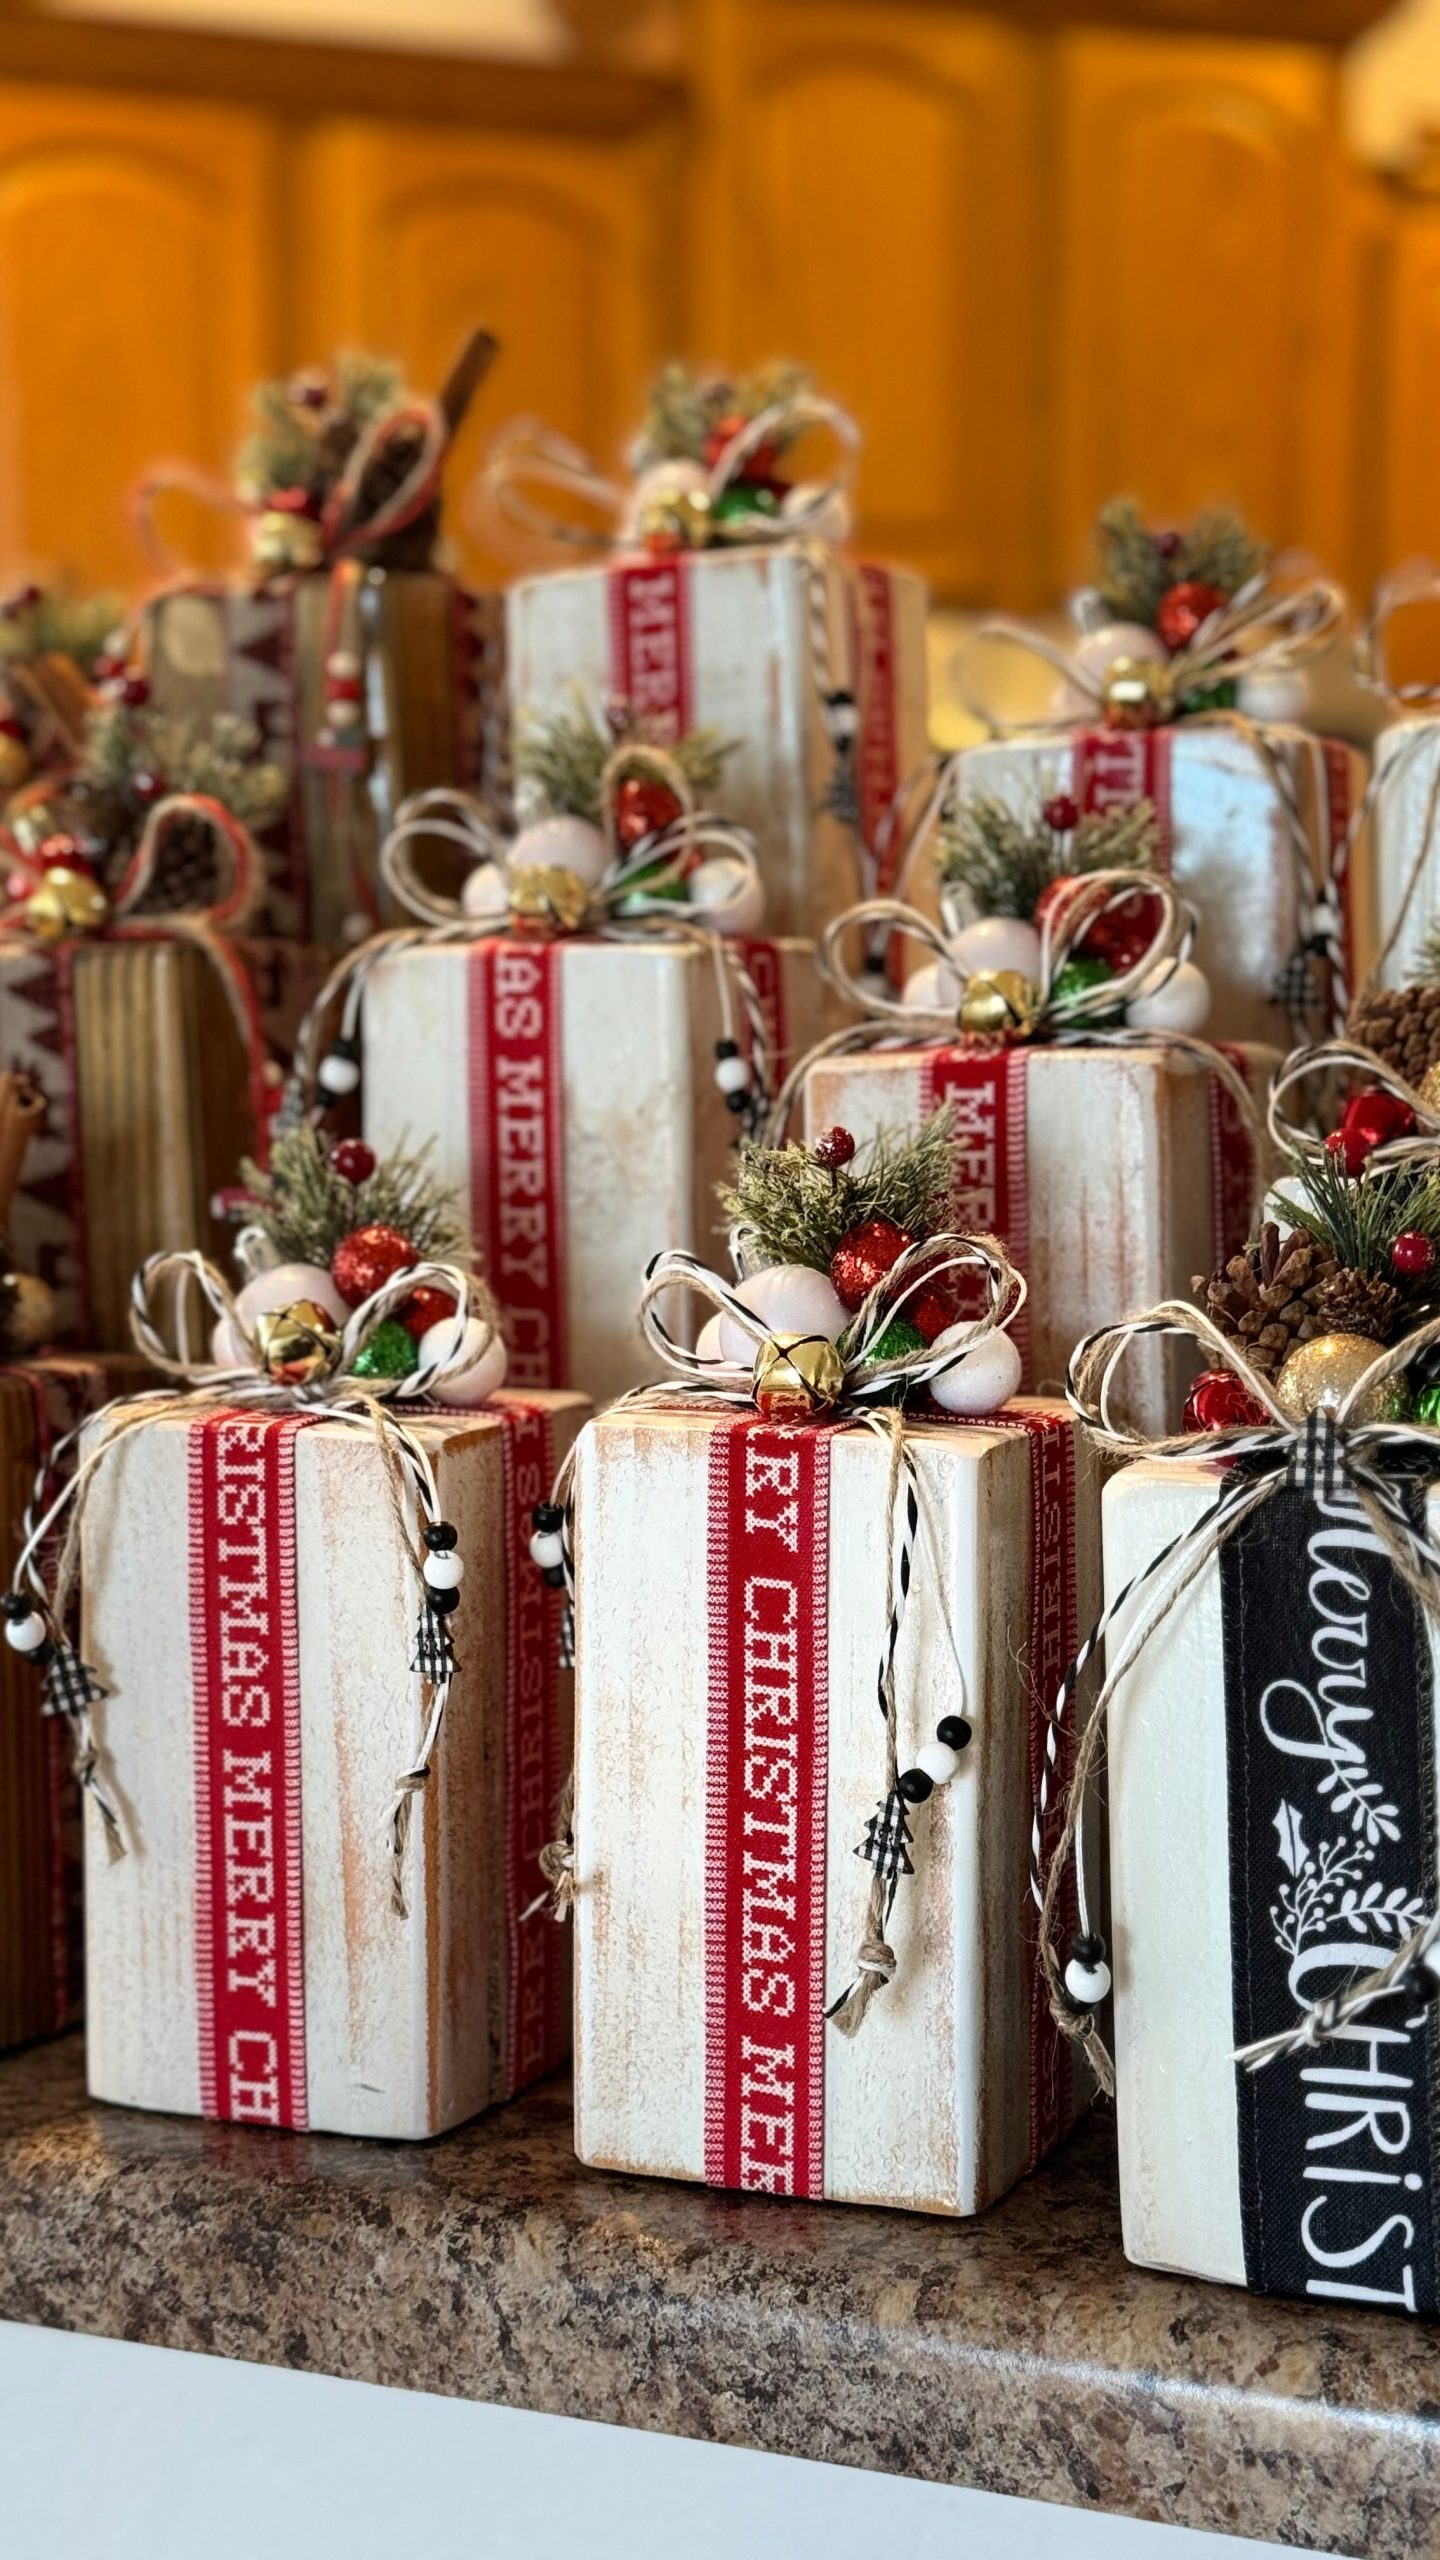
- Wood offcuts, $0–$8
- Chalk paint in two colors, $6–$12
- Vertical ribbon trim, $5–$10
- Twine, beads, and small bells, $4–$8
- Pinecones and faux greenery, $8–$16
Total: $23–$54. Trim that by skipping printed ribbon entirely — a 2-inch plaid ribbon from Dollar Tree over a paper band does the same job for a dollar.
Distressing reads as fake when it’s uniform. Sand only where a real object would wear: the edges, the corners, and one random spot on the front face. Then rub a touch of dark wax into the raw wood so it settles into the grain — and stop before it looks deliberate. Two or three passes with 120 grit is usually plenty.
11. A Plank Tree Laid Flat — the Layout That Becomes Anything
Start with layout, not screws.
- Lay two long boards at the base angles, tips meeting at the top.
- Fill in with progressively shorter angled pieces, alternating sides.
- Leave a 1/4-inch gap between boards so the ground shows through.
- Add a horizontal base plank and a short trunk block centered below.
- Photograph the arrangement before you fasten anything — you’ll rearrange it three times.
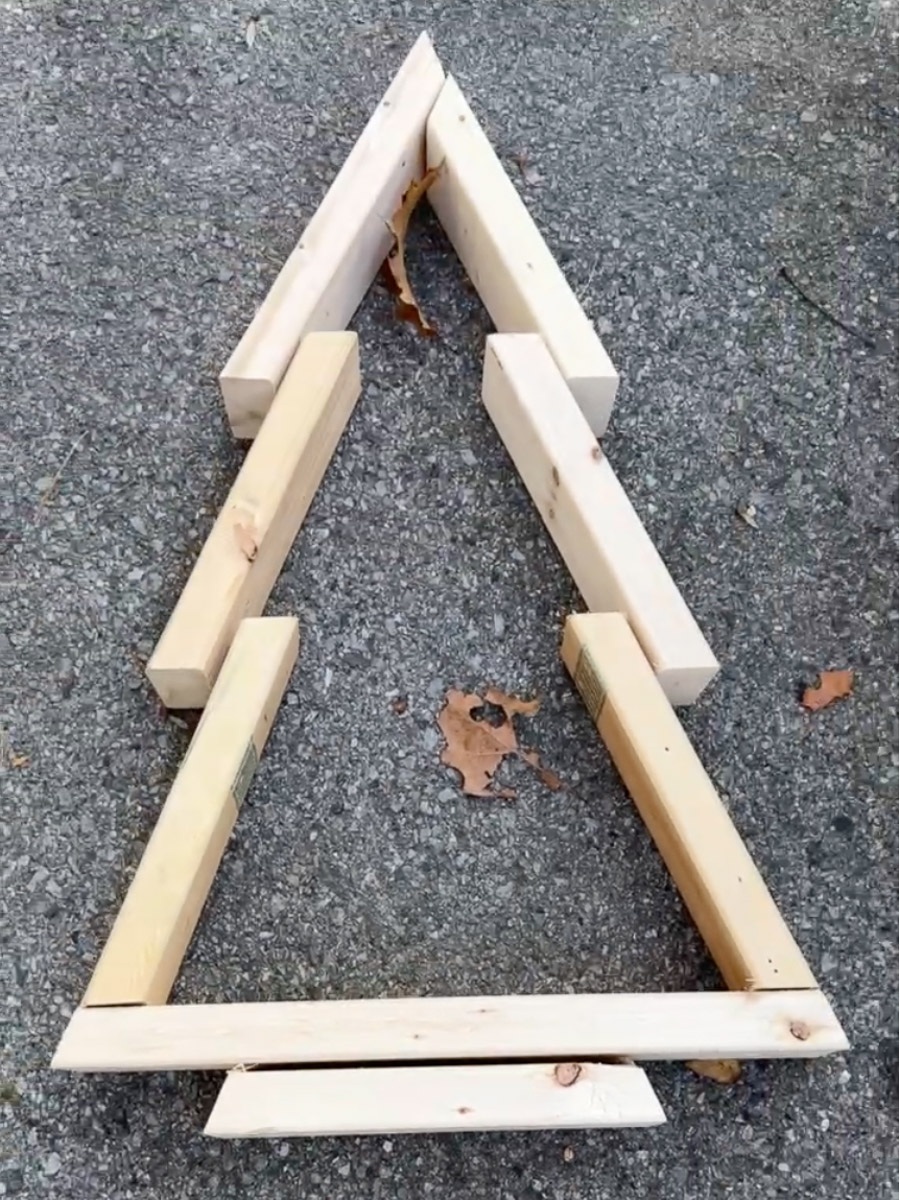
This is the cheapest idea on the list. Ask the lumber desk about the cull pile — warped or split boards that sell for around 70 percent off. One 8-foot 2×4 costs about $4 and yields three or four tree segments, so a full tree runs $15 to $25 including screws. For a wall-mounted version using the same silhouette, see Idea #7.
12. Weathered Pallet Panels Spelling J-O-Y in Dimensional Letters
The letters are dimensional, not painted. That half-inch of shadow behind each one does more for this wall than any paint color could — it’s the difference between a sign and a sculpture. Cut them from 1/2-inch plywood with a jigsaw, round the edges with sandpaper, and mount with construction adhesive plus a couple of finish nails so they never shift.
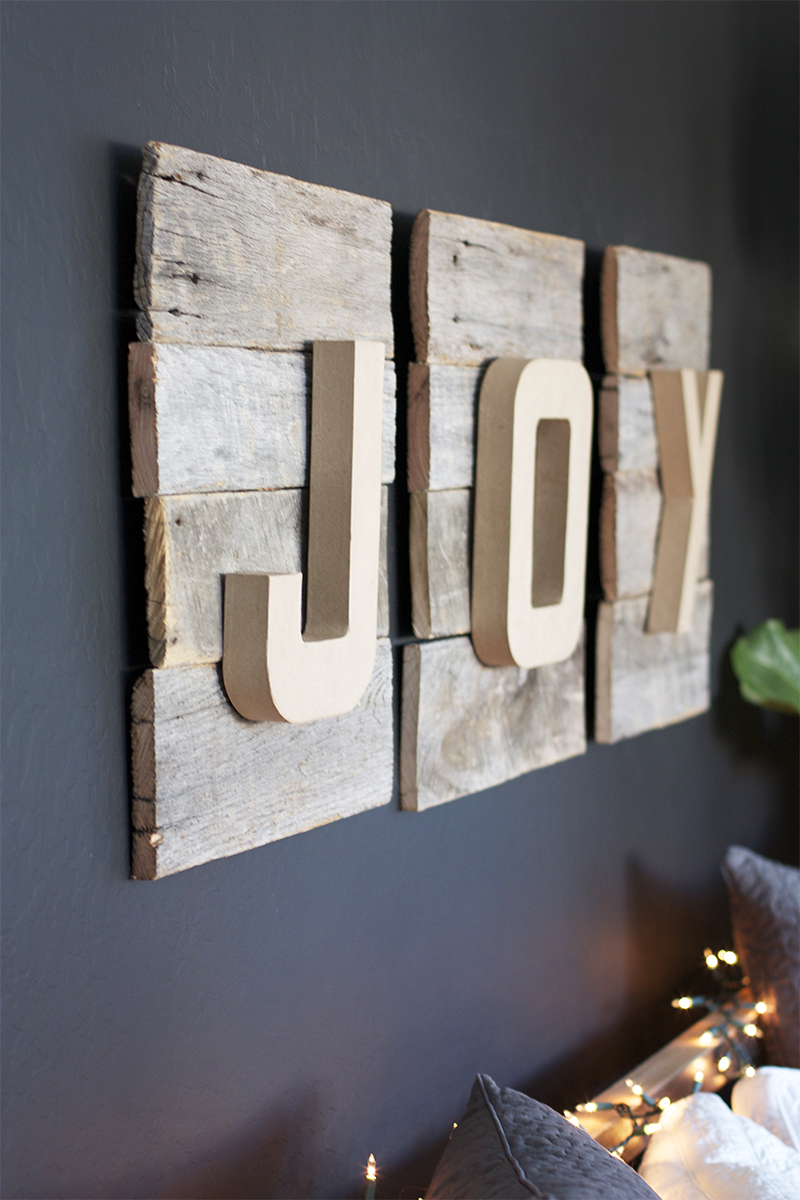
Three panels at 10 inches wide with 2-inch gaps need about 34 inches of wall — perfect for the awkward strip beside a door or above a console. Hang the center panel at 60 inches on center and level from there. In a room with 9-foot ceilings, add a fourth panel with a star. For a lighter, less woody look, see Idea #24.
13. Green and Red Blocks Dressed Like Tiny Presents
Fifty percent painted color, thirty percent bare wood at the base, twenty percent gold. Alternate green and red so no two neighbors match — that irregularity is what makes a set of blocks look collected instead of mass-produced. Swap the gold reindeer for silver snowflakes and the same formula still holds.
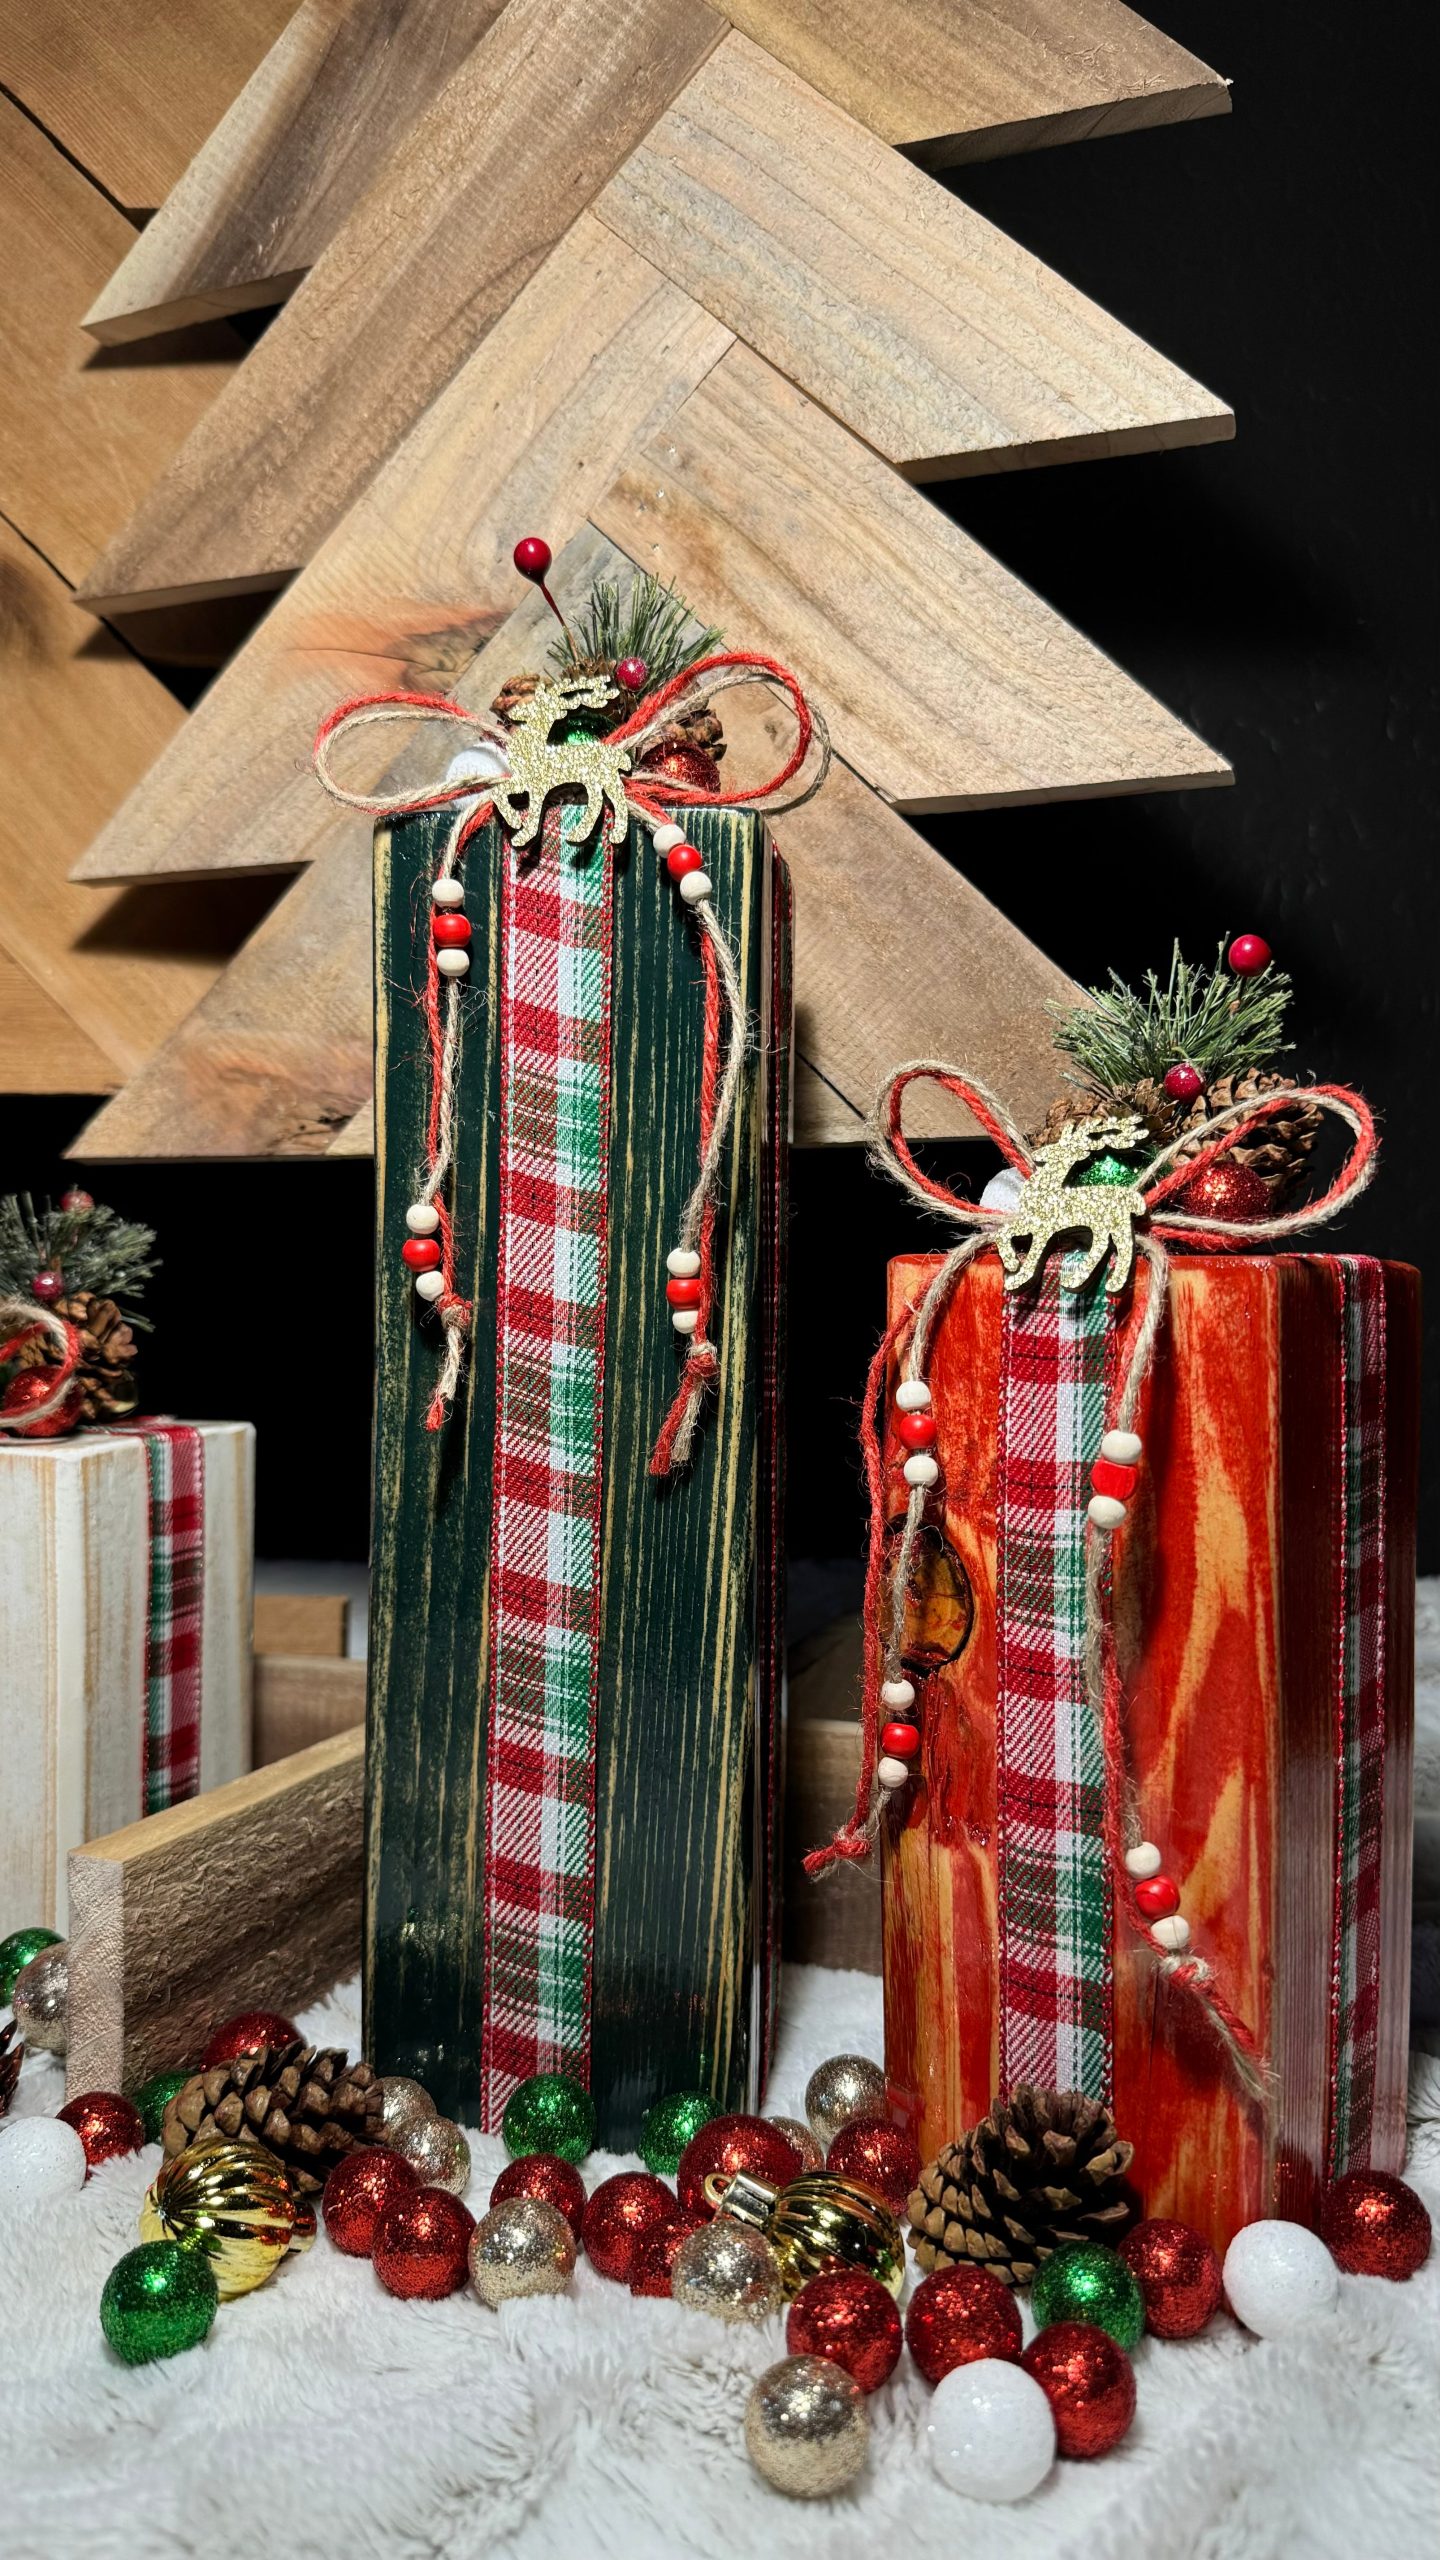
Plaid-and-pinecone styling keeps returning because it’s the cheapest way to look like a Christmas catalog. What’s changed in 2026 is scale: people are building four or five small objects instead of one big centerpiece, because small pieces store easily and travel between rooms. Buy the set once, and it works on the entry console in December and in the powder room in January.
14. A Tabletop Sled That Says Merry Christmas in Cutout Letters
Hobby Lobby sells the sled blank for around $12, and cutout letters come in a $4 pack. You don’t need a scroll saw. If you want the full custom route, a 1×8 board and a jigsaw gets you there for $9 — print letter templates at 200 percent and trace them.
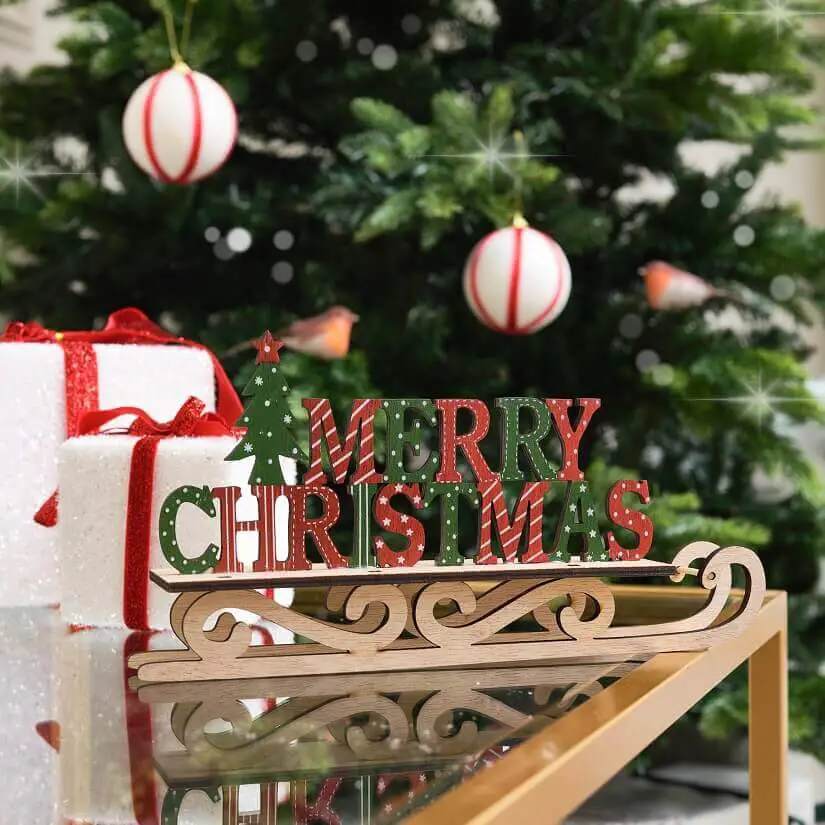
The proportions are cartoonish on purpose. The sled is oversized, the letters are chunky, and alternating red and green keeps your eye moving left to right. The striped ornaments in the tree behind echo those same two colors, so the vignette reads as one composition. Compare with Idea #17 for the single-object version.
15. Gnomes With Fuzzy Faux Fur Beards and Hand-Painted Hats
Faux fur is the hard part. Cut with the nap, never scissors-and-pray — flip the fabric over and slice only the backing with a craft knife so the fur edge stays full. A 6×6-inch square covers one gnome beard. Run a thin bead of hot glue along the block edge, press, then fluff with a toothbrush. Too much glue and the fur goes stiff and shiny.

The wooden bead nose is what sells it. A painted nose sits flush and vanishes. A 3/4-inch bead adds a real shadow and a smooth texture against all that fur and flat paint — three materials on one 6-inch figurine.
16. A Painted Green Tabletop Tree With Circular Cutouts
Painted pine in a dry room is nearly maintenance-free. Dust it with a dry brush every couple of weeks and it looks new for years. The weak points are the hanging ornaments, which chip when they knock against the cutouts, and the round base, which wobbles on uneven surfaces. Felt pads solve that last one for about $3.
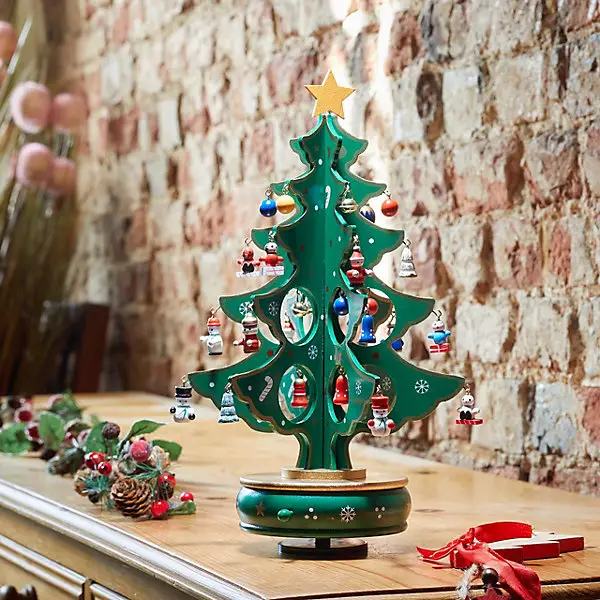
Watch the cutouts. A 2-inch hole saw on 3/4-inch pine tears out the back edge unless you clamp a scrap board behind it as a backer. And paint before you drill — trying to get an even coat inside a circle after assembly is a fool’s errand.
17. A Red Cutout Tree With Painted Snowflakes and a Snowman at the Base
Materials, itemized:
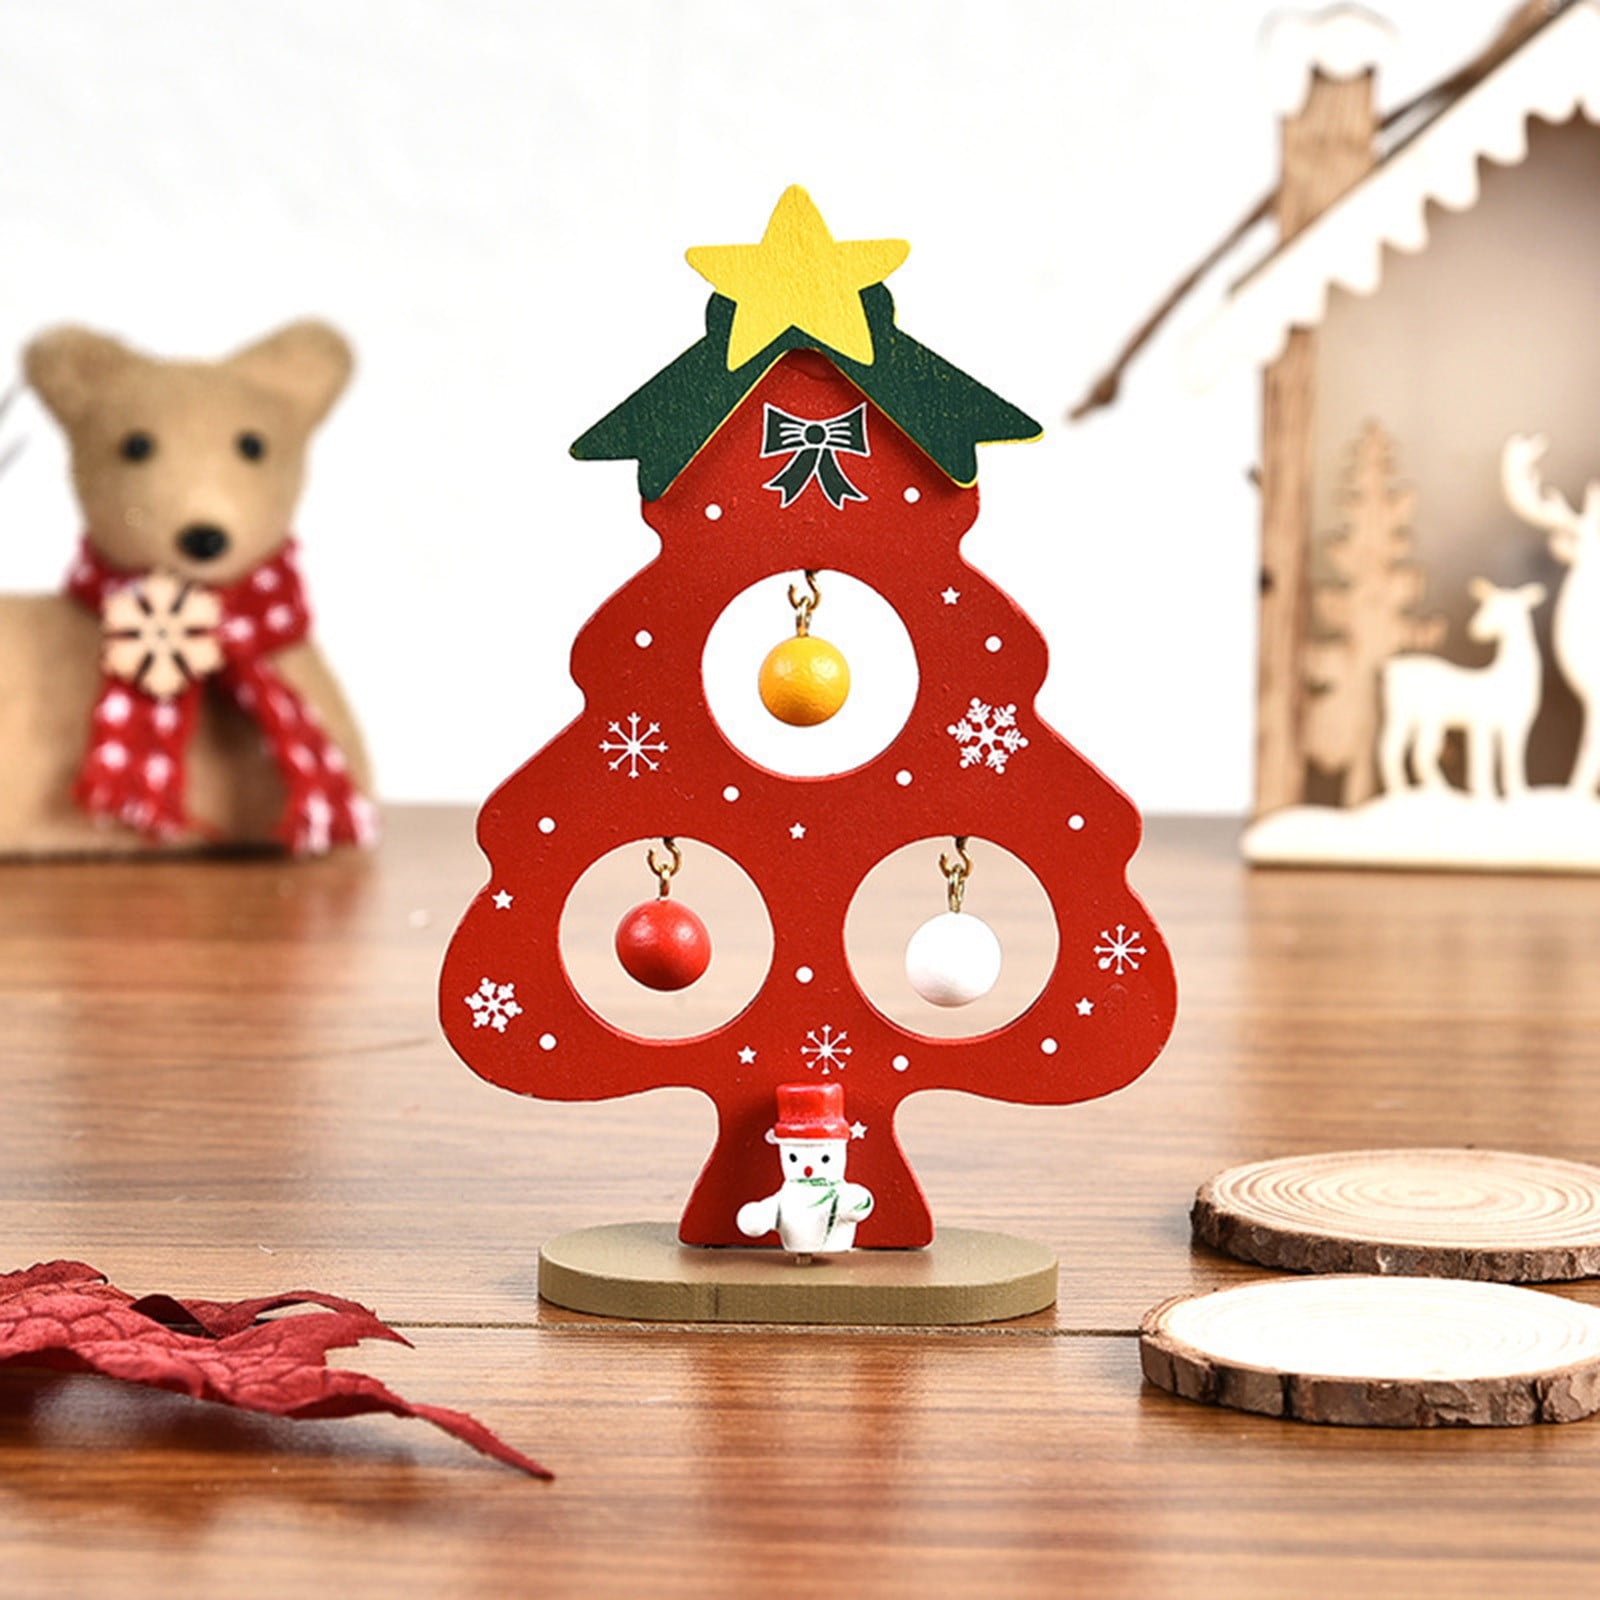
- Red craft paint, $4–$8
- 1×12 pine board, $10–$18
- Mini snowman figurine, $3–$7
- Ornaments for hanging, $5–$12
- Star topper and green trim, $7–$15
Total: $29–$60. Cut that by using a thrifted cutting board as your tree blank and a dollar-store snowman at the base.
Eighty percent red, ten percent white, ten percent yellow. The snowflakes are small and scattered on purpose. Yellow appears exactly twice — the star and the snowman’s scarf — and when an accent shows up twice, it reads as a decision rather than an accident.
18. A Cutout Metal Tree on an Oval Wood Base
Contrast, and only contrast. Distressed grey metal against warm raw wood. A hard industrial silhouette against soft evergreen sprigs. A cool color against candle glow. Nothing here matches, and that’s exactly why it works on a mantel full of warm neutrals. The votive also throws a moving shadow of the metal tree onto the wall behind it — free decoration.
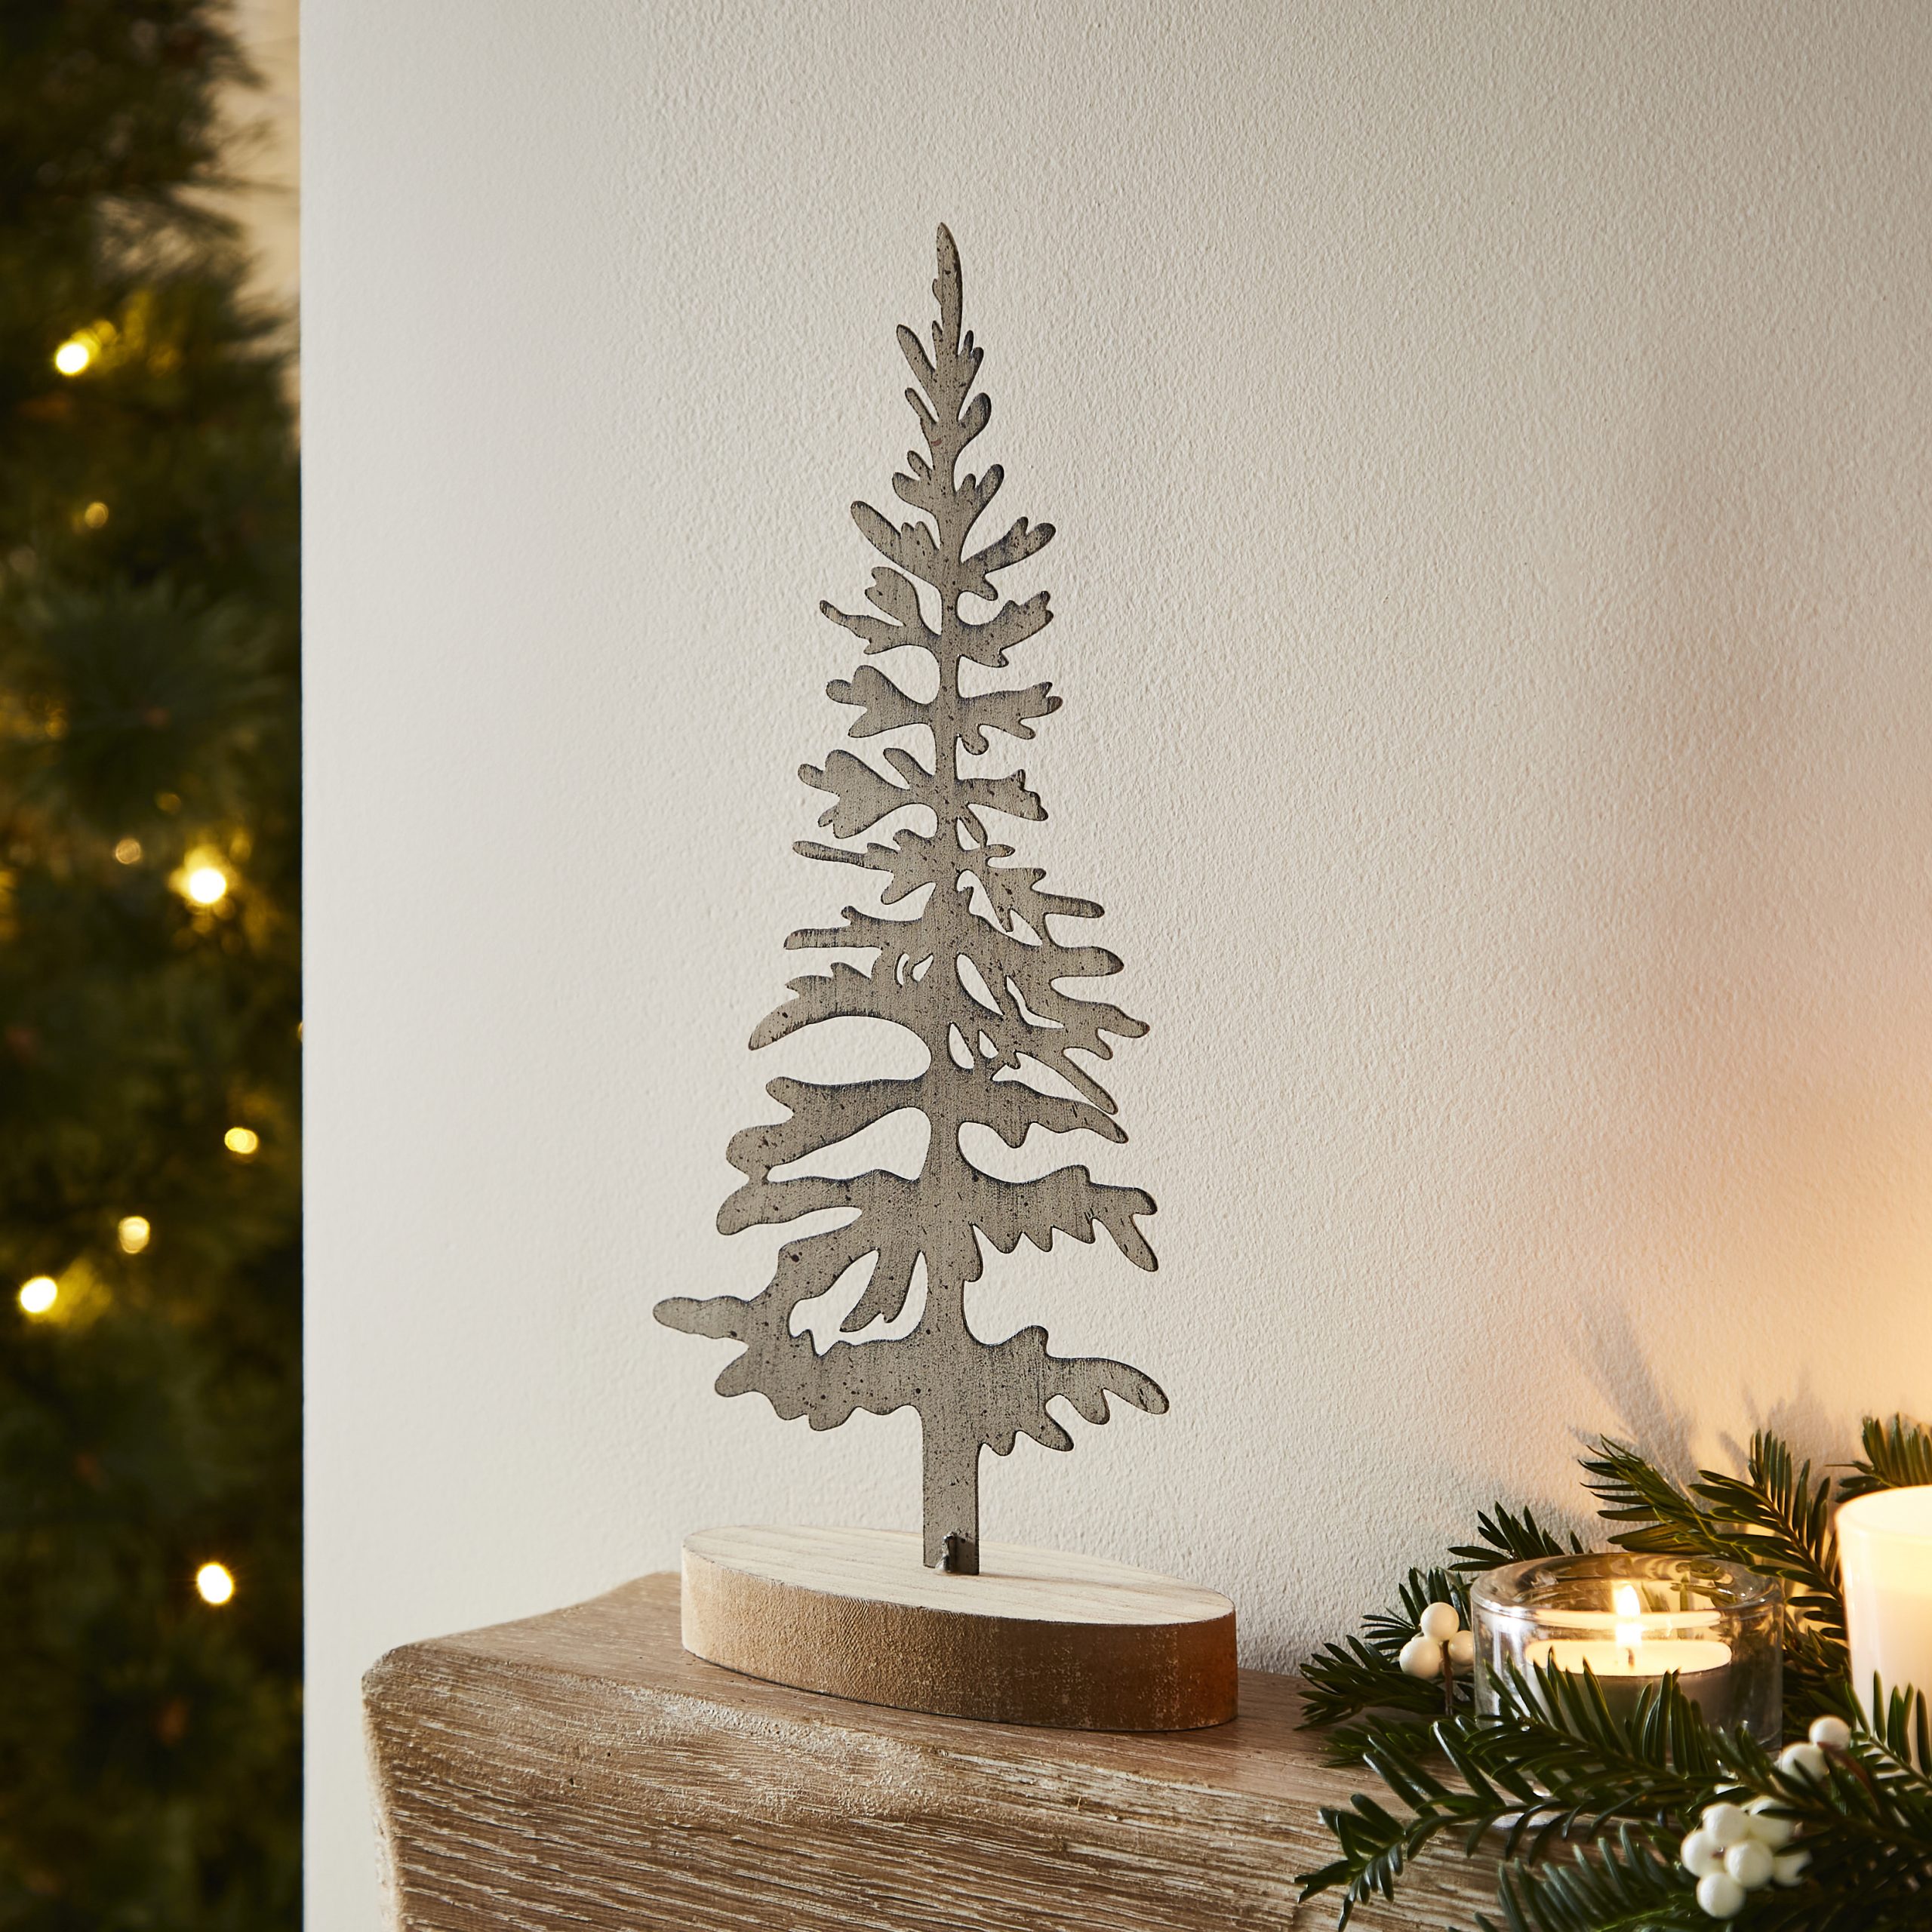
Check these before you commit:
- Measure mantel depth; the oval base plus a votive needs about 6 inches.
- Make sure the tree isn’t so tall it disappears against a busy tile backsplash.
- Check for felt or cork underneath — raw metal scratches painted wood.
- Decide now whether you’re comfortable with a real flame there, or buy a battery votive.
19. A Countdown Calendar Built on Numbered Wooden Blocks
Build order:
- Cut two 3.5-inch blocks and sand to 220.
- Paint the faces white, two coats.
- Apply number decals or stencil digits 0 through 9 in green.
- Build a shallow tray from 1×4 scraps.
- Cut a tree backdrop from 1/4-inch plywood and glue it to the back of the tray.
- Attach a gold glitter star and a reindeer silhouette to the tree front.
Two evenings, about $18.
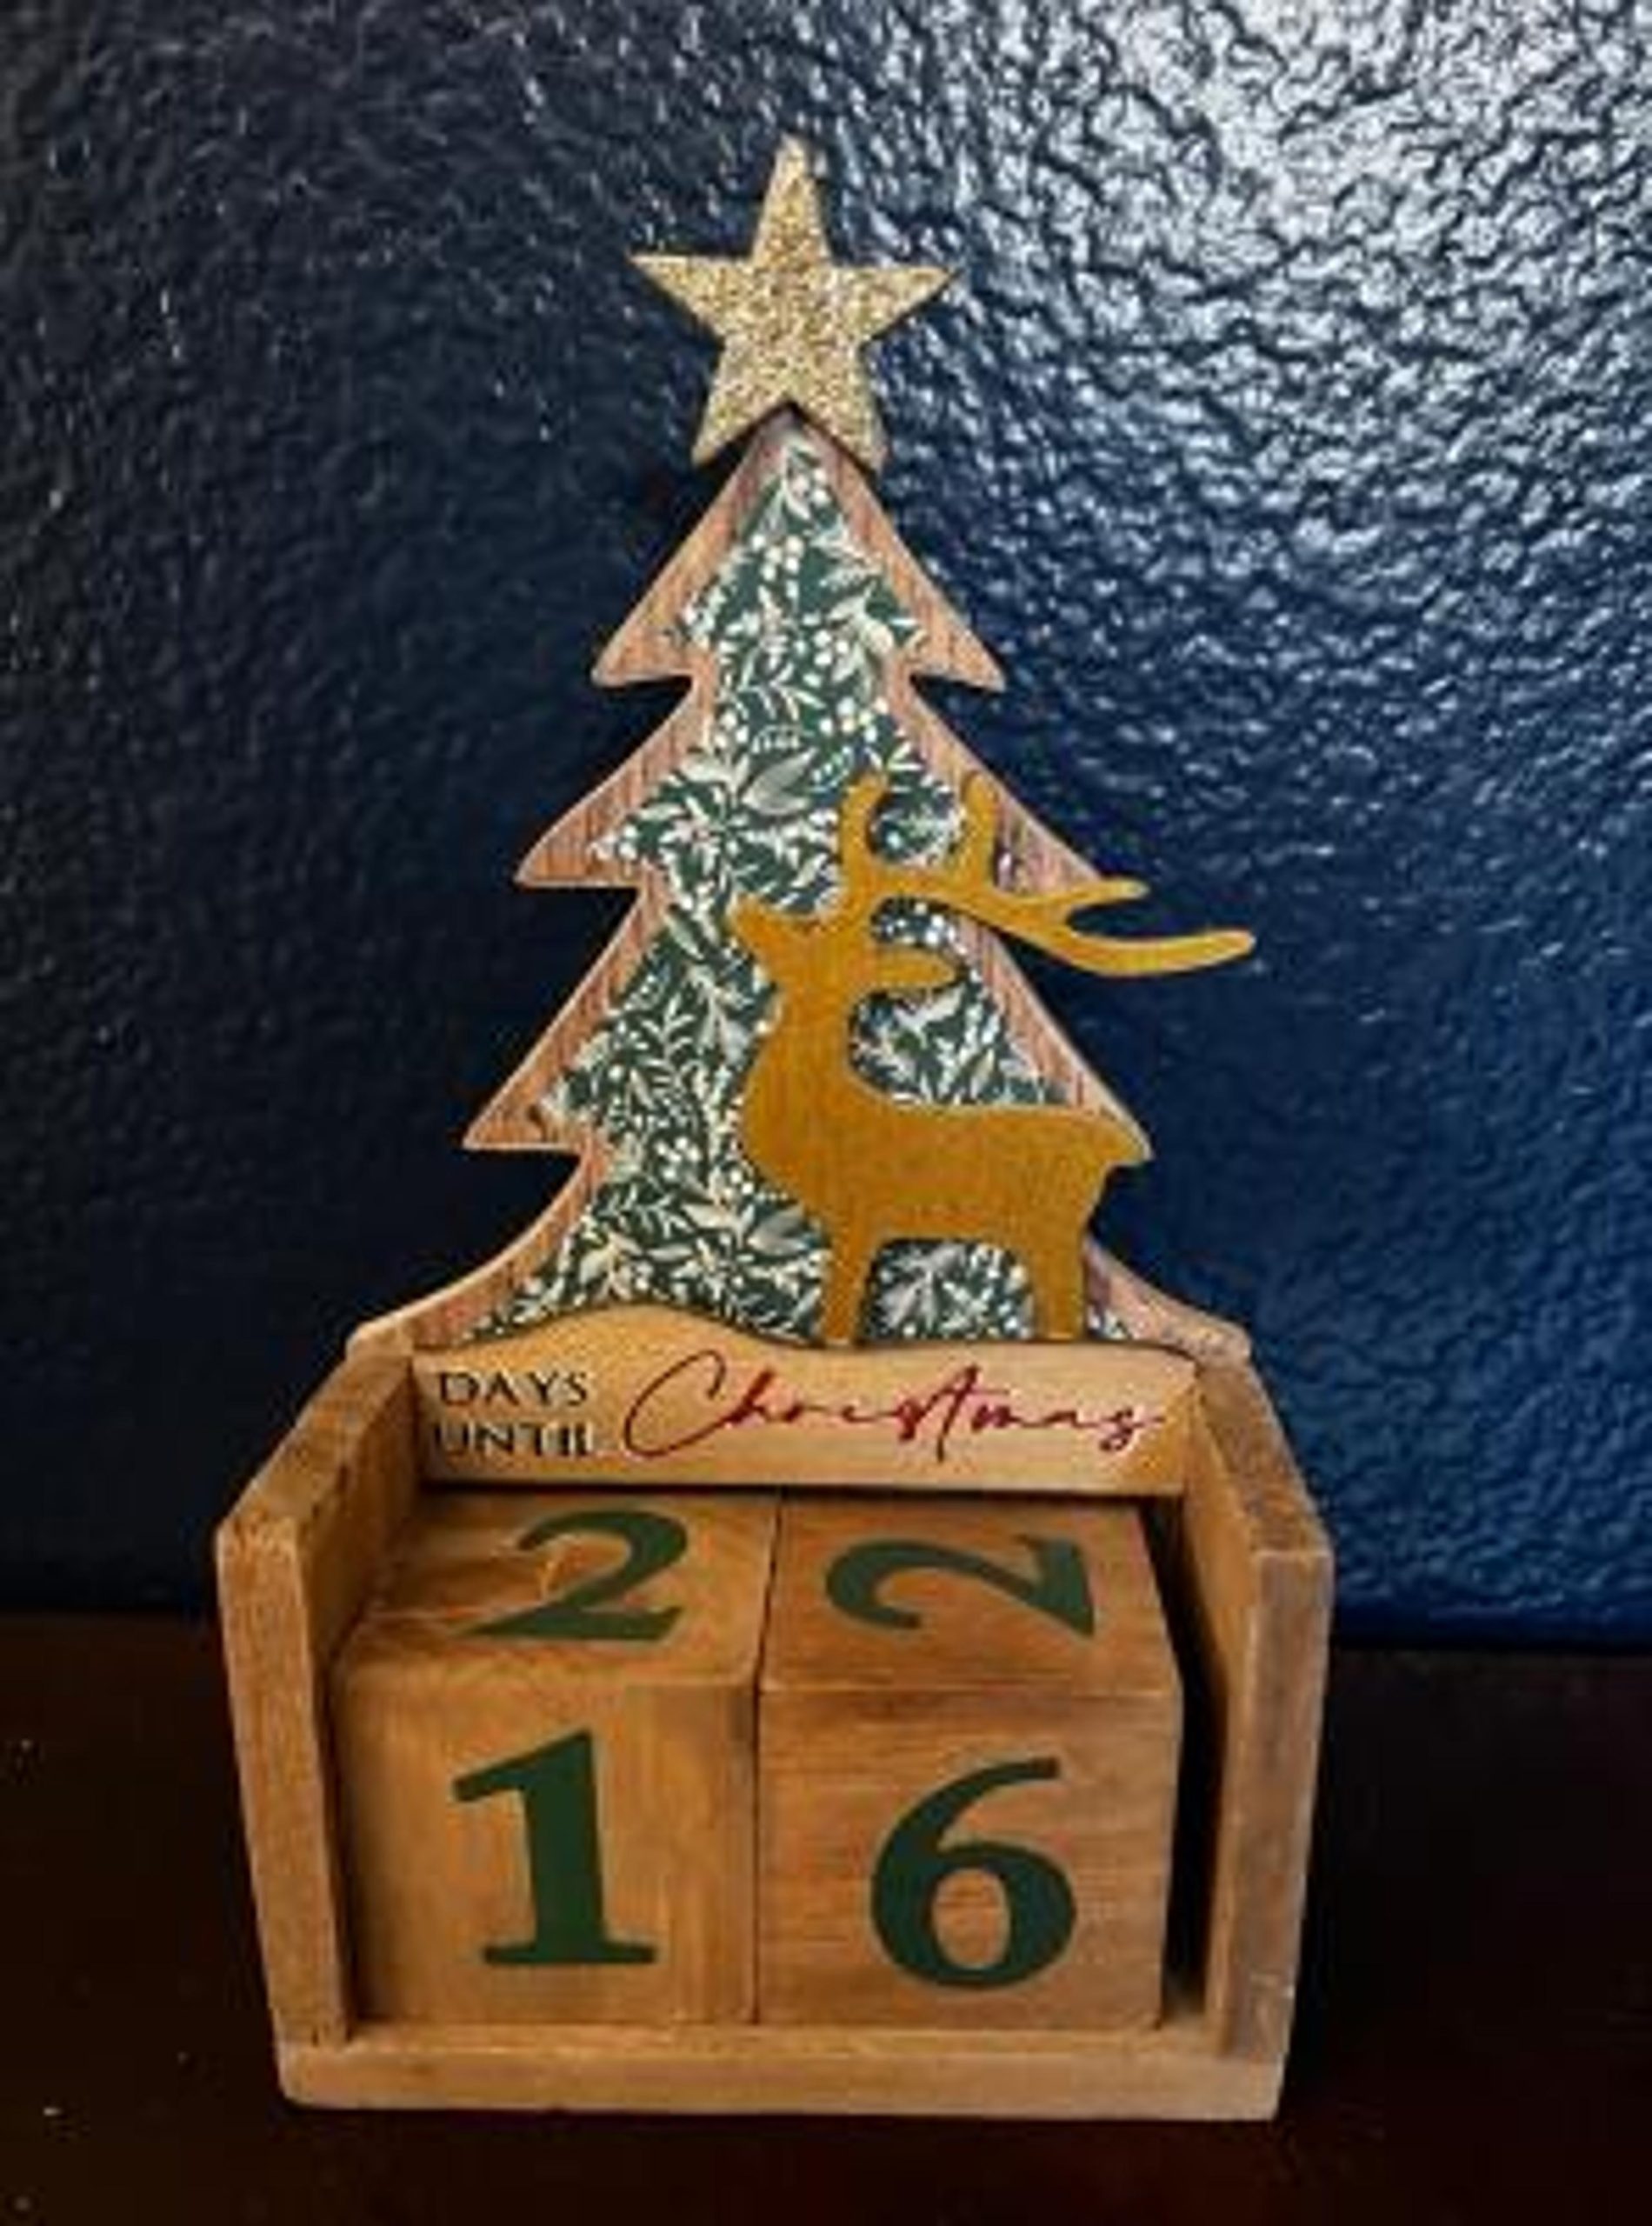
Leave a 1/4-inch margin between the numbers and the block edge. Nothing makes a handmade countdown look rushed faster than digits jammed into the corners — and that margin is also what lets you rotate the blocks without chipping paint. If you’re using decals, burnish them with the back of a spoon before sealing.
20. A Stapled Wooden Star With a Jute Twine Hanger
This is a $4 ornament if you own a miter saw, and free if you save 2×4 offcuts from other projects on this list. A 100-yard spool of jute twine runs about $5 at Walmart and lasts for years. The white bead garland beside it? A thrifted necklace restring, roughly $2.
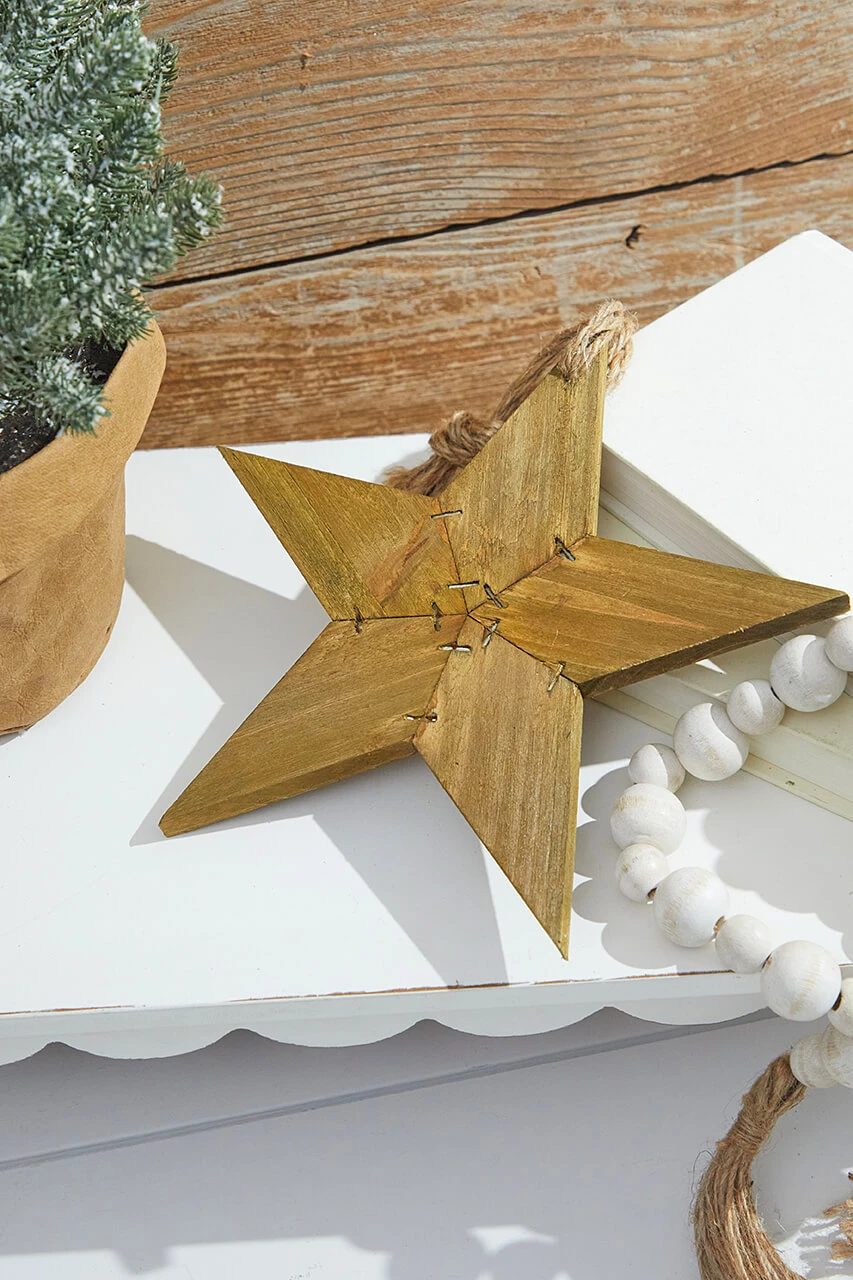
Visible staples are the honest version of this ornament — they say handmade, not factory. But staples pull through soft pine, so predrill or use a brad nailer instead. The star also only looks right when all five points match, so cut one, use it as a template, and mark the rest. Compare with Idea #6 for a simpler triangle take.
21. Wood Slice Ornaments Hand-Painted With Pudding, Wreath, and Candy Cane
The formula: one wood slice, one motif, three colors maximum. The pudding uses brown, white, and red. The wreath uses green, red, and a dot of gold. Holding each ornament to three colors is what makes four different designs look like one collection instead of four separate crafts.
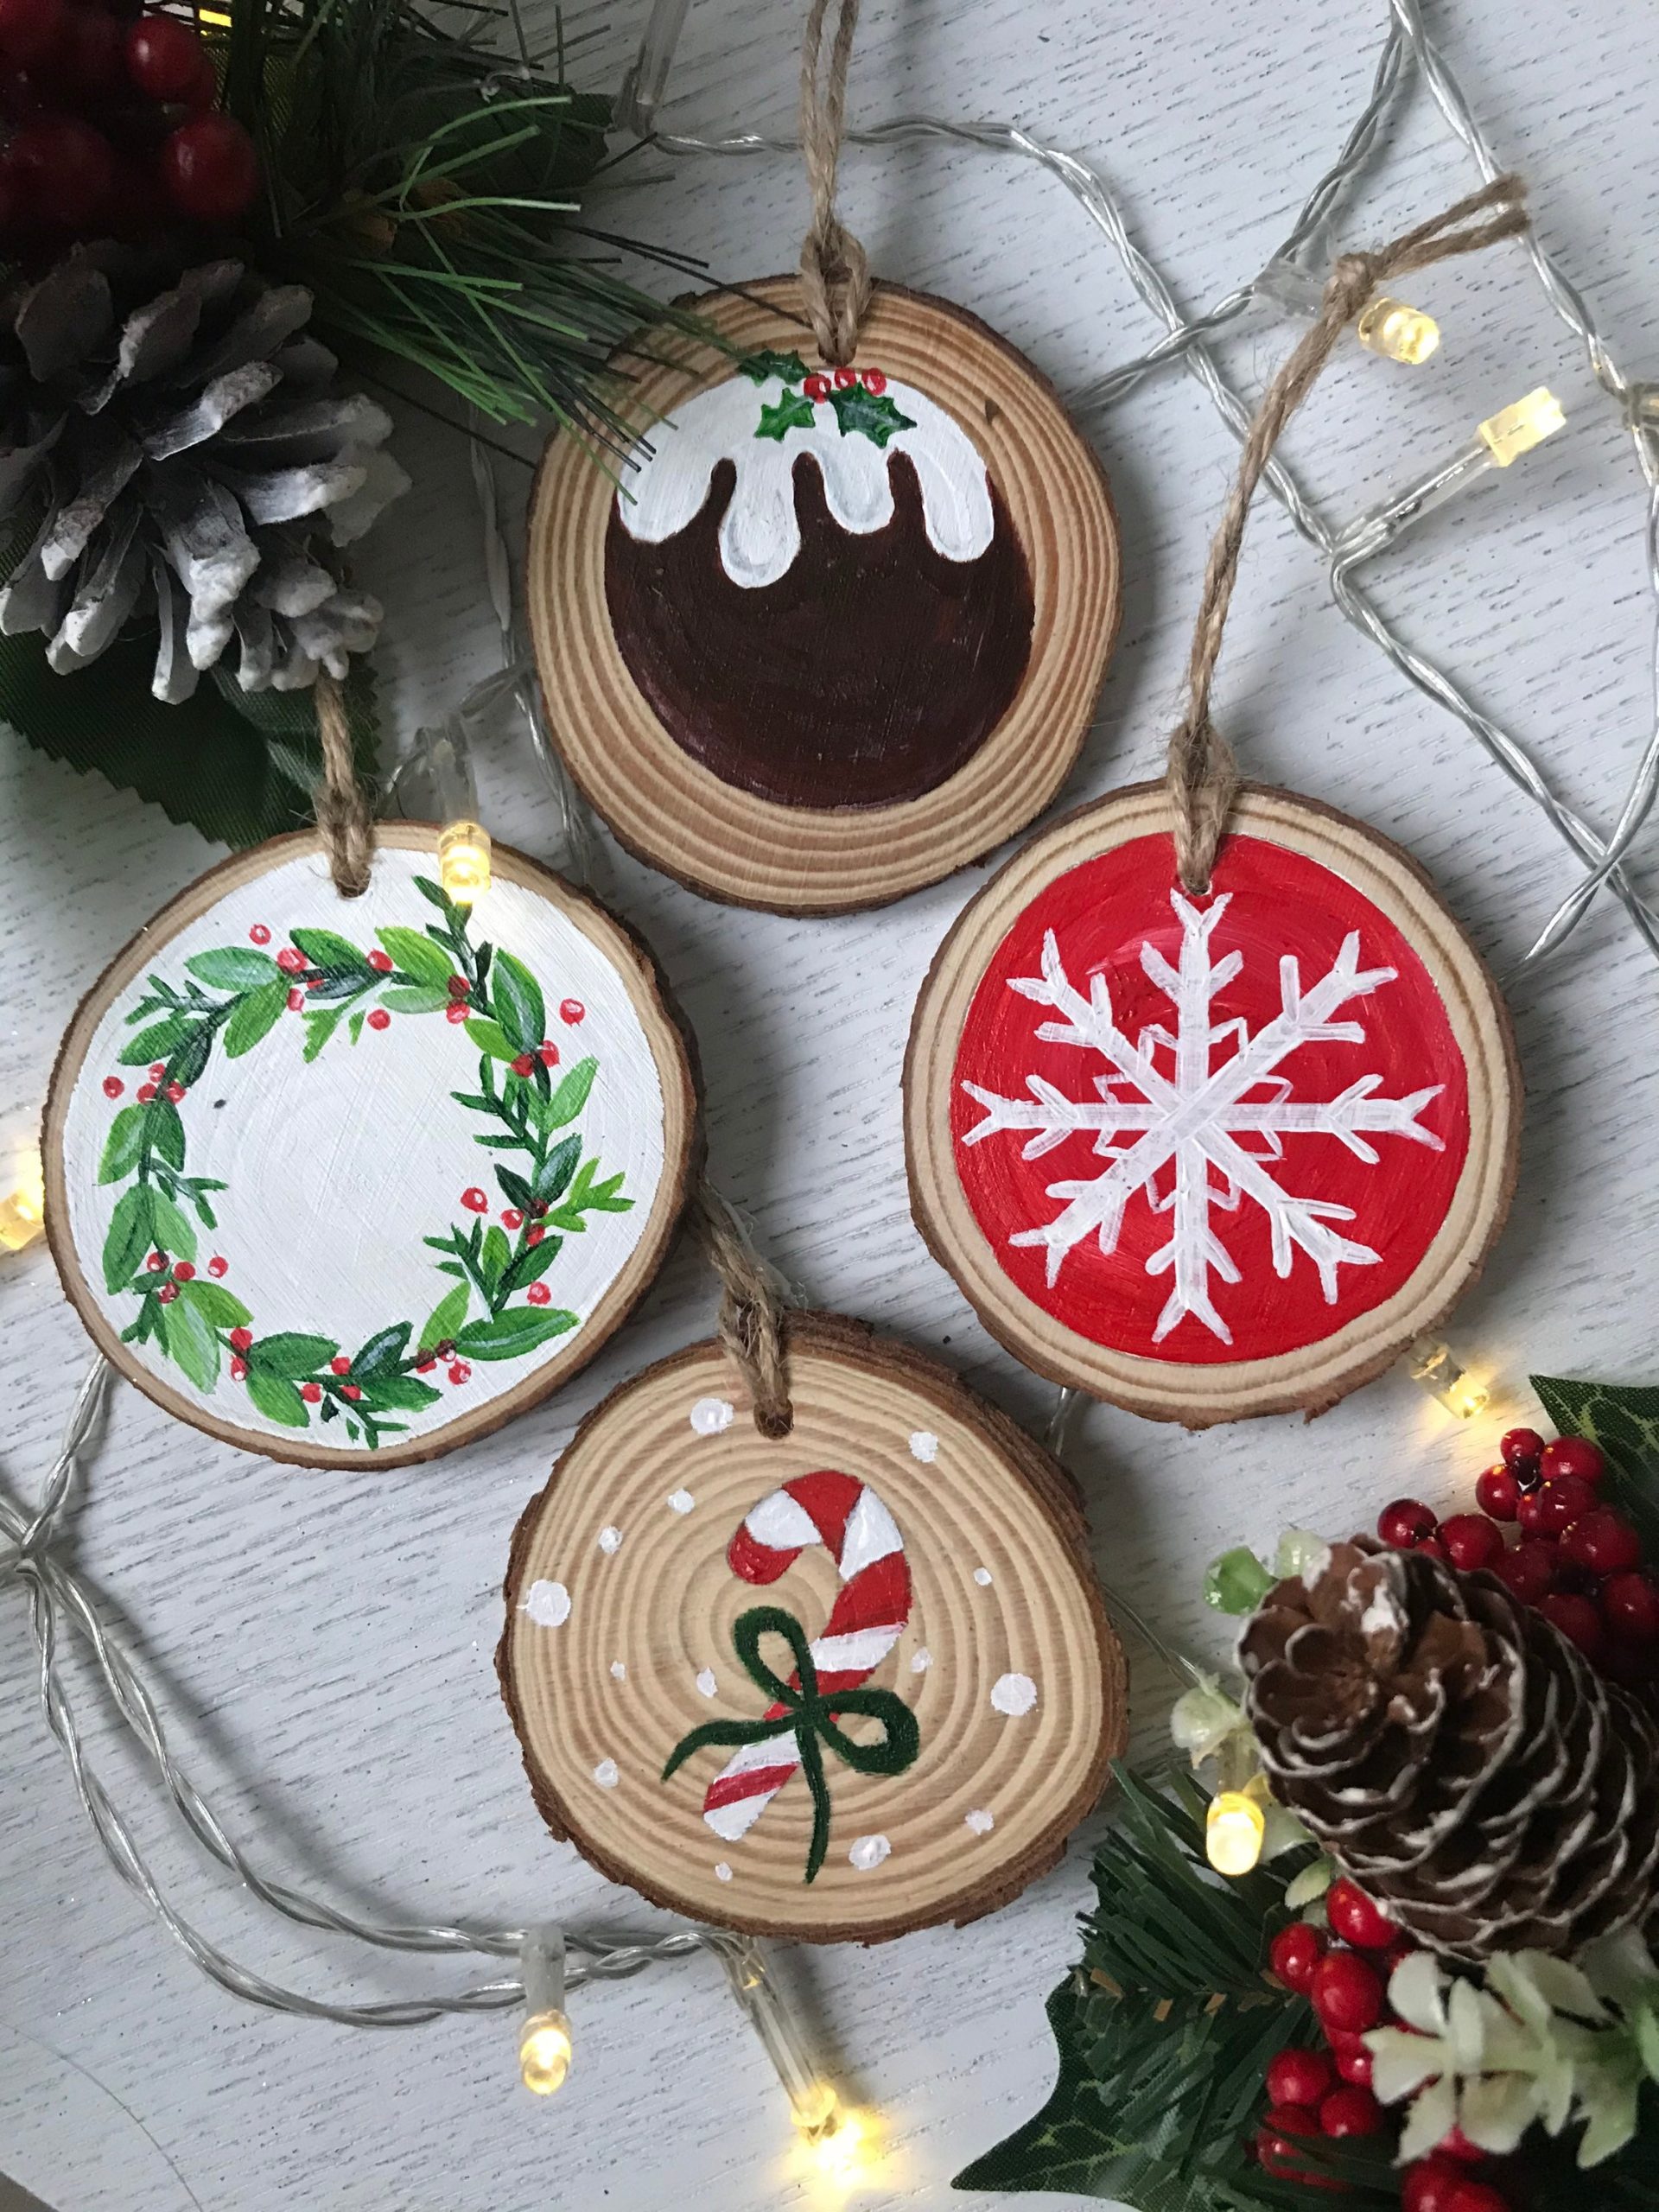
Hand-painted wood slice ornaments are climbing because they’re the rare craft that works as a gift, a tree filler, and a table scatter. In 2026, interest in folk-art holiday pieces is riding the same maximalist-craft revival that brought back painted eggs and hand-tied bows — people want things that look made.
22. A Terracotta Folk-Art Tree Ornament Covered in Painted Flowers
Folk art lives and dies on brush control. Load a size-2 round brush, then roll it on a paper towel until it comes to a point — that one brush becomes your vine, stem, and petal. Paint the largest flower first and work down to the smallest. Basecoat the terracotta in two thin layers so the floral pattern sits on color, not raw wood.
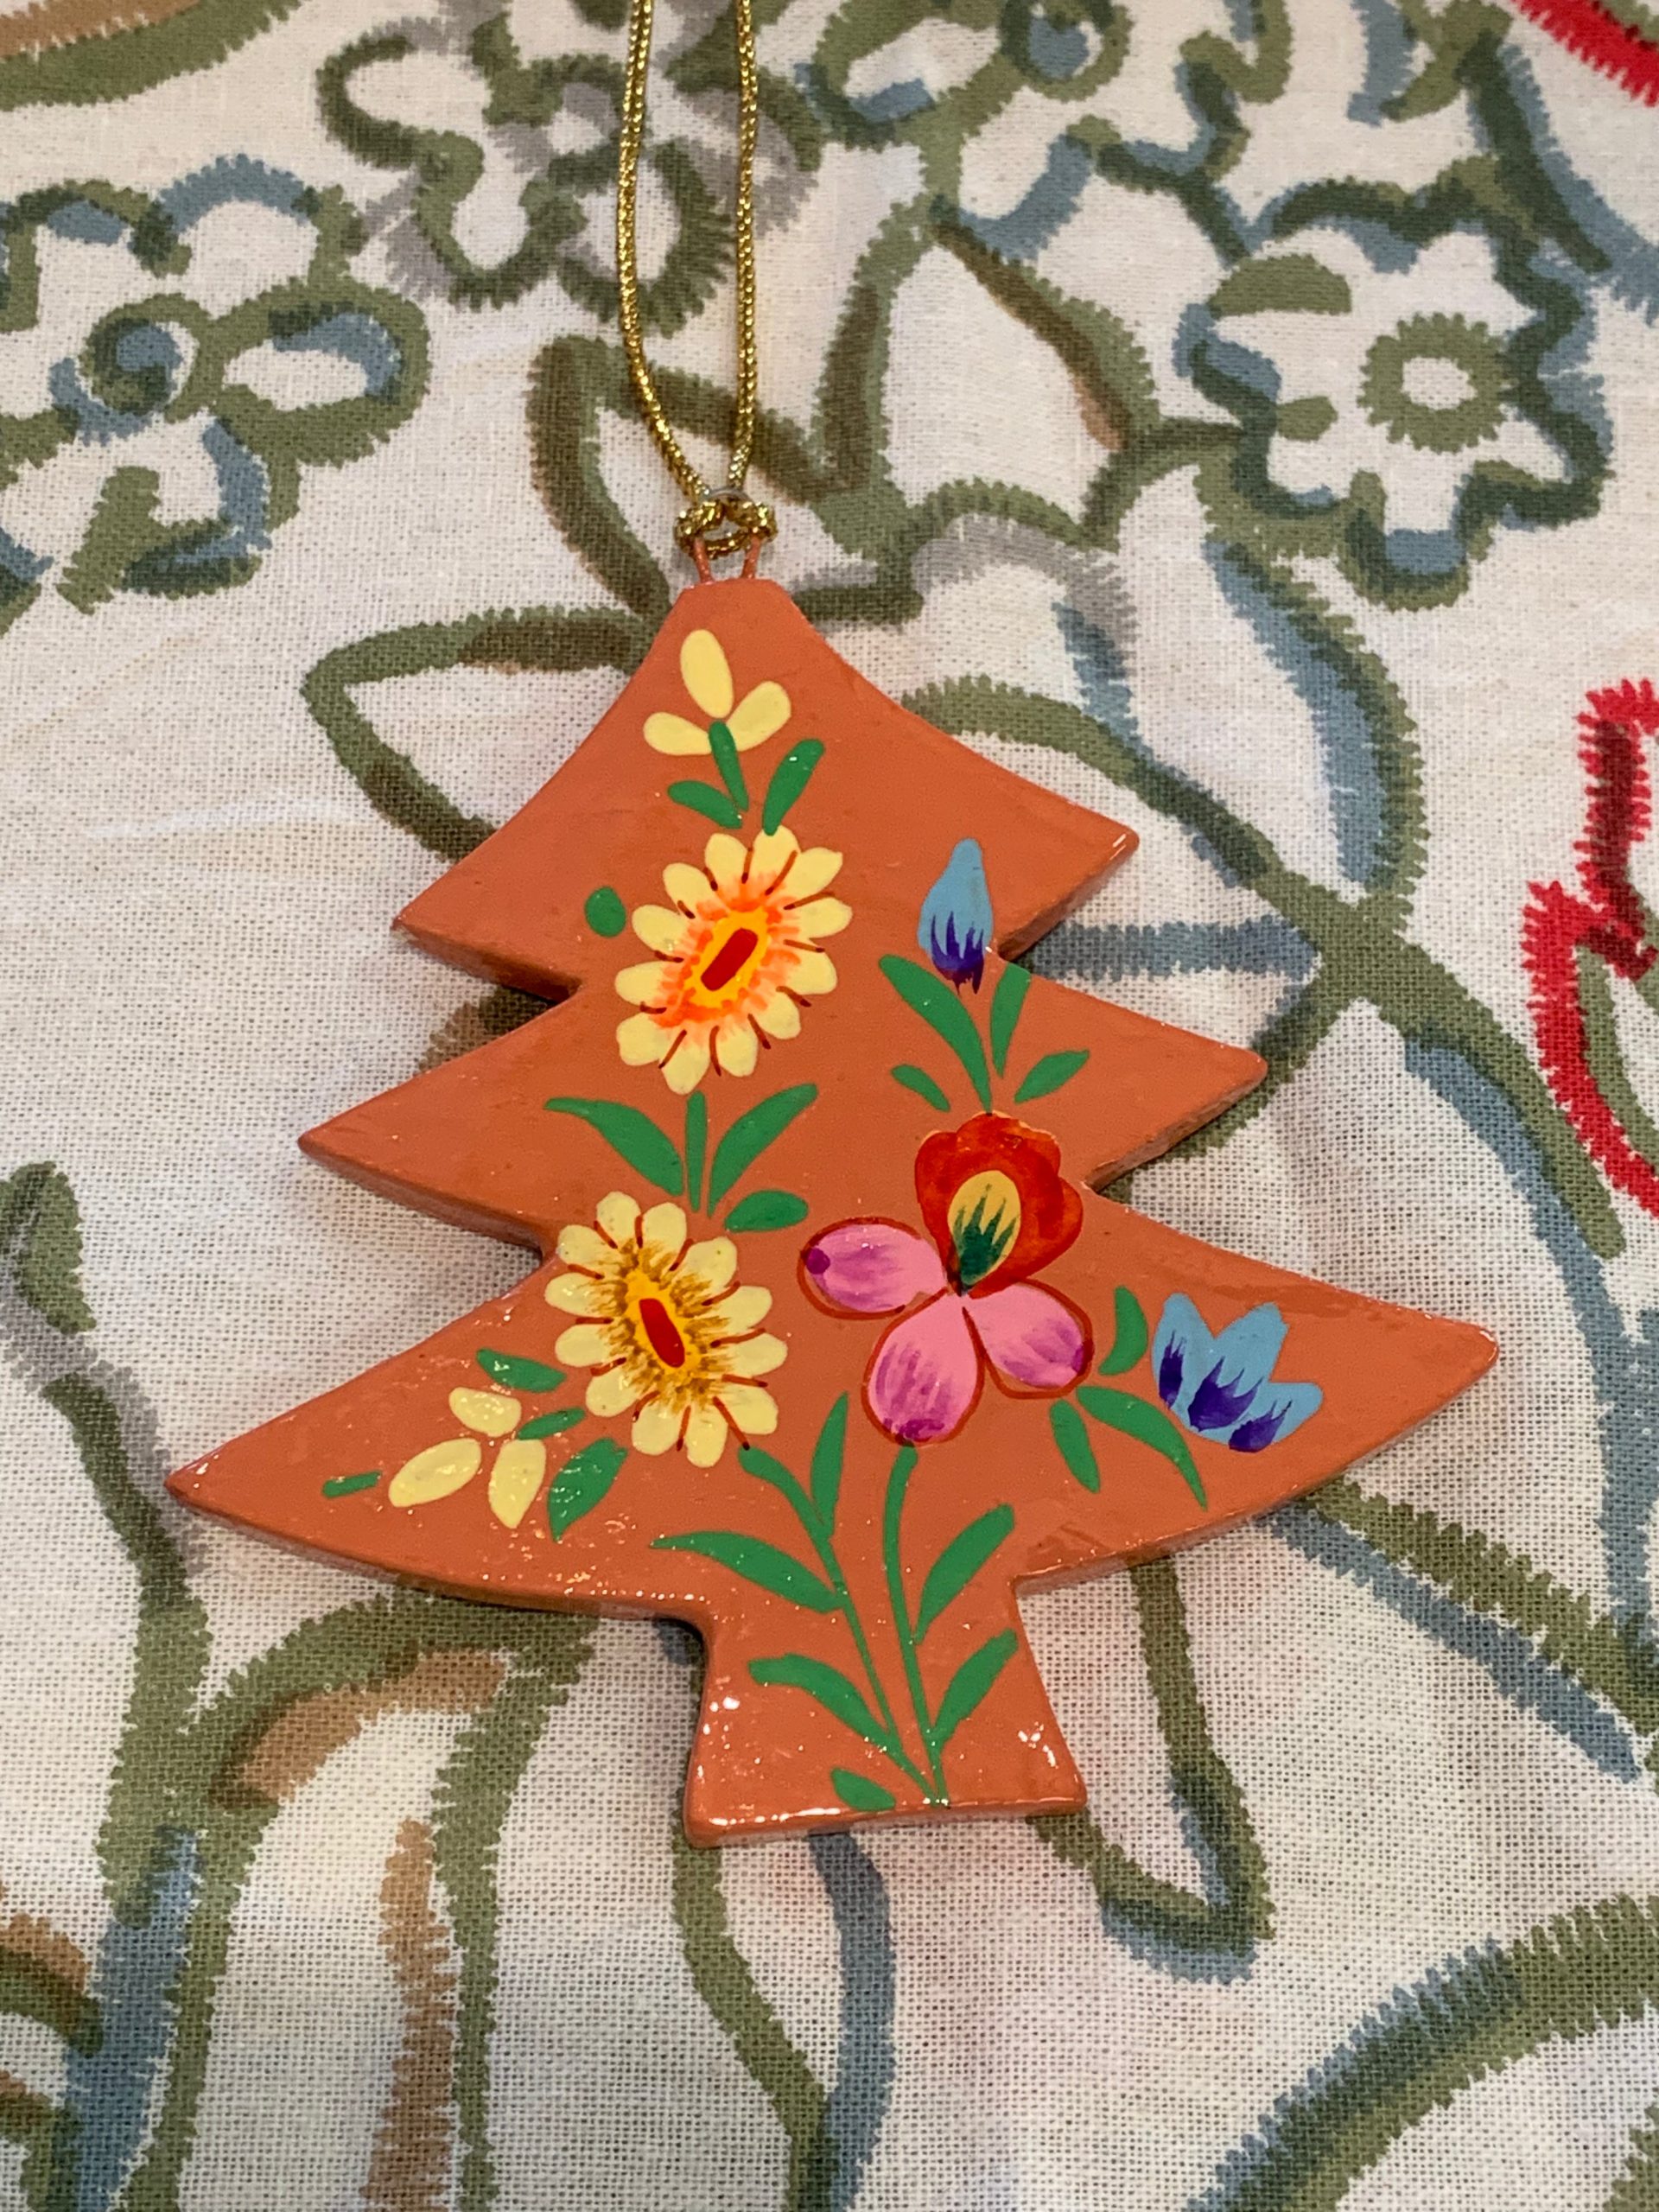
The base color is the whole idea. Every other ornament in this lineup is green, red, or white. Terracotta is what makes this one look like it came from a pottery market instead of a craft aisle — and it happens to flatter oak, walnut, and warm white walls alike.
23. A Sheep on a Crescent Moon, Hung in Fresh Pine
Sort these out before you drill:

- Decide the hanging loop first — gold cord needs a 1/8-inch hole drilled before painting.
- Weigh the ornament against your branch; a 1/2-inch pine cutout is light, but three paint coats add up.
- Test the dangling star charms for clearance so they don’t tangle in the next branch.
- Seal the painted faces with matte varnish if the tree gets watered nearby.
Whimsical ornaments are the first to get lost. A pale sheep on a plain white tree disappears. This one lands because it hangs against dark green needles and its moon is bright orange. If you love this style, hang it at eye level near a light. One-offs read as special only when someone can actually see them.
24. A Dowel Rod Tree With Pink and Gold Ornaments
At 18 inches tall and about 12 inches wide, this sits comfortably on a console, a nightstand, or a narrow windowsill where a real tree would never fit. Want the full-size wall version instead? See Idea #7. For a dining table centerpiece, scale it to 24 inches tall and 16 wide and you’ll still clear plates on either side.
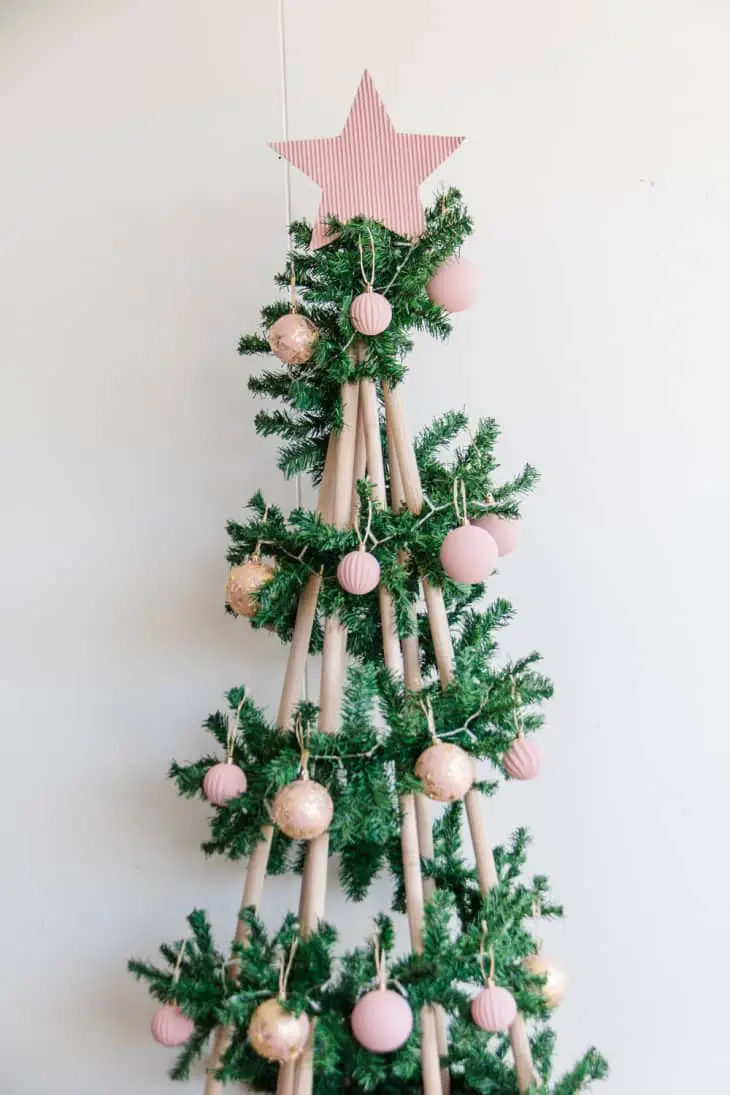
Rough costs:
- 1/2-inch dowel rods, $6–$10
- Round base disc, $4–$8
- Faux pine garland, $8–$14
- Pink and gold ornaments, $10–$18
- Striped star topper, $4–$8
Total: $32–$58. Trim it by wrapping the dowels with a single garland strand and pulling ornaments from a Dollar Tree multipack.
25. A Block Reindeer With Twig Antlers and a Painted Red Nose
Build order:
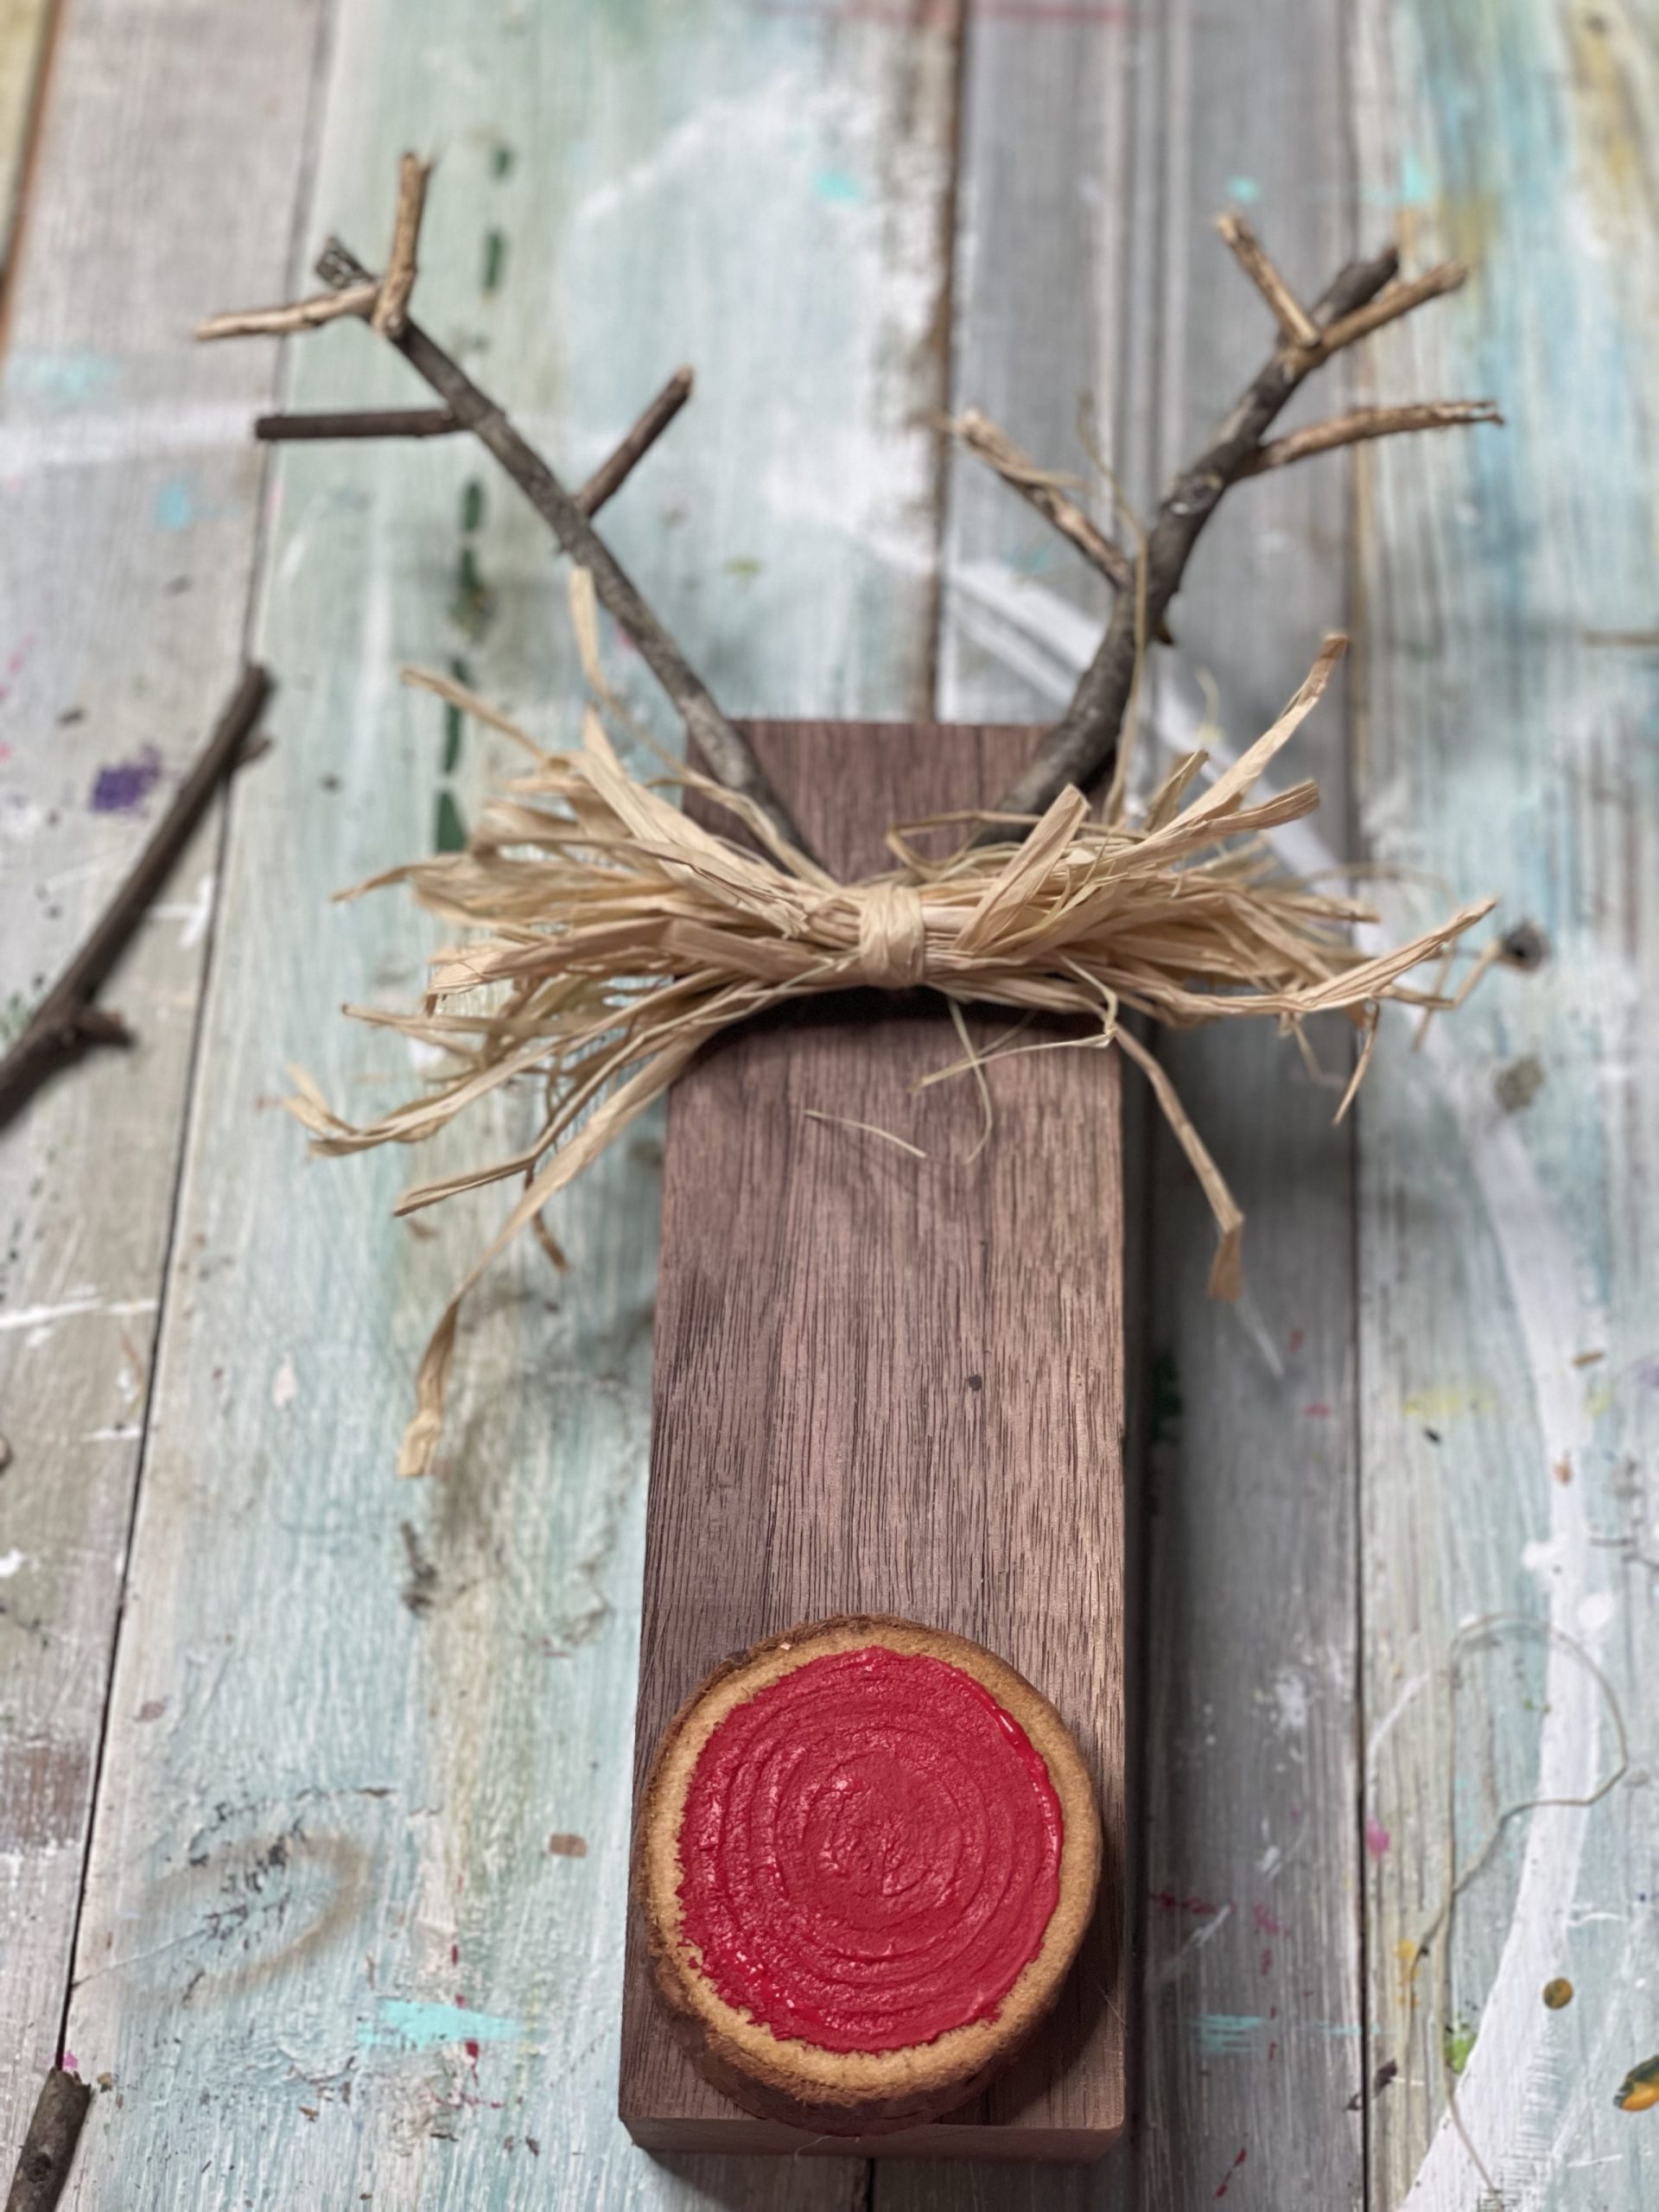
- Cut a 6-inch 2×4 block and paint or stain it dark walnut.
- Drill two 1/4-inch holes at the top corners for antlers.
- Snap thin twigs to length and hot-glue at an angle so they read as antlers.
- Glue a 1 1/2-inch wood slice to the center front and paint it bright red.
- Tie a raffia bow an inch below the nose.
Twig antlers are the fragile part, so loop a rubber band around both before you wrap the reindeer in tissue paper.
Raffia bleeds if it gets damp — keep this one on a shelf, not a covered porch. Dust with a dry brush rather than a damp cloth, since moisture raises the grain on stained pine and leaves a dull patch. Stored carefully, this thing survives a decade of Decembers.
26. Layered Slat Tree Ornaments With Painted Holiday Messages
These are the ultimate offcut project: three slats per ornament, each half an inch shorter than the last, plus a small red star on top. A single 2×4 yields about eight ornaments, which means one $4 board covers your whole tree plus gift tags. Beaded spacers come from a $3 Dollar Tree pack or a bracelet you never wear.

Small scale changes the rules: 60 percent bare wood, 25 percent painted text, 15 percent red. At this size, paint more than a quarter of the surface and the ornament turns into a blob. That’s why the star is the only saturated element in the whole thing.
27. A Folk-Art Wooden Horse Painted With Orange and Blue Florals
Scandinavian and Eastern European folk painting has been migrating from paper to wood for a couple of years, and the horse is the gateway shape — simple enough to cut with a jigsaw, forgiving enough to paint badly. In 2026 this is what replaced the minimalist ceramic ornament for anyone who wanted more story on the tree.
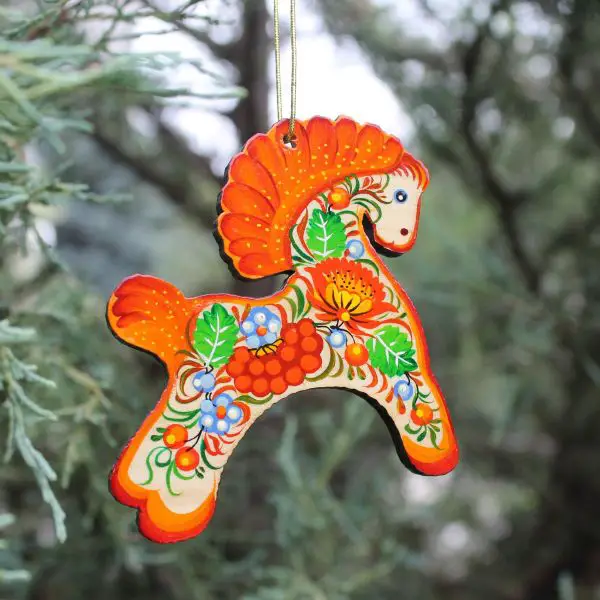
Paint light colors first and outlines last. Folk art isn’t about shading; it’s flat shapes with a dark outline. A size-0 liner brush and a steady hand beats a fancy design every time. Sand to 220 and seal the wood before you paint, or the pine grain will fight your florals.
Two things make it work: a recognizable silhouette and total color commitment. The horse reads at ten feet because the shape is simple, and it holds up close because the florals are dense. Most painted ornaments only manage one of those.
28. A Round Blue Puffin Ornament With Hand-Painted Snowflakes
The blue. Not navy, not pastel — a real mid-tone blue that makes the black-and-white puffin pop and doesn’t vanish against green needles. Get the disc basecoat smooth before the graphic goes on: two thin coats, sanded between, no brush marks. Paint the dotted hanging lines last, using a template punched from an index card.
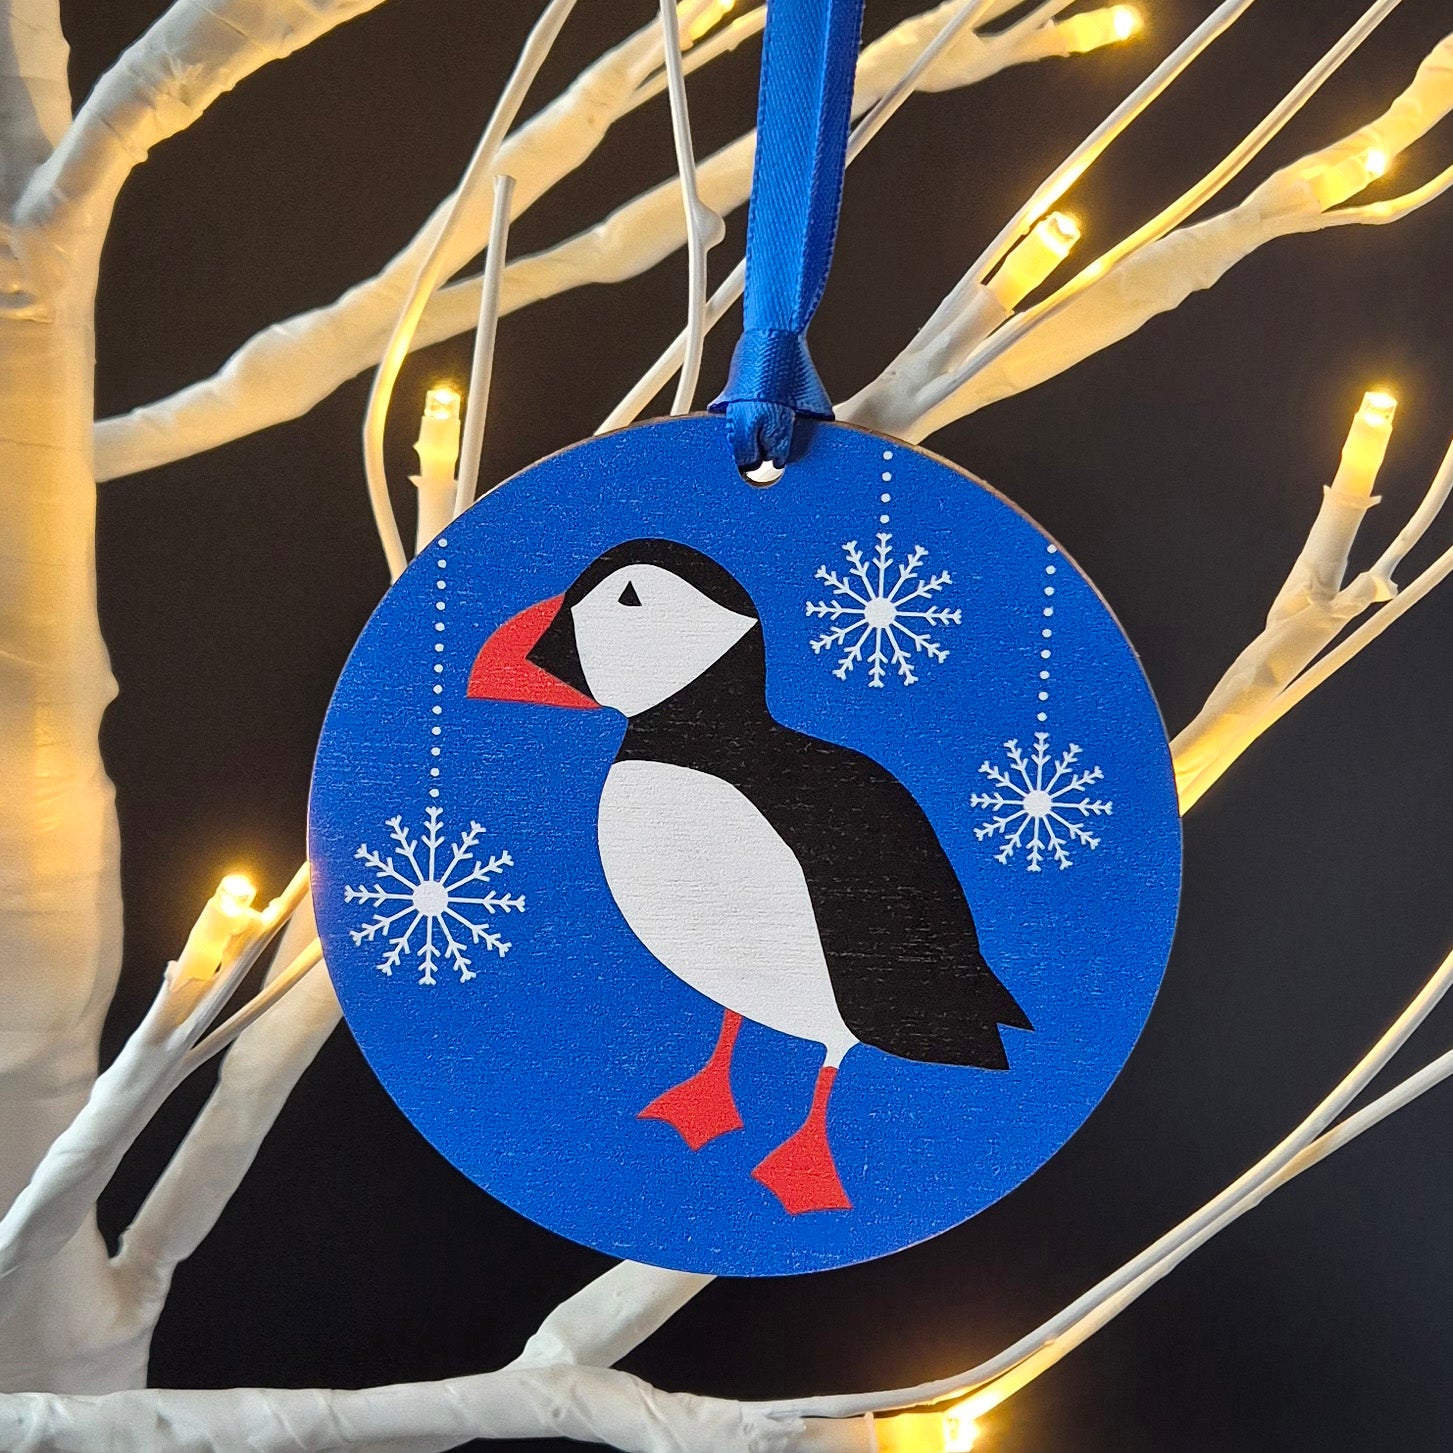
Round discs roll. Store them in a shallow box with dividers, or thread them onto a ribbon and hang the whole strand in a closet. Blue craft paint also shows fingerprints, so a $6 matte acrylic varnish earns its keep — it also stops the paint transferring onto your tree lights.
29. A Painted Angel With a Teal Starred Robe and Gold Halo
The halo does the heavy lifting. It’s a flat gold semicircle behind the head, and it glows against that soft pink background without a single light source. Then the star pattern on the robe repeats the halo color at a smaller scale, so the ornament ties itself together in two colors plus white.

Costs for a set of six:
- Wood blanks or 1/4-inch ply, $2–$5
- Teal and gold acrylic paint, $6–$12
- Fine liner brushes, $5–$10
- Gold cord for hanging, $3–$6
Total: $16–$33. Budget alternative: trace the angel shape onto cardstock, decoupage it to $1 wood discs, and skip the painting entirely.
30. The Block Reindeer, Take Two: White Eyes and a Raffia Collar
The eyes are what separate this from every other block reindeer. Two white ovals with black pupils, set a touch too far apart, give it a face. Skip them and you have a brown rectangle with antlers. Use a fine-tip paint pen instead of a brush — you get a cleaner oval, and you can catch a wobble before it dries.
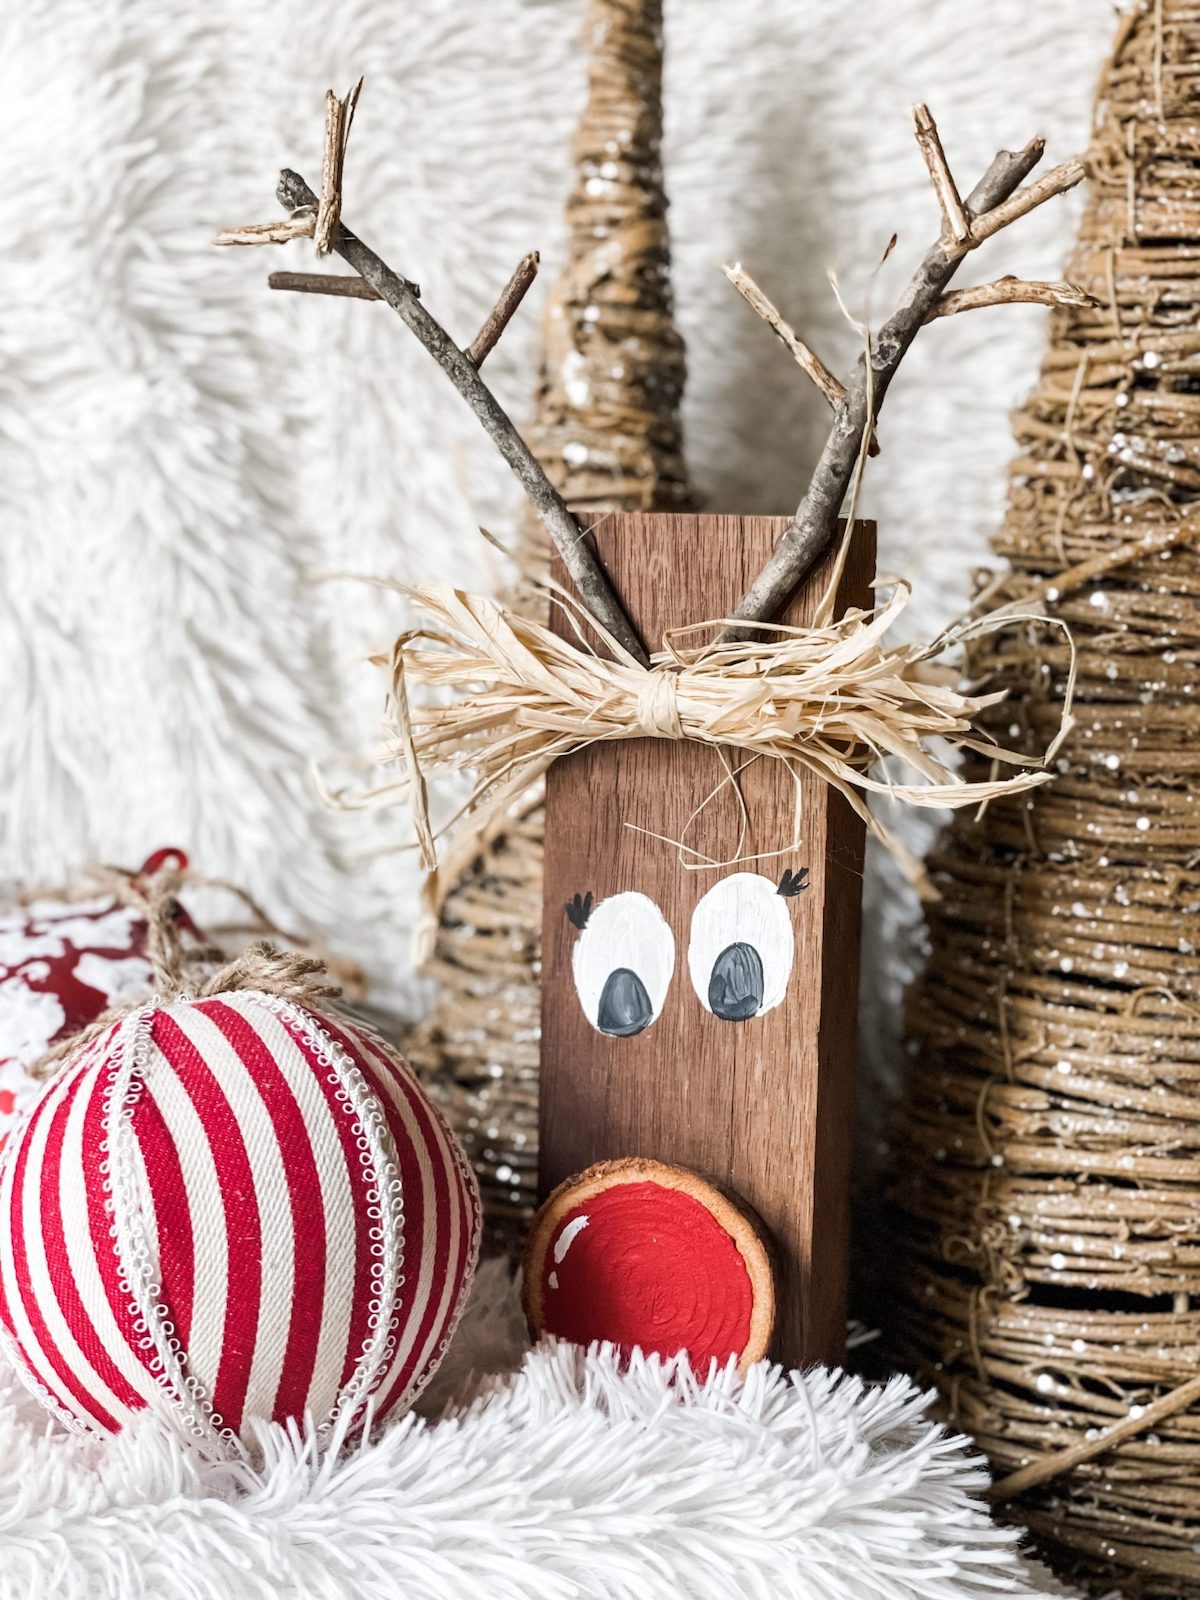
Total cost: one 2×4 offcut, a twig from the yard, a 1 1/2-inch wood slice, and some raffia. Buying everything new runs about $12 — Walmart sells pre-cut wood slices in packs of 10 for under $6, and $3 of raffia is more than you’ll ever use. Compare with Idea #25: same anatomy, different finish.
Time to Turn Those Offcuts Into Keepsakes
Every project here started life as a $4 board and a Saturday afternoon, which is the whole point — handmade Christmas decor doesn’t need a workshop, just a saw, some paint, and the willingness to sand one more time than you think is necessary.
Pick one idea, build it this weekend, and let the rest wait for next December. 📌 Save this to Pinterest so it’s ready when you are.